If the User Profile of any User Account on a Windows computer gets corrupted, the system won’t be able to read files, settings and configurations associated with that particular user; which can result in the following signs and error messages.
- Temporary Profile: Upon login, Windows may display “You have been signed in with a temporary profile” or “We can’t sign-in to your account” message.
- Login Failure: Windows may totally prevent you from logging into the User Account by displaying “User Profile Service failed the sign-in” error message at the login screen.
- Generic Profile: Windows may load a generic user profile; with empty Desktop, Documents and Photos Folder.
If the User Account does not contain important files, you can deal with this situation by deleting the corrupted User Account and creating a new User Account.
However, this solution is not suitable; if there are important files located in the corrupted User Account and you want to gain access to them.
Fix Corrupt User Profile in Windows 11/10
In our case, the reason for User Profile becoming corrupted on our testing computer was due to installation of an Android Emulator getting disrupted by a power-outage. Luckily, it was possible to repair the corrupted user profile and gain access to the User Account by using Registry Editor.
Another way of dealing with a corrupted user profile is by creating a new User Account and transferring all your files from the corrupted User Account to New User Account.
1. Fix Corrupt User Profile Using Registry Editor
Login to the Admin Account on your computer and follow the steps below to identify and fix the Corrupted User profile on your computer.
1. Right-click on the Start button and click on Run.
2. In the Run Command window, type regedit and click on OK.

3. On the Registry Editor screen, navigate to HKEY_LOCAL_MACHINE\SOFTWARE\Microsoft\Windows NT\CurrentVersion\ProfileList.
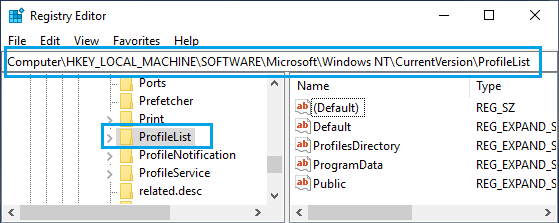
4. Open ProfileList Folder and you will see Folders starting with S-1-5. Each of these Folders represents a User Profile linked to a User Account that was created on your computer.
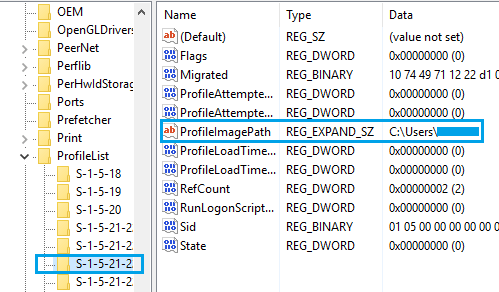
Now, the difficult task is to identify the right S-1-5 Folder that belongs to the corrupted User Profile. You can do this by clicking on each S-1-5 Entry and taking a look at ProfileImagePath in the “Data” Column.
As you can see in above image, the User Name (C:\Users\User Name) is clearly visible in ProfileImagePath Entry for the selected S-1-5 entry in the ProfileList Folder.
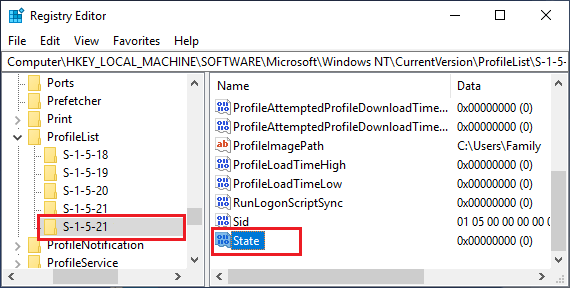
5. Once you find the right S-1-5 Folder, double-click on the State Field in the right-pane.
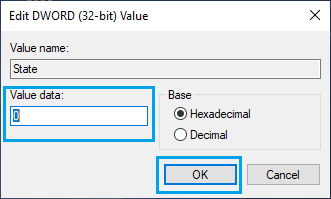
6. On the Edit DWORD pop-up, change the Value Data from 1 to 0 and click on the OK button.
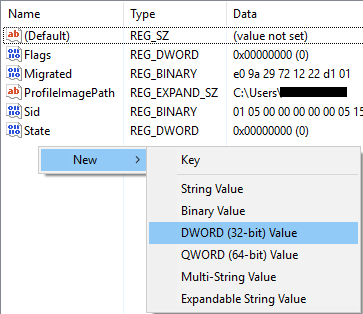
7. Similarly, double-click on RefCount entry and change the Value Data from 1 to 0. If you cannot find “RefCount”, you will have to create a New RefCount.
Right-click in any blank space in the right pane > click on New > DWORD (32 bit) Value and type RefCount as the Name for this New DWORD.
8. Close the Registry Editor and Restart the computer.
After this, you should be able to login to the User Account which had a corrupted User Profile and gain access to all your files.
2. Create New User Account & Transfer Files
As mentioned above, another way to deal with the problem of a corrupted User Profile is by creating a new User Account and transferring all files to the new User Account.
In this method, the first step is to create a New User Account by using steps as provided in this guide: How to Create Local User Account in Windows 11/10.
Important: The Name of the New User Account needs to be different from that of the corrupted User Account.
Once the new User Account is created, you can transfer files from the corrupted User Account to New User Account by using the following steps.
1. Open the File Explorer on your computer.
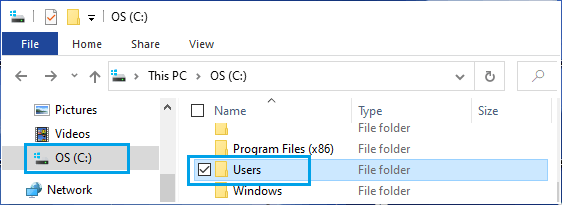
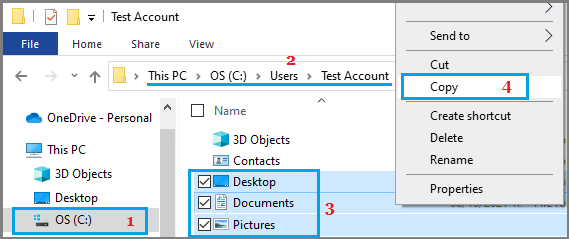
2. On the File Explorer screen, select Local Disc (C:) in the left-pane and double-click on Users Folder in the right-pane.
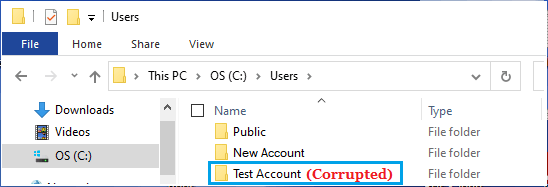
3. Once you are in Users Folder, open the Corrupted User Account by double-clicking on it.
4. Once you are in the corrupted User Folder, individually select Desktop, Documents, Pictures and other Folders that you want to transfer to the New User Account.
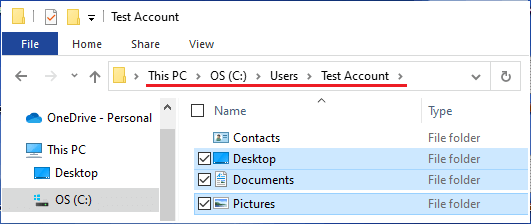
Important: Do not right-click and select all Files/Folders in the Corrupted User Folder, as you will end up copying hidden system files (Ntuser.dat, Ntuser.dat.log and Ntuser.ini) linked to the corrupted user profile.
5. After selecting the Files/Folders, right-click and select the Copy option to copy the selected Files to the clipboard on your computer.
6. Now that all your Files are available on the clipboard, open the New User Account Folder and Paste copied files into the New User Folder.
After this, login to New User Account and you will be able gain access to files that were transferred from the corrupted User Account.
What to Do If the Admin Account is Corrupted?
If the Admin account is corrupted, you can activate or enable the Hidden Admin Account that Microsoft makes available on Windows computers for such rare occasions. After logging in to the hidden Admin Account, you can try to repair the corrupted user profile by using steps as provided in the first method.
If this does not help, you can create a new User Account and transfer files from the corrupted User Account to new User account by using the second method as provided in this guide.
Note: As mentioned above, the Name of the New User Account cannot be the same as that of the corrupted User Account.
After deleting the corrupted User Account, you can Rename the New User Account to the original User Account Name (if you want to maintain the same User Name).