The default setting in Windows is to automatically lock out the screen, if the computer remains unused for a certain period of time (5 to 10 minutes). While this built-in security feature in Windows is designed to prevent unauthorized access to your device and data, it can be easily disabled (if required).
In general, the main reasons for users looking for a way to disable the Auto-Lock setting on a Windows computer are the following.
- Presentations/Meetings: Preventing the computer from locking out while attending a meeting or giving a presentation.
- Kiosk/Display: Allow the screen to always remain open and not get locked out, while the computer is being used as a Kiosk or required to keep its display always switched-on.
- Easy Access: Avoid the hassle of typing password multiple times a day by disabling auto-lock on a computer located at home.
Turn OFF Auto-Lock in Windows 11
If required, you can disable the built-in Auto-Lock feature in Windows and prevent the screen of your computer from automatically locking itself by using any of the methods as provided below in this guide.
After disabling the auto-lock setting, you can still manually lock the screen of your computer at any time by using Windows + L keyboard shortcut, unless the Auto-Lock setting has been totally disabled by using Registry editor.
Related: How to Enable On-Screen Keyboard in Windows 11/10.
1. Disable Auto-Lock Using Screen Saver Settings
You can disable the auto-lock setting on your computer by accessing the Screen Saver Settings screen.
1. Open the Settings menu on your computer (press Windows + I keys).
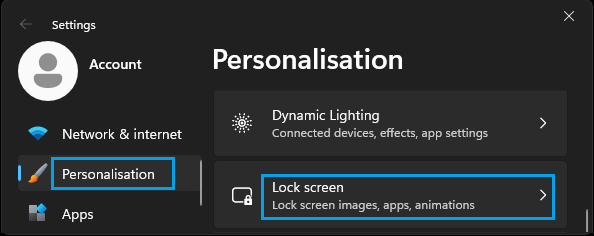
2. On the Settings screen, select Personalization in the left-pane and click on Lock Screen in the right-pane.
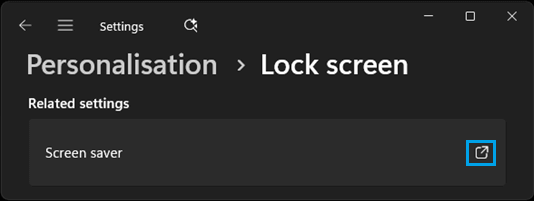
3. On the next screen, scroll down to “Related Settings” and click on Screen Saver tab.
4. On the next screen, uncheck On resume, display logon screen option.
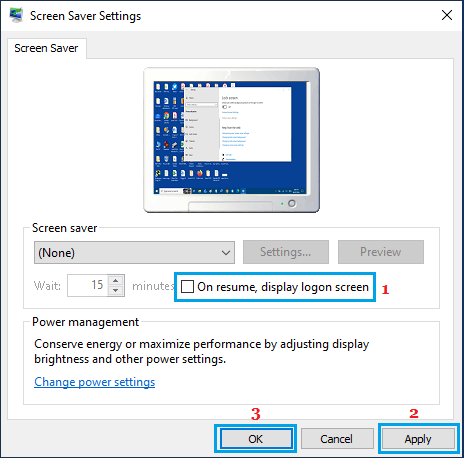
5. Click on Apply & OK to save this setting on the computer.
Note: If the Dynamic Lock feature has been enabled, the screen will still get locked out; when you step away from the computer.
2. Disable Auto-Lock Using Sign-in Options
Another way of disabling the Auto-Lock feature on a Windows computer is by modifying the Sign-in options.
1. Go to Settings > Accounts > click on Sign-in Options in the right-pane.
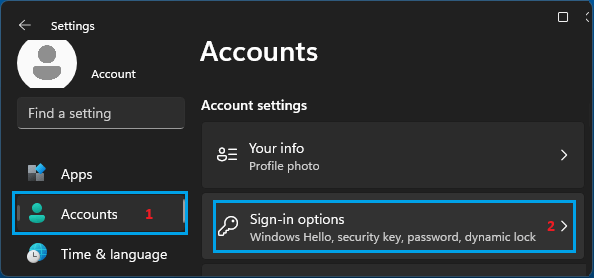
2. On the Sign-in Options screen, scroll down to “Additional Settings” and select the Never option for If you’ve been away, when should Windows require you to sign-in again option.
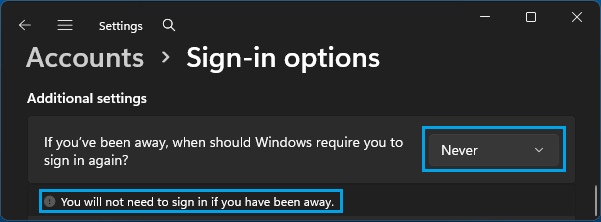
3. On the authorization pop-up, enter your Admin Password to authorize this change.
Note: If the Dynamic Lock feature has been enabled, the screen will get locked out; if you step away from the computer.
3. Disable Dynamic Lock
As mentioned above, the Dynamic Lock feature needs to be disabled; in order prevent the screen from getting locked out; when you step away from the computer.
1. Go to Settings > Accounts > Sign-in options.
2. On the Sign-in options screen, scroll down to “Additional Settings” section > click on Dynamic Lock and Uncheck Allow Windows to lock your device when you’re away automatically option.
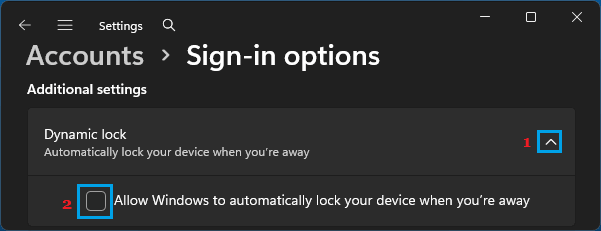
3. Restart the computer to implement this change.
4. Disable Lock Screen Using Registry Editor
You can totally disable the Auto-Lock feature on your computer by making the following changes to the Personalization registry entry.
1. Right-Click on the Start button and click on Run.
2. On the Run Command window, type regedit and click on OK.
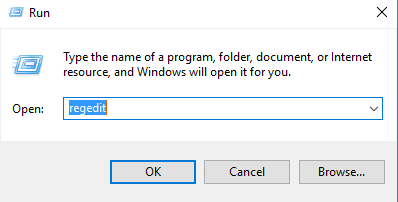
3. On the Registry Editor screen, navigate to HKEY_LOCAL_MACHINE\SOFTWARE\Policies\Microsoft\ and click on the Windows Folder to open it.
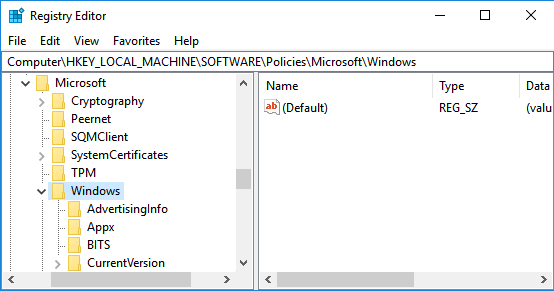
4. In Windows Folder, see if you can find a Folder named as Personalization. If you cannot find the Personalization key, right-click on Windows Folder and select New > Key option.
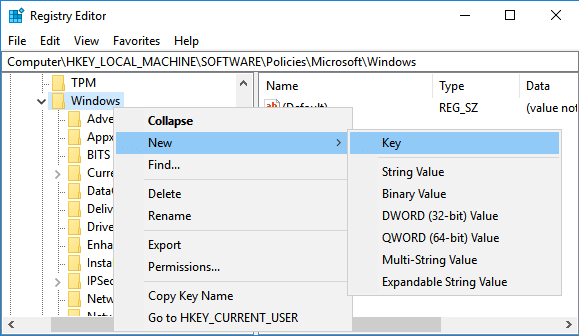
5. Once the New Key is created, rename the New Key that you just created as Personalization.
6. Next, right-click on Personalization and select New > DWORD (32-bit) Value in the right-click menu.
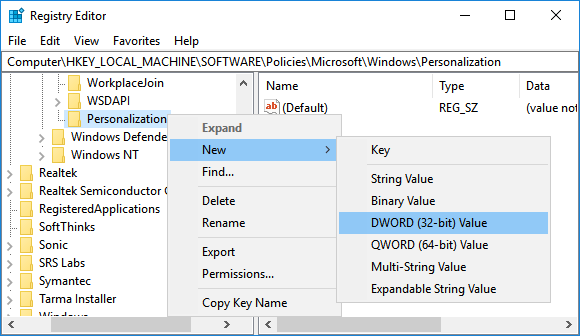
7. Name the New DWORD that you just created as NoLockScreen.
8. Next, double-click on NoLockScreen to launch the Edit DWORD windown > Enter “1” in the Value data field and click on OK button.
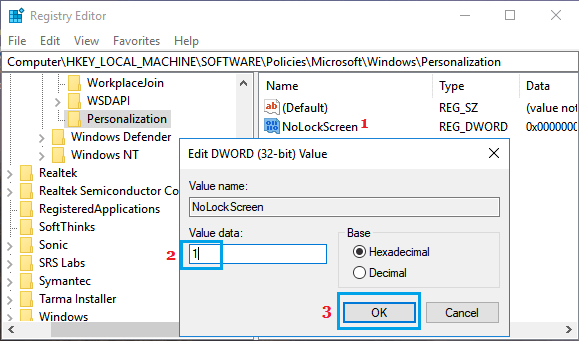
Now when you Restart the computer, you should find it skipping the Lock Screen and taking you straight to the Login screen. At at any time, you can re-enable the Lock screen by going to NoLockScreen key and changing the Value Data back to “0” from “1“.
5. Disable Lock Screen Using Group Policy
If you are using the Pro, Enterprise or Education version of Windows, you can disable Lock Screen by using Group Policy Editor.
1. Press Windows + R keys to open Run command.
2. Type gpedit.msc and click on OK.
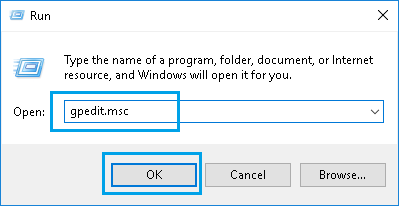
3. In the Group Policy Editor screen, navigate to Computer Configuration > Administrative Templates > Control Panel and click on Personalization.
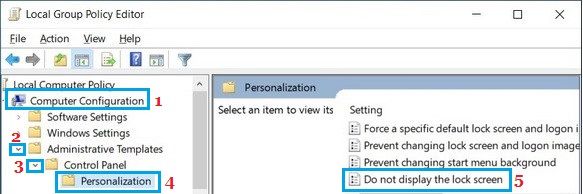
4. In the right-pane. double-click on Do not display the lock screen and set it to Enabled.
5. Click on Apply & OK to implement this policy.