The built-in camera on a Laptop computer makes it easy to video chat with family, friends, relatives and conduct work or business related online meetings. However, there are cases, where you may find the need to disable the camera on your Windows computer.
- Accidental Video Conferencing: Avoid chances of being on a video conference while not being ready or prepared to be on the camera.
- Webcam Hacking: Prevent chances of the camera on the laptop or the webcam being hacked by a rogue app or malware.
- Children/Older Users: It is good security practice to keep the camera disabled on a computer; which is being used by children or by a non-tech savvy older individual.
Note: Disabling the camera prevents video calls, online meetings and apps like Microsoft Teams and Zoom from working.
Disable Camera In Windows 11/10
You can disable the integrated camera of a Laptop computer or the external webcam attached to a Desktop computer by using Settings, Device Manager, Registry Editor and other methods as provided below in this guide.
Once the camera of a Laptop computer or the webcam attached to a Desktop computer is disabled, it can only be enabled back by an Admin.
Note: If multiple cameras are connected to the computer (built-in and external), each camera needs to be individually disabled.
1. Disable Camera Using Settings
The easiest way to enable or disable the Camera on a Windows computer is by using the Settings App.
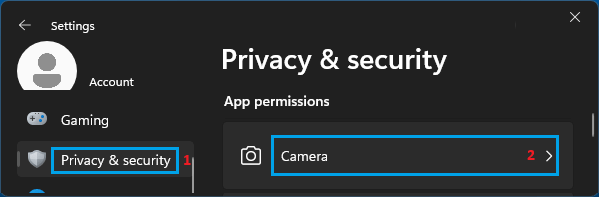
1. Go to Settings > select Privacy & Security in the left-pane. In the right-pane, scroll down to “App Permissions” section and click on Camera.
2. On the next screen, disable Let apps access your camera option by moving the slider to OFF position.
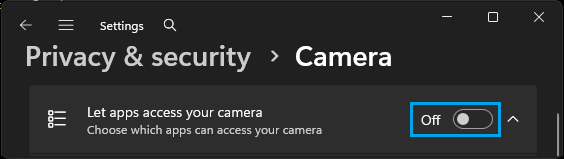
Note: This will totally disable the camera for all the apps on your computer.
2. Disable Camera for Specific Apps
As mentioned above, the Privacy Settings in Windows can also be used to disable camera access for specific apps.
1. Go to Settings > Privacy & Security > Camera.
2. On the next screen, you can disable camera access for any of the listed apps that were provided with access to the camera on your computer.
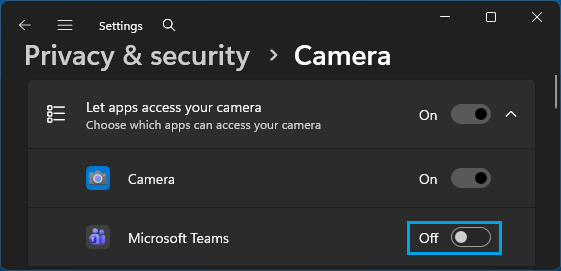
Note: This method disables camera access only for the selected apps and allows other apps to request camera access.
3. Disable Webcam Using Device Manager
You can also switch OFF the built-in Laptop camera and the webcam attached to a Desktop computer by using Device Manager.
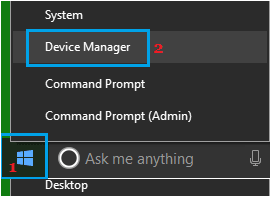
1. Right-click on the Start button and click on Device Manager.
2. On the Device Manager screen, expand the entry for Cameras (or imaging devices) > right-click on your camera (Integrated Webcam or USB Camera) and select the Disable Device option.
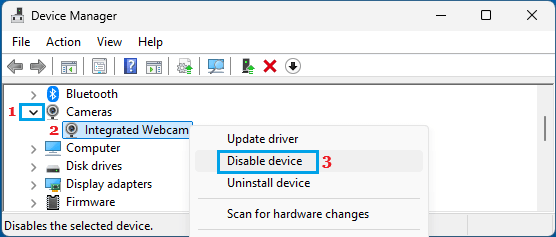
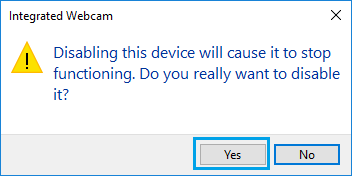
3. On the Confirmation pop-up, click on Yes to confirm your action.
At any time, you can enable the camera by right-clicking on the Camera again and selecting the Enable Device option.
4. Disable Camera Using Camera Covers
If you want to keep it simple, you can cover the camera with a sticker or use Camera Privacy Covers as available on Amazon.
In the case of a Desktop computer, you can simply unplug the attached webcam to totally prevent the possibility of the webcam being used by Remote Access tools (RATs).
5. Disable Camera Using Registry Editor
You can also disable the camera on a Windows computer by modifying the AllowCamera key.
1. Press Windows + R keys to open Run Command.
2. Type regedit in the Run Command window and press the enter key.

3. From the registry editing screen, navigate to HKEY_LOCAL_MACHINE\SOFTWARE\Microsoft\PolicyManager\default\Camera\AllowCamera.
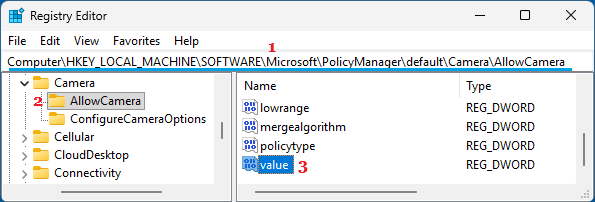
4. In the right-pane, double-click on the Value DWORD (See above image)
5. On the pop-up, change the value data from 1 to 0 to disable the camera.
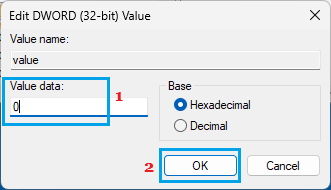
6. Restart the computer to apply this change.
Note: If “AllowCamera” entry does not exist, you can create it by right-clicking the Camera folder, selecting New > Key and naming it as AllowCamera.
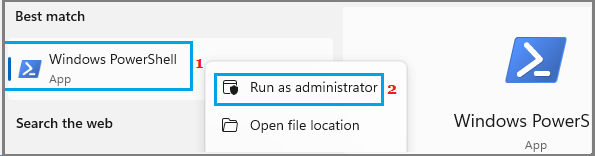
6. Disable Camera Using PowerShell
Another way to disable the camera on a Windows computer is by using PowerShell command.
1. Type PowerShell in Windows Search bar > right-click on Windows PowerShell in the search results and select Run as administrator option.
2. On the PowerShell screen, type Get-PnpDevice -Class Camera | Disable-PnpDevice -Confirm:$false and press the enter key.
At any-time, you can enable the camera on your computer by running Get-PnpDevice -Class Camera | Enable-PnpDevice -Confirm:$false command.