If the right-click is not working, you won’t be able to access WinX and other contextual menus that play a vital role in getting tasks done on a Windows computer.
The reason for right-click not working on a Windows computer could be due to Right-click button of the mouse being faulty, Outdated mouse driver, System File Corruption or the User Account being damaged.
Right Click Not Working in Windows 11/10
Before going ahead with other troubleshooting steps, it is recommended that you restart the computer to rule out the possibility of the problem being caused due to a software glitch.
If the problem persists, you can move to other troubleshooting steps as provided below in this guide.
1. Restart Windows Explorer
The problem could be due to the Windows Explorer process being stuck on the computer.
1. Press Ctrl + Shift + Esc keys at the same time on the keyboard of your computer.
2. On the Task Manager screen, select Windows Explorer entry in the Process column and click on the Restart button.
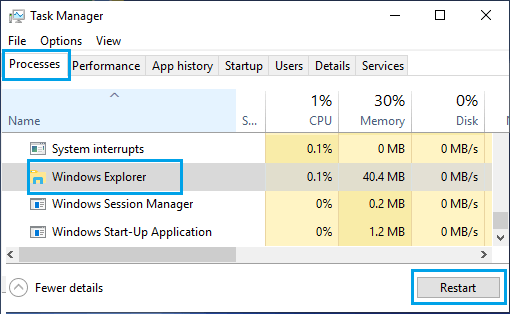
3. After restarting File Explorer, see if you are able to access the right-click menu on your computer.
2. Turn Off Tablet Mode
The problem could be due to the computer being in tablet mode, which automatically disables the right-click function.
1. Click on Action Center Icon located at bottom-right corner of the screen. If your computer is in Tablet Mode, the Tablet Mode Icon will appear highlighted.
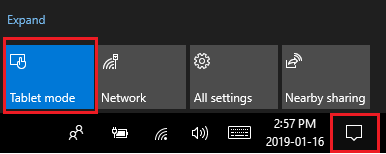
2. If the Tablet Mode Icon is highlighted, simply click on the Tablet Mode Icon and this will disable the Tablet Mode on your computer.
3. Make Sure the Mouse is Working
The problem could be due the Right-click button of the mouse not working. You can rule out this reason by plugging the Mouse to another Desktop or Laptop Computer to see if the right-click button works.
If you are using a wireless mouse, replace the batteries with new ones and see if you are able to access the right-click menu on your computer.
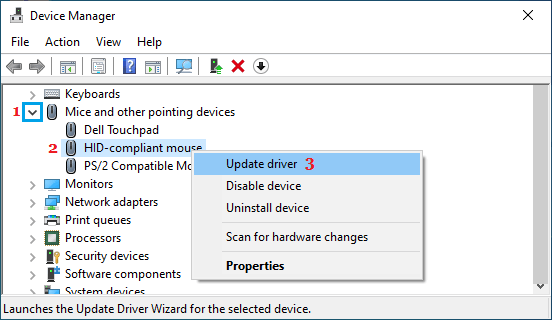
4. Update Drivers for Mouse
As mentioned above, the problem could be due to the driver software of the mouse being outdated.
1. Press Windows + X keys and click on Device Manager in the WinX menu that appears.
2. On Device Manager screen, open “Mice and other pointing devices” entry > right-click on Hid-compliant mouse and click on Update Driver option.
3. On the next screen, select Search automatically for updated driver software option.
4. Wait for Windows to search for the updated driver and install it on your computer.
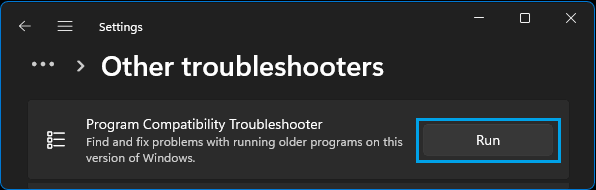
5. Troubleshoot Compatibility Problems
The problem could be due to a legacy app or program becoming incompatible with the operating system on your computer
1. Go to Settings > System > Troubleshoot > Other Troubleshooters.
2. On the next screen, click on the Run button located in “Program Compatibility Troubleshooter” tab.
Windows 10: Go to Settings > Update & Security > Troubleshoot > click on Run the Troubleshooter button
3. Follow the instructions (if any) provided by the compatibility troubleshooter on your computer.
6. Uninstall Recently-installed software
If the problem has started after installing a new app or program, it is likely that the newly installed program is either incompatible with Windows or not properly installed.
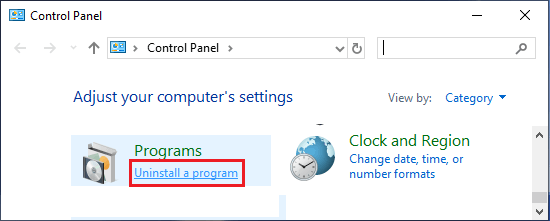
1. Open the Control Panel on your computer.
2. On the Control Panel screen, click on Uninstall a program link in “Programs” section.
3. On the next screen, right-click on the program that you had recently installed and click on Uninstall.
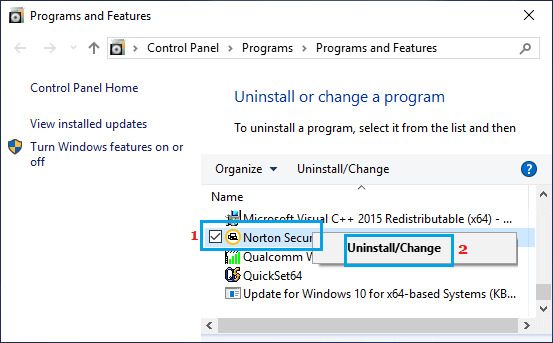
After the program is uninstalled, check to see if you can now access the right-click menu on your computer.
7. Run System File Checker
Follow the steps below to rule out the possibility of the problem being caused due to corrupted system files.
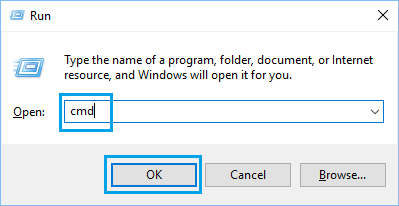
1. Press Windows + R keys to open the Run Command on your computer.
2. Type cmd and press Ctrl + Shift + Enter keys to open Command Prompt with Admin privileges.
3. On the Command Prompt screen, type sfc /scannow and press the Enter key.
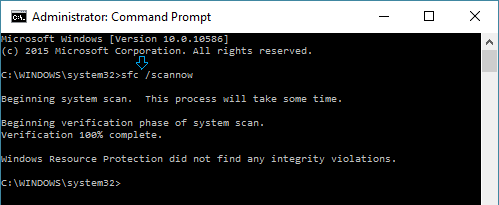
4. Wait for the Scan to be completed > Restart the computer and see if the problem has now been fixed.