While the default setting in Windows is to keep the printer online and ready to receive print jobs, it is very common for both USB connected and wireless printers to transition to an offline status; and this usually happens due to the following reasons.
- Connectivity Issues: This can happen; if a wireless printer gets disconnected from the network or goes to sleep. In the case of USB printers, this issue can be caused due to a loose connection or damage cable.
- Offline Mode: Printer may have been accidentally switched to offline mode by the user or automatically switched to offline mode by Windows due to multiple communication timeouts.
- Print Spooler Service: Printers can go offline; if the Windows background printing service (Print Spooler) gets stuck or stooped due to a corrupted print job or other issues.
- Driver Problems: Outdated, corrupted or missing drivers can make the printer go offline by preventing communication between the printer and computer.
In addition to this, a printer can change its status to “Error” or “Offline” in the print queue; if a paper gets stuck and the printer indicates an offline status in the print queue to prevent further damage or data corruption.
Make Printer Online in Windows 11/10
You can find below the steps to eliminate the most common reasons for a printer becoming offline and make the printer online on a Windows computer.
1. Disable Offline Mode
Follow the steps below to check; if the printer has been switched to offline mode by Windows and disable the offline status.
1. Type Printers in the search bar and click on Printers & Scanners in the search results.
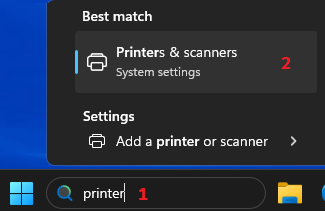
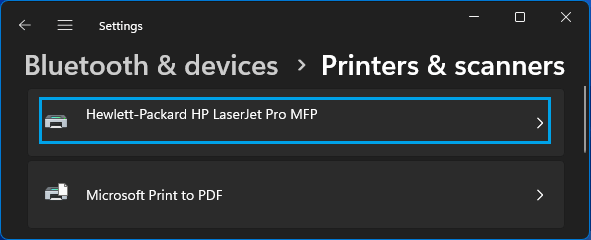
2. On Printers & scanners screen, select the Printer that you want to make online.
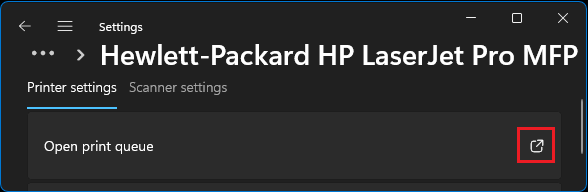
3. On the next screen, click on Open print queue option.
4. On the next screen, go to Printer tab and click on Use Printer Offline to remove the check mark.
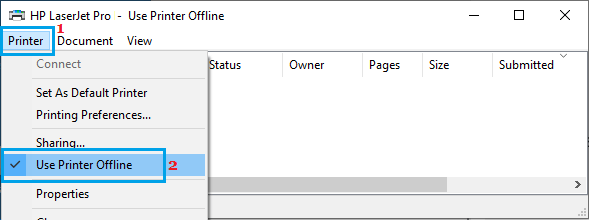
5. Once the check mark is removed, the printer should become online; unless there are other issues for the printer being offline.
2. Cancel Stuck Print Jobs
As mentioned above, a stuck or corrupted print file can make the printer offline. Hence, follow the steps below to clear stuck or pending print jobs (if any).
1. Type Printers in the search bar > click on Printers & Scanners in the search results.
2. On Printers & scanners screen, select the offline Printer > On the next screen, click on Open Print Queue.
3. On the next screen, right-click on the Stuck Document (if any) and select the Cancel option in the right-click menu.
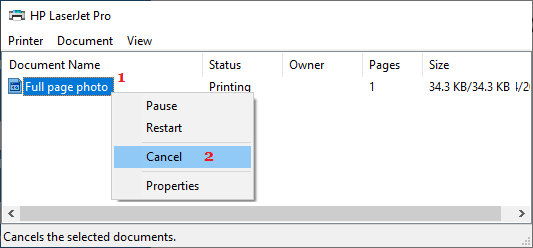
Once the stuck print job is cleared, you should find the printer becoming online.
3. Restart Printer, Computer & Router
This can help; if the printer has become offline due to glitch or connectivity issues.
1. Power-off the Printer > Unplug the Printer > Plug it back after 30 seconds and restart the Printer.
2. Restart the computer
3. If it is wireless printer, switch off the Router > wait for 60 seconds and switch it back on.
4. Run Printer Troubleshooter
See if the built-in Troubleshooter as available in Windows can find and fix the reason for the printer being offline.
1. Go to Settings > System > Troubleshoot > click on other Troubleshooters.
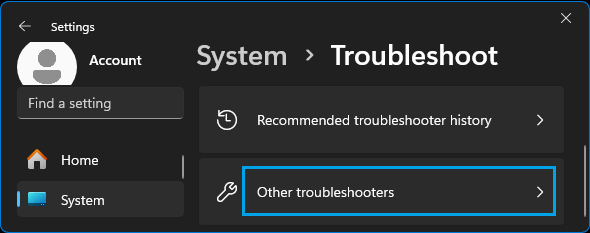
2. On the next screen, click on the Run button located in the Printer tab.
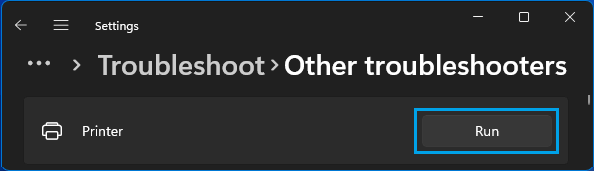
Follow the onscreen instructions as the troubleshooter tries to find and fix printing problems on your computer.
5. Restart Print Spooler Service
The Print jobs on a Windows computer are managed by the Print Spooler Service; which can sometimes get stuck, hang-up, freeze or stop working.
In most cases, this issue can be fixed by restarting the print spooler service by using steps as provided in this guide: How to Start, Stop, Restart Print Spooler in Windows 11/10.
6. Set Default Printer
If you usually use the same printer, making it as the Default Printer can help in avoiding printing problems in future. For the steps to Set Default Printer, you can refer to this guide: Set Default Printer.
7. Update Printer Driver
As mentioned above, an outdated Printer Driver can make the printer go offline by preventing proper communication between the printer and the computer.
1. Right-click on the Start button and click on Device Manager.
2. On the Device Manager screen, expand the Printers entry > right-click on the Printer and click on Update Driver.
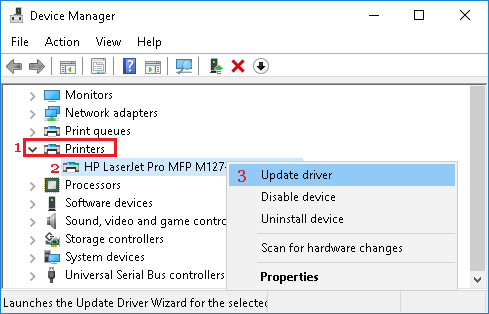
3. On the next screen, click on Search Automatically for updated driver software option.
4. Allow Windows to search for the updated printer driver and install it on your computer.