Windows provides the option to designate a particular printer as the default printer on the computer, which ensures that all the Print jobs are always sent to your preferred printer.
Setting a default printer can be useful if your computer has access to multiple printers (as in an office) and you want to make sure that your print jobs are always going to a nearby or a preferred printer.
Selecting a default Printer ensures that you always know the Printer to which your documents are being printed and this can help in preventing the possibility of your personal or confidential documents being exposed during the printing process.
Set Default Printer in Windows 11/10
While setting a default Printer ensures that all the print jobs are being sent to your preferred printer, it does not prevent you from printing to other printers on the network.
For example, even if Home Printer is set as the default on your computer, you will still be able to print to any printer at your Office by selecting the Office Printer in the Print dialogue box.
You can find below different methods to Set Default Printer on a Windows computer and also the steps to prevent Windows from switching to another Printer.
1. Set Default Printer Using Text File
Perhaps the easiest way to set default printer on a Windows computer is by opening a New text document.
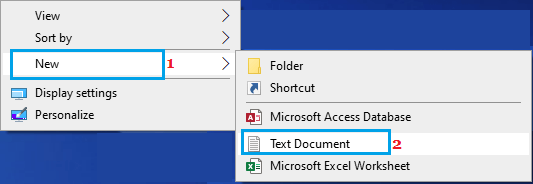
1. Right-click in an empty space on the Desktop and select New > Text Document option.
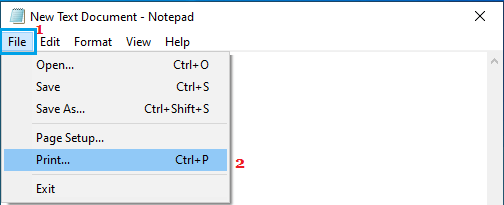
2. Open the new Text Document that you just created > click on the File tab and select Print option in the drop-down menu.
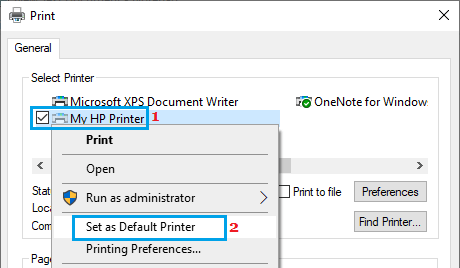
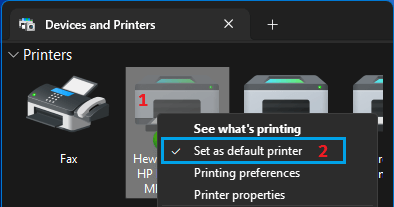
3. On the next screen, right-click on your desired Printer and select Set as Default Printer option.
2. Set Default Printer Using USB Drive
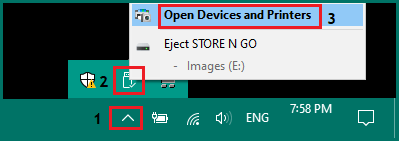
Attach a USB Drive to any of the USB ports on the computer and this will provide you with access to “Open Devices & Printers” shortcut.
1. Open System Tray > right-click on the attached USB Drive and select Open Devices and Printers option.
2. On the next screen, right-click on your desired Printer and select Set as default printer option.
Currently, this appears to be the quickest way to change or set default Printer on both Windows 11 and Windows 10 computers.
3. Set Default Printer Using Control Panel
You can also set default printer by using Control Panel.
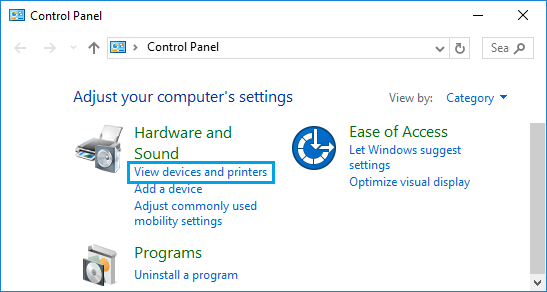
1. Open the Control Panel on your computer.
2. On the Control Panel screen, switch to Category view and click on View Devices & Printers.
3. On the next screen, right-click on your desired Printer and select Set as Default Printer option.
Special Note: If above steps do not work, click on Hardware and Sound and then click on Devices & Printers link on the next screen.
Default Printer Keeps Changing in Windows 11/10
While you can set the default printer using any of the above methods, you may find your computer switching back to another printer.
The reason for this is due to Windows being allowed to manage the default Printer on the computer and this can be changed.
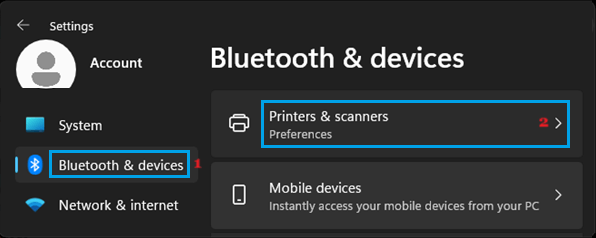
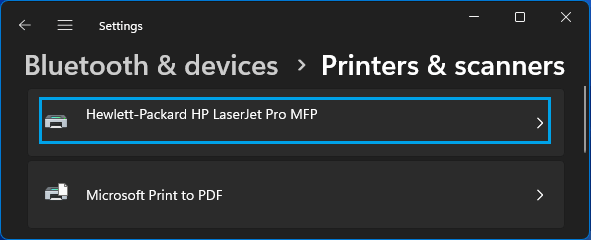
1. Go to Settings > Bluetooth & Devices (left-pane) > click on Printers & Scanners in the right-pane.
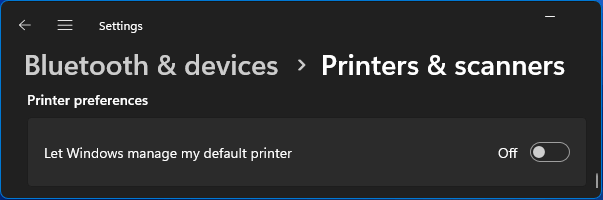
2. On Printers & Scanners screen, scroll down to “Printer Preferences” section and disable Let Windows manage my default printer option.
3. On the same screen, scroll up and click on the Printer that you want to set as the default Printer.
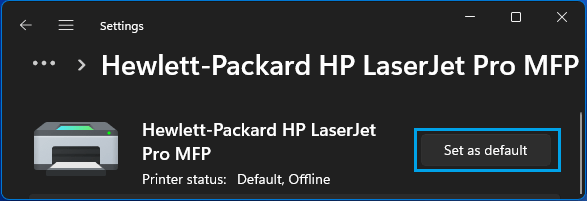
4. On the next screen, click on Set as Default button next to the Printer that you want to set as the Default Printer on your computer.
After this, you should no longer find your computer switching back to any other Printer.