Configuring the Laptop to open when the Lid is lifted up and shut down when the lid is closed can be useful for students, mobile banking professionals and others who move around with their Laptops.
This feature eliminates the need to start the computer by pressing its Power button and also ensures that the Laptop is totally powered-off when the lid is closed.
This feature may not be available on many older Laptops and also on some newer Laptops due to hardware and driver limitations.
Also on some Laptops, only the option to close Laptop using Lid is made available, while the option to open Laptop when the Lid is lifted is kept hidden.
1. Shut Down Laptop When Lid is Closed
Follow the steps below to make your Laptop shut down when the Lid is closed.
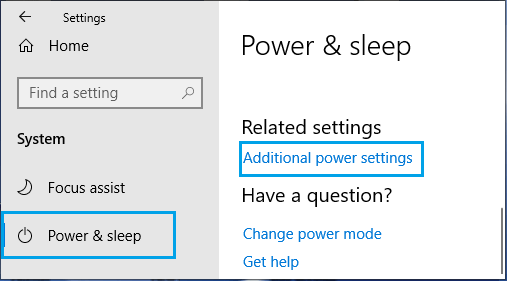
1. Go to Settings > System.
2. Click on Power & Sleep in the left pane. In the right-pane, scroll down to ‘Related Settings’ section and click on Additional Power Settings link.
3. On Power Options screen, click on Choose What Closing the lid does link in the left-pane.

4. On the next screen, set ‘When I Close the lid‘ setting under ‘Battery’ and ‘Plugged in’ to Shut Down.
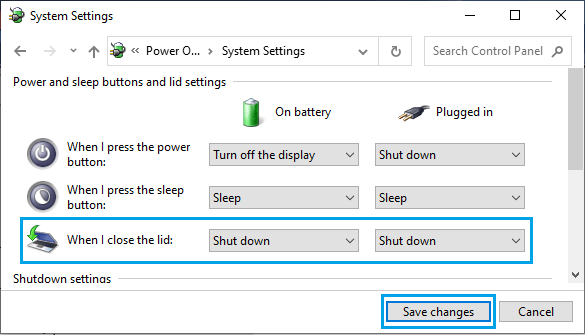
5. Click on Save Changes to save this setting on your computer.
After this, you will find your computer shutting down as soon as its lid is closed.
2. Open Laptop When Lid is Lifted
You can also configure the Power Settings on your Laptop to turn on the display as soon as its Lid is opened or lifted up.
1. Go to Settings > System.
2. Click on Power & Sleep in the left pane. In the right-pane, scroll down to ‘Related Settings’ section and click on Additional Power Settings link.
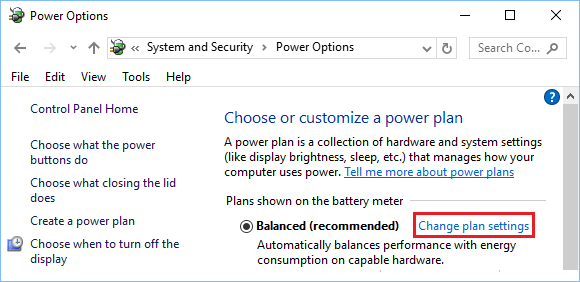
3. On Power Options screen, click on Change Plan Settings link, located right next to the active power plan setting on your computer.
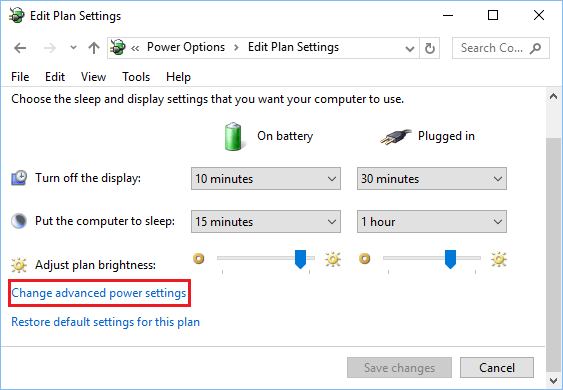
4. On Edit Plan Settings screen, click on Change Advanced Power Settings Link.
5. On the next screen, expand Power Buttons and lid entry > expand Lid open action and select Turn on the display option for ‘On battery‘ and ‘Plugged-in‘ entries.
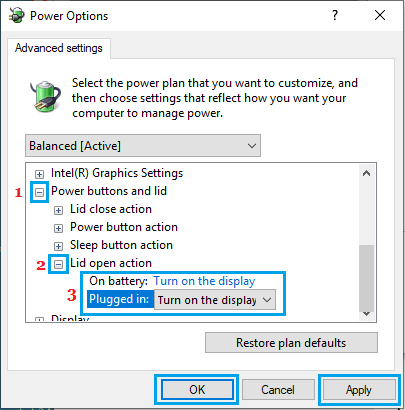
6. Click on Apply and OK to save this setting on your computer.
After this, you will find your computer starting up as soon as its lid is opened or lifted up.
3. Lid Open Option Missing in Windows 10/11
If the Lid Open Action is not available on your Laptop, it is likely that this option is hidden on your computer.
1. Type Command Prompt in the Search Bar > Right-click on Command Prompt App in the search results and select Run As Administrator option.

2. In the command prompt screen, type powercfg -attributes SUB_BUTTONS 99ff10e7-23b1-4c07-a9d1-5c3206d741b4 -ATTRIB_HIDE and press the Enter button on the keyboard of your laptop.
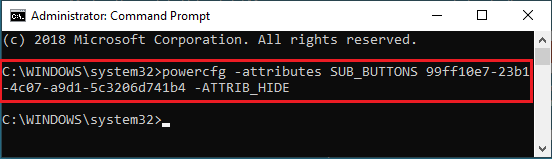
When this command is executed, you won’t receive a confirmation, but Lid Open Action will be immediately added to the Power Options screen on your computer.
After the Lid Open Option is enabled, you can follow the steps to Open or Shut Down Laptop using the Lid.
Note: If the above command did not add the Lid Open Action, you might be able to enable this option by going to BIOS settings of your computer.