You may find the need to transfer Photos from your iPhone to an external storage drive as an additional backup or to clear the storage space on your iPhone.
The later reason is more common due to tendency of most smartphone users to take photos at every available opportunity, which eventually ends up in their iPhone not being able to take any more photos due to lack of storage.
Transfer iPhone Photos to External Drive Using Mac
You can find below three different methods to transfer photos from iPhone to an external hard drive connected to a MacBook, Mac Mini or an iMac.
1. Transfer Photos from iPhone to External Drive Using Preview App
A simple way to transfer Photos from iPhone to Hard Drive is by using the Preview App as available on your Mac.
1. Connect both iPhone and External Hard Drive to Mac.
2. Open the Preview App on your Mac using the LauchPad.
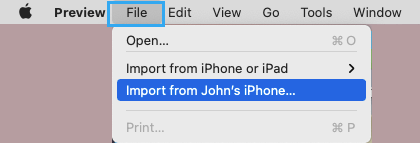
3. Click on the File tab in top-menu bar and select Import from your iPhone option.

4. If you see “Photos cannot be imported…” pop-up, click on OK to close the pop-up.
5. On the next screen, you can either select Photos manually or select the Edit option in top-menu bar and click on Select All to select All Photos.

Tip: Press Command + I to unselect All Photos.
6. Once the Photos are selected, click on the Import option.

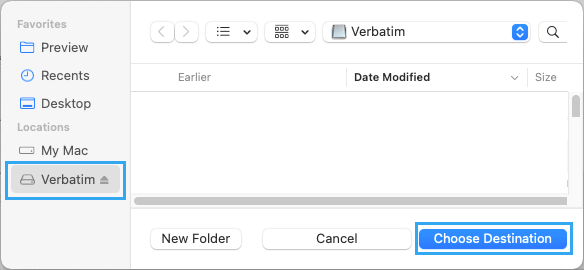
7. On the next screen, select your External Hard Drive and click on Choose Destination.

Wait for selected Photos to be transferred from iPhone to External Hard Drive.
2. Transfer iPhone Photos to External Drive Using Image Capture
Another way to transfer Photos from iPhone to External Hard Drive is by using the “Image Capture” utility as available on your Mac.
1. Connect External Hard Drive and iPhone to Mac.
2. If prompted, unlock iPhone by entering its Lock Screen Passcode.
3. Open the Image Capture utility on your Mac (using LaunchPad or from the Applications Folder).
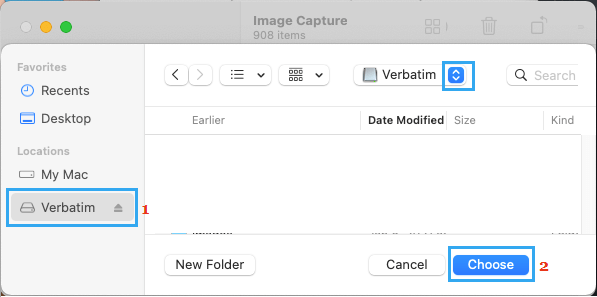
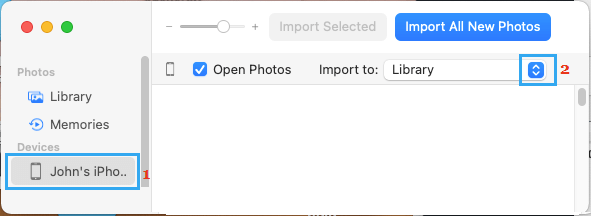
4. Select your iPhone under “Devices” section > click on the Down Arrow next to “Import To” and select Other in the drop-down menu.

5. On the next screen, select your External Hard Drive and click on Choose.

6. On the next screen, select Photos and click on Download option to transfer Photos from iPhone to External Hard Drive.

The selected Photos will be available in a Folder Named after your iPhone on the External Hard Drive.
3. Transfer iPhotos to External Drive Using Photos App
As it must have already occurred to you, you can also make use of the Photos App to Transfer Photos from iPhone to Mac.
Once the iPhone photos are transferred to Mac, you can drag them to the External Hard Drive attached to your Mac.
1. Connect iPhone to Mac.
2. Open Photos App on your Mac > select your iPhone under “Devices” section and click on the Down Arrow next to Import To.

3. On the pop-up, click on New Album > type a Name for the New Photo Album and click on Create.
4. On the next screen, you can manually select the Photos that you want to transfer to Mac or click on Import All option to transfer all iPhone Photos to New Photo Album on your Mac.

5. Wait for Photos to be transferred from iPhone to New Photo Album on your Mac (Desktop).
Once the Photos are transferred to Mac, you can simply drag the entire folder containing imported photos to your External Hard Drive.