While iPhone has an impressive camera, there are users who prefer using a professional digital camera to shoot photos and transfer those photos to iPhone for editing and other purposes.
The advantage of using iPhone to edit photos is that it provides access to a number of photo editing apps, in addition to the free native Photos app, which features decent photo editing capabilities.
The method to transfer photos from camera to iPhone or iPad depends on the type of storage being used by the camera and whether or not it comes with an App to transfer Photos.
Once the Photos are transferred from camera to iPhone, they can be found in Imports Album, which is located within the Photos App on your device.
Transfer Photos from Camera to iPhone
If the Camera comes with its own Photo Transfer App, you should be able to transfer photos to iPhone over Wi-Fi network, without the need to buy any tool or adapter.
If your digital camera is not equipped with a photo transfer app or if you do not want to use the app, you can transfer photos using Lightning to USB and Lightning to SD Card Reader adapters.
1. Transfer Photos From Camera to iPhone Using SD Card Reader
If the photos are stored on the SD Card, you can transfer photos from camera to iPhone is by connecting your device to Lightning to SD Card Reader.
1. Remove the SD Card from your Camera and insert it into the Reader End of Lightning to SD Card Reader.

2. Next, connect the Lightning End of Lightning to SD Card Reader to your iPhone (See above image).
3. After this, open the Photos App on your iPhone (in case it does not automatically open)
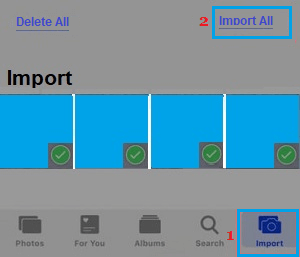
4. Once you are in the Photos App, tap on the Import tab located in bottom-menu and select Import All option located at the top-right corner of the screen.
Note: You can also manually select specific photos by individually tapping on them and tap on Import option.
5. Once the photos are imported, you will be prompted to select whether you want to keep photos on the SD card after transfer or delete them.
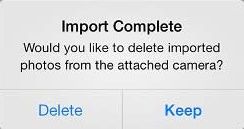
Tap on Keep, if you want the photos to be available on the SD card. Tap on Delete, if you want to empty the SD card.
2. Transfer Photos From Camera to iPhone Using Lightning to USB Adapter
If the camera comes with its own in-built storage and does not use an SD Card, you can transfer photos using Lightning to USB Camera Adapter.
1. Connect a USB cable to your camera and connect the other end to the USB End of Lightning to USB Camera Adapter

2. Connect the Lightning end of Lightning to USB Camera Adapter to your iPhone.
3. Turn on the Camera and make sure it is in transfer mode.
4. Open the Photos App on your iPhone (in case it does not automatically open)
5. Once you are in Photos App, tap on the Import tab located in the bottom-menu and select Import All option located at the top-right corner of the screen.
Note: If you only want to import selected photos, tap on the individual photos that you want to transfer and then tap on Import.
6. When the import is complete, you will see the option to either Keep or Delete the transferred Photos on your Camera.
Tap on either Delete or Keep option, depending on your requirements.
3. Transfer Photos From Camera to iPhone Using Wi-Fi
If your digital camera comes with an app to transfer photos (like Canon Camera Connect), you can follow the steps below to transfer photos from camera to iPhone.
1. Open the menu of your Camera and select Enable Wi-Fi option.
2. After this, open the Settings app on your iPhone and tap on Wi-Fi.
3. On the next screen, connect to the Camera Wi-Fi Network being broadcasted by your digital camera.
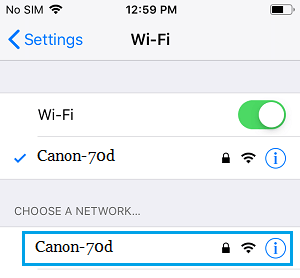
Note: In most cases, the Camera Wi-Fi network name will be the same as the model number of your Camera (50d, 70d or similar)
4. On your Camera, open Camera connect App (in case of Canon Cameras) or the branded App on your Camera that allows you to transfer Photos.
5. Once the branded Camera App is open, tap on the option to transfer photos from Camera to Phone.
The advantage of transferring photos using Wi-Fi is that no cables or wires are required. However, this method is not suitable for transferring large number of Photos.
Unable to Find Import Tab on iPhone
If you do not see the Import Tab in Photos App on iPhone or iPad
- Make sure the Digital Camera is switched ON and the mode to export photos is selected.
- Restart your iPhone
- Unplug the digital Camera from Adapter and reconnect after 60 seconds
- Disconnect the Adapter from iPhone and reconnect after 60 seconds
One of the above steps should bring back the Import Tab in the Photos App on your iPhone.