If you are looking for a way to change/update the phone number linked to your Apple ID, it is likely that your phone number has changed or you are dealing with “Update Apple ID Phone Number” notification.
In the latter case, Apple is reminding you to make sure or confirm that the Trusted Phone Number linked to your Apple ID is correct.
While, instances of iPhone coming up with “Update Apple ID Phone Number” notifications are usually noticed prior to a major iOS update, they can also occur at any other time.
Change or Update Apple ID Phone Number on iPhone
If you are dealing with “Update Apple ID Phone Number” notification, you can tap on the Notification and select “Keep Using Existing Number” or “Change Trusted Phone Number” option (If your number has changed).
If you are not dealing with the Notification and your phone number has changed, you can change your phone number by using the Settings menu on your iPhone or Mac.
Note: If your previous phone number was being used for iMessage/FaceTime, you will have to disable both these services, before following any of these methods.
1. Fix “Update Apple ID Phone Number” Notification
If you are dealing with “Update Apple ID Phone Number” notification, you can follow the steps below to confirm or change your phone number (If it has changed).
1. Open Settings > Tap on Update Apple ID Phone Number Notification.
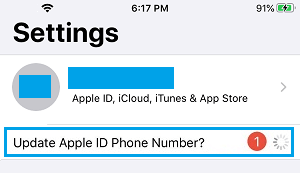
2. Tap on Continue > on the next screen, select Keep Using Existing Number option and the notification will go away.
If your Phone Number has changed, you can select Change Trusted Number option and follow the prompts to enter New Phone Number and verify the new phone number.
2. Change Apple ID Phone Number on iPhone
If your phone number has changed, the first step is to Add your New Phone Number to iPhone and then remove the old phone number.
1. Open Settings and tap on your Apple ID Name
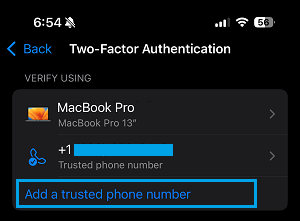
2. From Apple ID screen, go to Sign-In & Security (or Password & Security) > Two-Factor Authentication.
3. On the next screen, tap on Add a Trusted Phone Number and follow the prompts to Add and verify your New Phone Number.
4. After the New Phone Number is added, select the Old Phone Number that you want to remove.
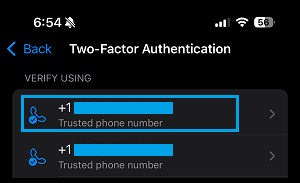
5. On the next screen, select Remove from Account option and follow the prompts to remove the phone number.