Upgrading Mac to SSD Drive can significantly boost its performance. However, the main concern when it comes to upgrading Mac to SSD drive is the possibility of data being lost and how to safely transfer data to New SSD Drive on Mac.
Luckily, macOS software provides multiple data transfer methods and you can use Time Machine Backup, Migration Assistant or the Cloning method to safely transfer data to new SSD Drive.
The easiest way to transfer Data from Mac to New SSD Drive is by using Time Machine, unless you have an older Mac running macOS High Sierra or MacOS Mojave.
In the case of older Macs, the external hard drive gets formatted as extended journal and cannot be used for Time Machine Backups (you will need to use the cloning method on older Macs).
Upgrade Mac to New SSD Drive
In order to make it easy for you to understanding the process of upgrading Mac to SSD Drive, we has divided the steps into the following main groups.
- Backup Existing Data to External Drive
- Replace HDD Drive with SSD Drive
- Format New SSD Drive Using Disk Utility
- Transfer Data From Old HDD to New SSD Drive
1. Backup Existing Data to External Drive
The first step is to back up all the files, apps and desktop programs on your Mac to an external storage drive using Time Machine Backup.
1. Connect External Hard Drive to the USB Port of your Mac.
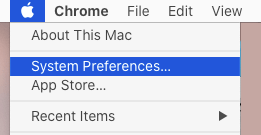
2. Click on Apple Logo and select System Preferences in the drop-down menu.
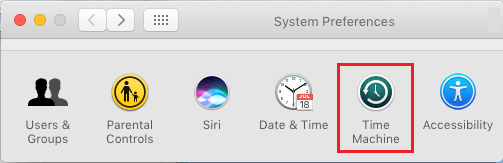
3. On the System Preferences screen, click on Time Machine.
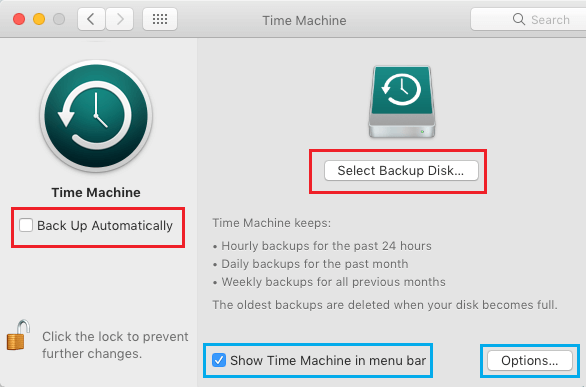
4. On the next screen, select Show Time Machine in menu bar option and click on Select Backup Disk… button.
5. On the next screen, select your attached Backup Disk and click on Use Disk button.
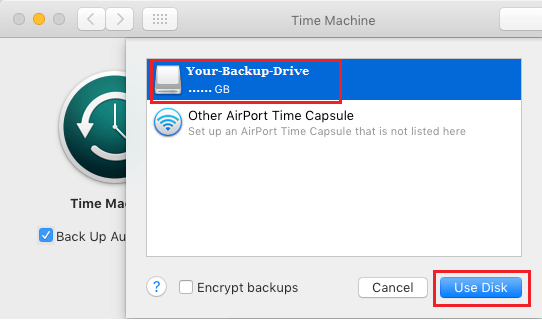
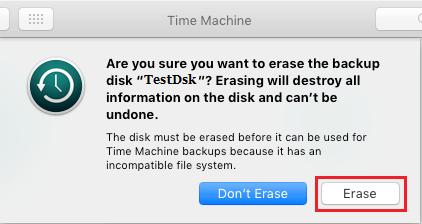
6. If prompted, click on the Erase button to Format the External storage drive.
7. After the disk is formatted, click on Backup Now to start the process of Time Machine Backup.
Note: If you are making a Time Machine Backup for the first time, it may take a long time for the Backup process to be completed.
2. Replace Existing Hard Drive on Mac with SSD Drive
Now that you have a Time Machine Backup of your Mac on an external drive, you can safely remove the current Hard Disk on your Mac and replace it with a New SSD Drive.
- If you are upgrading Mac Mini to SSD Drive, make sure that have TR6 and T8 Screw drivers, Logic Board Removal Tools and Spudger.
- If you are upgrading MacBook Pro to SSD Drive, make sure that you have P5 Pentalobe Screwdriver, T5 Torx Screwdriver and Spudger.
Detailed steps to replace 2014 Mac Mini Hard Drive with SSD can be found in this ifixit guide and you should also watch this video on YouTube.
For the steps to replace 2015 MacBook Pro Hard Drive with SSD, you can refer to this ifixit guide and you should also watch YouTube videos applicable for the model of your Mac.
3. Format New SSD Drive Using Disk Utility
After replacing the Hard Drive on your Mac with New SSD Drive, you need to format the disk to APFS format.
1. Turn on the Mac and immediately press and hold Command + R keys on the keyboard of your computer.
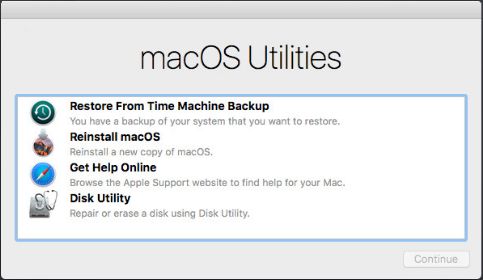
2. Release both the keys when you see your Mac starting with white Apple Logo. This should make your Mac go to macOS Utilities startup screen.
3. On macOS Utilities screen, select Disk Utility option and click on Continue.
4. On the next screen, type a Name for your SSD Drive and click on Apply to start the format process.
5. When the SSD Drive is formatted, close the screen and this should take you back to macOS utilities startup screen.
4. Transfer Data From Old HDD to New SSD Drive on Mac
The final step is to transfer Data from Old SSD Drive to New SSD Drive on your Mac. You can skip steps 2, 3 below, if you are already on macOS utilities screen.
1. Connect External Hard Drive containing Time Machine Backup to the USB Port of your Mac.
2. Turn on the Mac and immediately press and hold Command + R keys on the keyboard of your computer.
3. Release both the keys when you see your Mac starting with white Apple Logo. This should make your Mac go to macOS utilities startup screen.
4. On macOS utilities screen, select Restore From Time Machine Backup option and click on Continue.
5. On the confirmation screen, click on Continue to confirm.
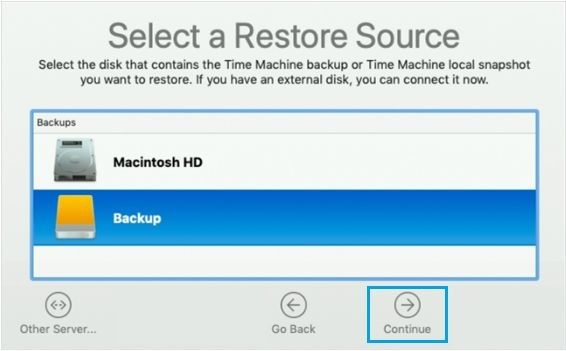
6. On the next screen, select your Time Machine Backup Disk as the restore source and click on Continue.
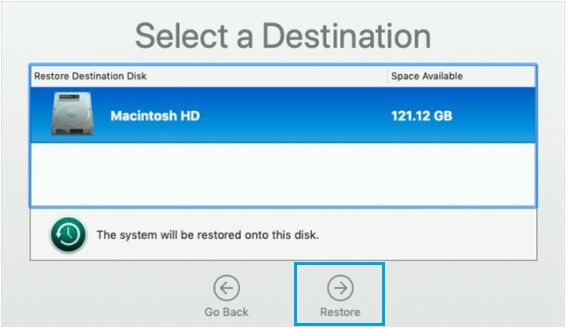
7. Select the New SSD Drive on your Mac as the destination source and click on Restore.
8. Patiently wait for the Restore Process to be competed.
Once the Time Machine Restore process is completed, restart Mac and see if all your data is intact.
5. Desktop & Apps Missing After Time Machine Restore
In our testing, Desktop Files and Program Files were missing on Mac after Time Machine Restore.
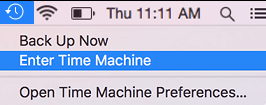
If this happens, you can always Enter Time Machine > copy desktop files from Time Machine Backup and paste them on your new desktop.
Similarly, you can copy Program Files from Time Machine Backup and paste them in Programs Folder on your Mac.