If the built-in Laptop keyboard or USB Keyboard attached to Desktop computer is not working, the problem could simply be due to accidental pressing of certain keyboard shortcuts.
This is especially true, if the keyboard has suddenly stopped working and you can hear it beeping when you press any of the keys.
In the other cases, the problem of Keyboard not working on a Windows computer could be due to the keyboard being switched OFF due to power saving settings on the computr and other reasons.
USB And Laptop Keyboard Not Working in Windows 10/11
Before going ahead with the troubleshooting steps, it is recommended that you simply restart the computer and see if this helps in fixing the problem.
If restarting did not help, you should be able to fix the problem using any of the following troubleshooting steps as applicable in your case.
1. Use Keyboard Shortcuts
As mentioned above, accidental pressing of certain key combinations can result in the keyboard becoming unresponsive or locked out.
1. Press Windows + Space keys on the keyboard of your computer
2. Press the key with Lock Icon on the keyboard of your Laptop. Depending on the manufacturer, the key with the Lock Icon could be the Escape Key, F10 Key or another key.
3. Press and Hold down the Shift key and press the Lock Icon Key.
2. Prevent Computer from Switching OFF Keyboard
The problem could be due to the keyboard being switched OFF by the operating system, in order to conserve power.
1. Right-click on Start button > click on Device Manager.
2. On Device Manager screen, double-click on HID Keyboard Device.
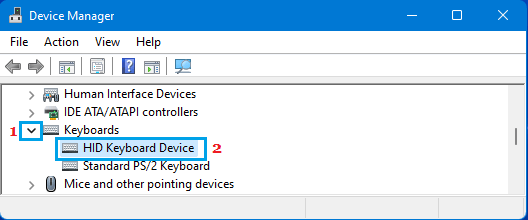
3. On Keyboard Device Properties screen, switch to Power Management tab and uncheck Allow computer to turn off this device to save power option.

After this, your computer won’t be able to switch off the Keyboard and prevent it from working.
3. Run Keyboard Troubleshooter
The next step would be to see if the built-in Keyboard Troubleshooter can help in fixing the keyboard problem on your computer.
1. Go to Settings > System > Troubleshoot (right-pane) > scroll down and click on Other troubleshooters.
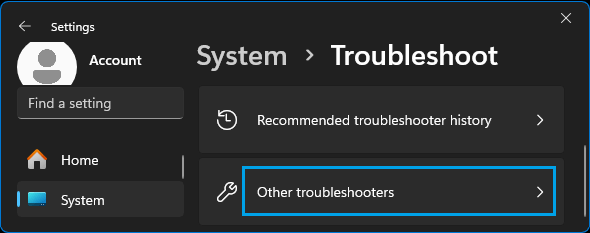
2. On Other Troubleshooters screen, click on the Run button located next to Keyboard.

Wait for the Troubleshooter to find and fix Keyboard related problems on your computer.
4. Make Sure USB Ports are Working
If you are using a USB Keyboard, the problem could be due to the particular USB Port to which the keyboard is attached not working. This can be confirmed by trying another USB port on the computer.
If USB Port/Ports are not working, you should be able to fix the problem using troubleshooting steps as provided in this guide: Fix: USB Ports Not Working Issue in Windows 11/10.
5. Manually Update Keyboard Driver
As mentioned above, the problem could be due to the keyboard drivers becoming outdated.
1. Open the Device Manager on your computer.
2. On Device Manager Screen, expand Keyboards entry > right-click on your Keyboard and select Update Driver option.
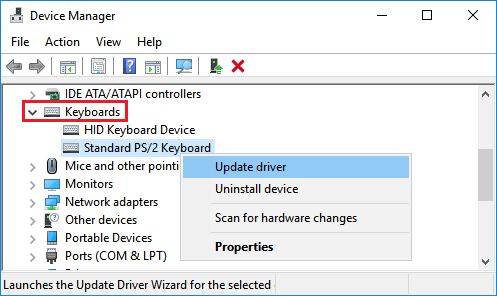
3. On the next screen, select Search Automatically for updated driver software option and follow the instructions to update the driver.
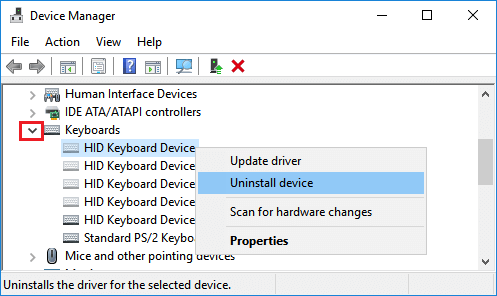
6. Uninstall Unnecessary Keyboard Devices
In the case of USB Keyboards, the problem could be due to multiple keyboard devices being installed on the computer.
1. Open Device Manager > click on the View tab and select Show Hidden Devices option to unhide all the hidden keyboard devices.
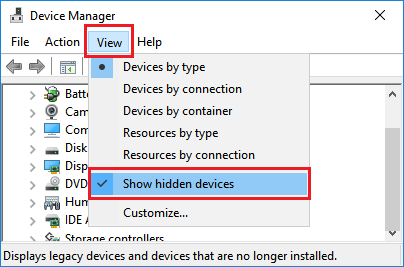
2. Uninstall all the HID Keyboard devices by right-clicking on them one-by-one and selecting the Uninstall Device option.
Note: If the native keyboard on your Laptop is working, do not uninstall Standard PS/2 Keyboard device.
After removing external Keyboard devices, restart the computer and Windows will automatically install back the right Keyboard Device on the computer.
7. Uninstall Wireless Keyboard Receiver
If you are using a wireless external keyboard with a USB Receiver or Dongle, uninstalling the USB Receiver and plugging it back again can help in fixing the problem.
1. Open Device Manager > right-click on the Keyboard Receiver and click on Uninstall.
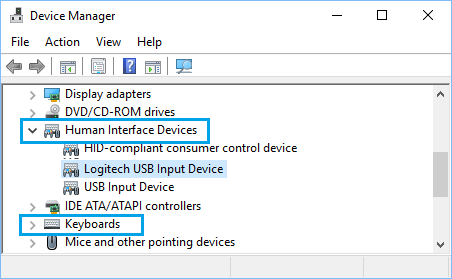
Note: You should find the Keyboard receiver or Keyboard input device in “Keyboards” section or in “Human Interface Devices” section.
2. After this, unplug the Keyboard Receiver from the USB port and Restart the computer.
After the computer restarts, plug back the Keyboard Receiver into the USB Port and you should now find the keyboard working.