A common reason for a Windows computer frequently disconnecting from Wi-Fi Network is due the computer not being set to automatically connect to your Wi-Fi Network.
In such cases, the computer remains connected to Wi-Fi as long as it is being actively used and tends to disconnect from the network, whenever the computer goes to sleep.
Apart from this, the problem could also be due to power supply to the Network Adapter being switched OFF by the computer and other reasons.
Computer Keeps Disconnecting from Wi-Fi
In most cases, the problem of a computer disconnecting from Wi-Fi network can be fixed by selecting the option to automatically connect to Wi-Fi and preventing the computer from switching off power supply to Network adapter.
If the problem persists, other troubleshooting steps as provided should help in fixing the Wi-Fi connectivity problem on your computer.
1. Set Computer to Automatically Connect to Wi-Fi Network
If your computer is disconnecting from Wi-Fi after every browsing session, the problem is most likely due to the computer not being set to automatically connect to Wi-Fi.
1. Click on the Network Icon located in the Taskbar.
2. Select your Wi-Fi Network and make sure Connect Automatically option is selected and click on the Connect button.

3. When prompted, enter your Wi-Fi Network Password and click on the Next button.
After this, you should hopefully find your computer consistently being connected to Wi-Fi network.
2. Stop Computer From Turning OFF Wi-Fi Adapter
The next would be to prevent the Network Adapter on your computer being automatically switched OFF by the computer.
1. Open the Device Manager on your computer.
2. On Device Manger Screen, expand Network Adapters entry > right-click on the Network Adapter for your computer and click on Properties.
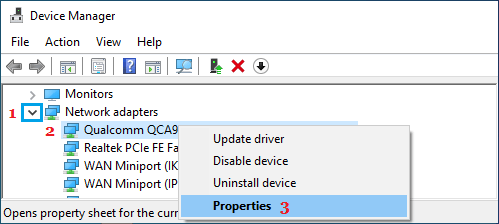
Tip: The Network Adapter entry always has Network or 802.11b or Wi-Fi in it.
3. On Wi-Fi Adapter properties screen, go to Power Management tab and deselect Allow the computer to turn off this device to save power option.
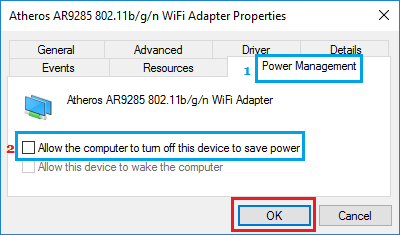
4. Click on OK to save this setting for the Network Adapter on your computer.
3. Run Network & Internet Troubleshooter
If the above two steps did not fix the problem, you can ask the built-in Network & Internet Troubleshooter on your computer to find and fix this problem.
1. Go to Settings > System > Troubleshoot > click on Other troubleshooters.

2. On the next screen, click on the Run button located in “Network & Internet” tab.
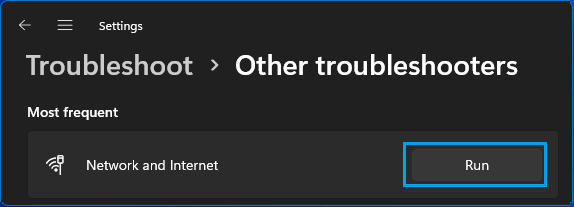
3. Follow the onscreen instructions, as the troubleshooter tries to find and fix the Wi-Fi connectivity problems on your computer.
4. Set Low Roaming Sensitivity
Setting Low Roaming Sensitivity prevents the computer from constantly trying to connect to other available Wi-Fi networks.
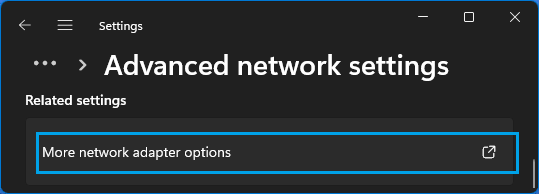
1. Go to Settings > Network & Internet > Advanced Network Settings > scroll down and click on More Network Adapter Options.
2. On the next screen, right-click on your Wi-Fi Network and click on Properties.
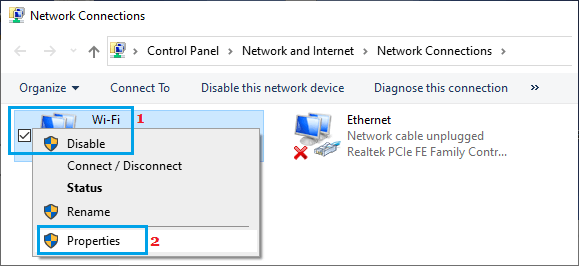
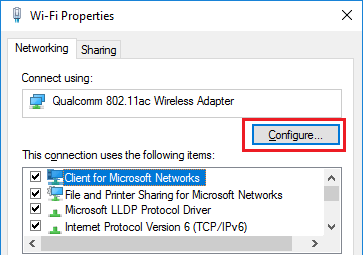
3. On Wi-Fi Properties screen, click on the Configure button.
4. On the next screen, switch to Advanced tab and set Roaming Aggressiveness value to Lowest or Medium-low level.
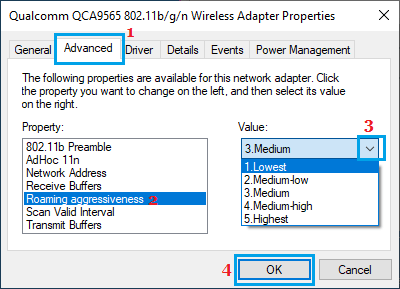
Your computer will now have a lesser tendency to disconnect from Wi-Fi and try to connect to other networks.