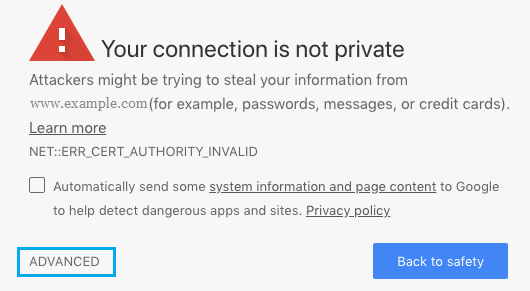
In general, Google Chrome and other web browsers display “Your Connection is Not Private” error message, when you try to access any website over an insecure connection.
This error message is usually triggered if the SSL certificate of the website that you are trying to open has expired, become invalid or has not been issued by an approved authority.
As you can see from the wordings, the overall purpose of “Your Connection is Not Private” message is to warn users about the possibility of their personal data being compromised.
Your Connection is Not Private Error in Google Chrome
Depending on the problem, “Your Connection is Not Private” error message can be fixed by any of the following methods.
1. Ignore Browser Warning and Proceed to Website
If the website that you are trying to access is known to be a reputable website and does not require your personal information, you can choose to ignore the warning message and proceed to the website.
1. Click on the Advanced link in the Error Message.
2. Next, click on Proceed to www.websitename.com (unsafe) option.
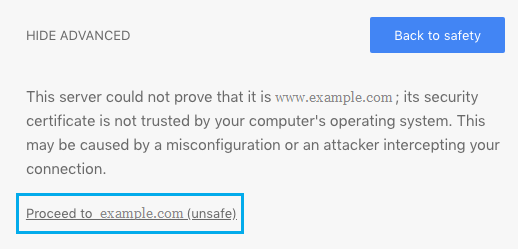
Chrome browser will take you to the website that you were trying to access and you should be able to browse the website, without any problem.
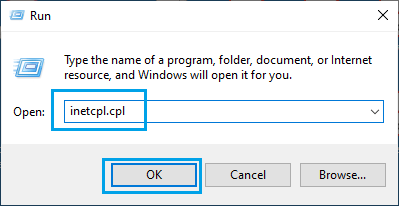
2. Clear SSL Certificate Cache
Follow the steps below to clear the SSL Certificate cache stored on your computer.
1. Right-click on the Start button and click on Run.
2. In the Run Command window, type inetcpl.cpl and click on OK.
3. On Internet Properties screen, select the Content tab and click on Clear SSL state button
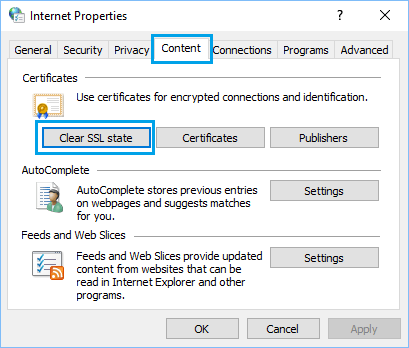
4. Click on OK to close Internet Properties window.
Make sure you Restart the computer to apply the changes.
3. Disable SSL Scanning by Antivirus Software
Sometimes, this problem can be caused by over-sensitive or aggressive antivirus program settings. This can be fixed by disabling SSL Scanning option in the Antivirus program settings.
Kaspersky: Click on Settings > Additional > Network > and disable Scan encrypted connections option.
Avast antivirus: Click on Settings > Active Protection > Web Shield > Customize. On the screen, uncheck Enable HTTPS scanning option.
Bitdefender: Click on Settings > Privacy Control > Antiphishing > Turn OFF SSL Scanning option.
Note: Above settings may vary, depending on the version of Antivirus program installed on your computer.