While, Microsoft Office automatically saves hidden metadata and personal information to Word, Excel and other Office files, it also provides the option to remove this information from Microsoft Office Documents.
Apart from personal information like the names of people that worked on the document, the hidden metadata may also end up revealing the comments of the reviewers and the people that worked on the document.
Hidden Information Attached to Microsoft Office Files
Microsoft Office by default saves the following information anytime you create and save a Microsoft Office file on your computer.
1. Author name, Company name, name of person who recently saved the document. Other personally identifiable information (PII), such as e-mail headers, send-for-review information, routing slips, and template names.
2. Shared or collaborated documents might contain revision marks, comments, ink annotations, names of people who worked on the document, comments from reviewers and changes that were made to the document.
3. Date the document was created, date the document was modified, document revisions, document versions.
4. The name of your computer, the name of the network server or hard disk where the document is saved.
5. Other Hidden text or cells that you may not be aware of.
1. Remove Hidden Information From Microsoft Word Document
In the new versions of Microsoft Office, you can follow the steps below to remove personal information and other hidden data attached to a Microsoft Word Document.
1. Open the Microsoft Word Document that you want to remove hidden information from.
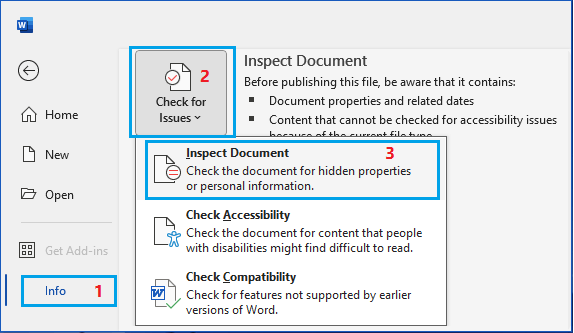
2. Click on the File tab in top-menu bar > Info > Check For Issues and select Inspect Document option.
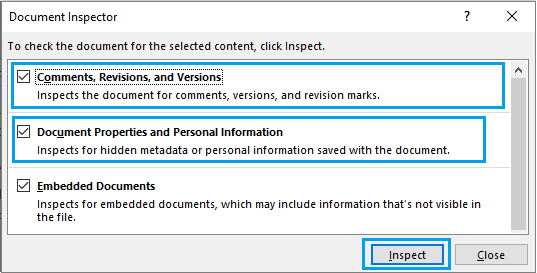
3. On the Document Inspector screen, select the type of information that you want to inspect and click on the Inspect Button.
4. Once the Document is inspector screen, click on the Remove All button, located next to the type of information that you want to remove from the Document.
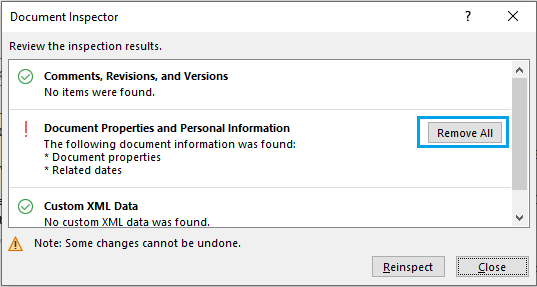
As you can see from the above image, you won’t be able to recover the deleted information. Hence, it is a good idea to make a backup copy of the file, before clearing the metadata from the Microsoft Word Document.
2. Remove Hidden Information From Microsoft Excel File
In the case of Microsoft Excel, the steps to remove personal and other hidden information is practically the same as provided above for Microsoft Word documents.
1. Open the Microsoft Excel File that you want to remove hidden information from.
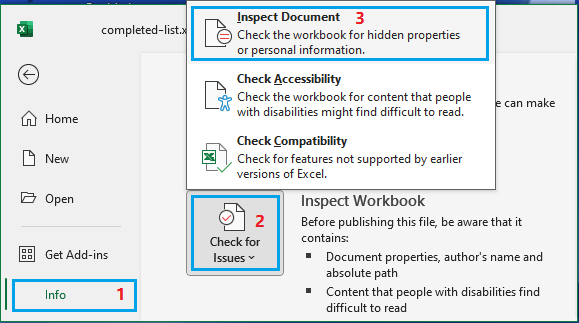
2. Click on the File tab in top-menu bar > Info > Check For Issues and select Inspect Document option.
3. On the Document Inspector screen, select the type of information that you want to inspect and click on the Inspect Button.
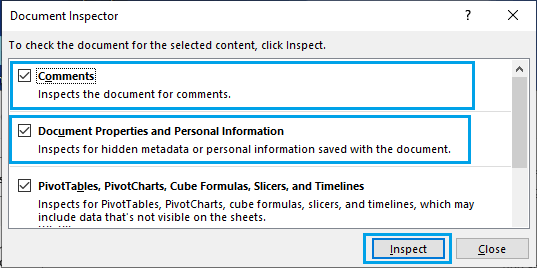
4. On the Document is inspected, click on the Remove All button, located next to the type of information that you want to remove from the Document.
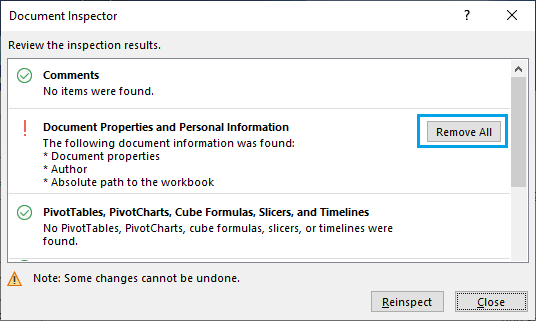
As you can see from above image, you won’t be able to recover the deleted information. Hence, you may want to make a backup copy of the file, before clearing the metadata from the Excel file.
Situations Where Hidden Data Attached to Microsoft Office Files May Cause Problems
In other situations, there are privacy concerns with the way Microsoft Office attaches Metadata and personal information to the documents.
1. You may register an anonymous complaint only to discover that your name and details were accessible through files hidden metadata.
2. You may upload a document to website, hoping to remain anonymous. However, unknown to you the document had enough information about you in the files hidden metadata.
3. There may be document headers, footers, watermarks and hidden text linked to your documents. These may convey sensitive information, trade secrets and other information which you may not want to reveal to others.
4. You or other people that worked on creating a document may have made certain comments/remarks that may not be appropriate to be sent to a client.
Hence, it is a good practice to remove personal information and hidden metadata from Microsoft Word documents and Microsoft Excel Files, before sending them to a client.
Stop Microsoft Office from Attaching Information to Files
1. Click on the File tab in top-menu bar > click on Options and select the Trust Center category.
2. On the next screen, click on Privacy Options and select Remove personal information from file properties on save option.
Note: If you do not find ‘Remove Personal Information ….’ option, click on Document Inspector button and allow the Document Inspector to remove all the hidden information attached to the document.
After this, save the file and try to access the Trust Center privacy options once again. This time the option should be available and you should be able to select ‘Remove personal information…’ option.
You need to be aware that this setting is limited to the current file only and does not apply to other files that you may have created prior to making this change or will be creating in future.