Similar to Windows computers, Chromebooks can automatically detect most wireless printers and also detect USB Printers, as soon as they are connected to the Chromebook.
Even if a certain brand of wireless printer is not detected by Chromebook, it can be manually added to Chromebook using steps as provided below in this guide.
Add USB & Wireless Printer to Chromebook
Adding Printer to Chromebook is just as easy as adding a Printer to Windows computer or MacBook. You can find below the steps to Add both Wireless and USB Printers to Chromebook
1. Automatically Add Wireless Printer to Chromebook
All that is required to connect a wireless printer to Chromebook is to switch ON the printer and allow the computer to automatically detect the printer.
1. Switch ON the Printer and make sure that both Printer and Chromebook are connected to the same WiFi Network.
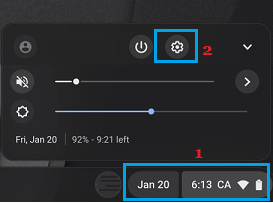
2. After this, click on the Clock Icon located at bottom-right corner on your Chromebook and then click on the Settings Icon in the menu that appears.
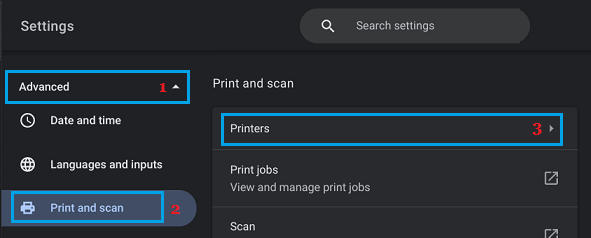
3. On the Settings screen, click on Advanced > Print and scan and then click on Printers tab in the right-pane.
4. On the next screen, you should find your Printer under “Available Printers” section. Click on the Save option next to the Printer.
When the Printer is saved it becomes the default Printer on your Chromebook.
2. Manually Add Wireless Printer to Chromebook
If the Printer is not automatically detected by Chromebook, you can manually add the Printer to Chromebook by following the steps below.
1. Switch ON the Printer and print a Network Configuration page (See the Manual for instructions). On this page, you will be able to see the IP Address of your Printer.
2. Make sure both Printer and Chromebook are connected to the same WiFi Network.
3. After this, click on the Clock Icon located at bottom-right corner on your Chromebook and then click on the Settings Icon in the menu that appears.
4. On the Settings screen, click on Advanced > Print and scan and then click on Printers tab in the right-pane.
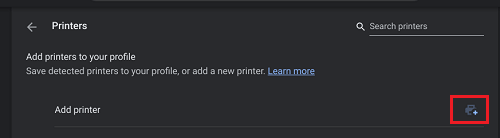
5. On the next screen, click on the + icon next to Add Printer entry.
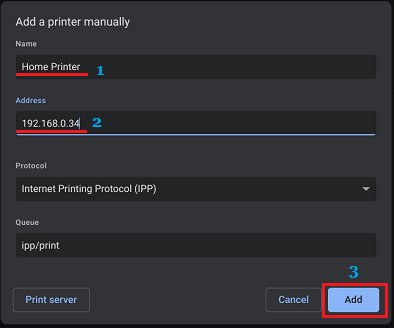
6. On Add Printer screen, type a Name for your Printer, enter Printer IP Address and click on the Add button.
7. Follow the instructions to Save the Printer to your Chromebook.
3. Add USB Printer to Chromebook
All that is required to connect a USB printer to Chromebook is to switch ON the printer and allow the computer to automatically detect the printer.
1. Switch ON the Printer and make sure that both Printer and Chromebook are connected to the same WiFi Network.
2. After this, click on the Clock Icon located at bottom-right corner on your Chromebook and then click on the Settings Icon in the menu that appears.
3. On the Settings screen, click on Advanced > Print and scan and then click on Printers tab in the right-pane.
4. On the next screen, you should find your Printer under “Available Printers” section. Click on the Save option next to the Printer.
When the Printer is saved it becomes the default Printer on your Chromebook.