It is a really good idea to insert Watermarks in Microsoft Word documents, in order to convey the progress status of the document or other information as required.

Add Watermark in Word Documents
As mentioned above, watermarks are mostly used to convey or highlight information about the status of a document.
By inserting a Watermark, you can inform people whether the document is a Draft, Final copy, Confidential, Copyrighted and other such information.
Watermarks can also be used to insert Company Logo, Business Tagline or to add pictures of the most popular product made or marketed by the Company.
The steps to add Watermark in Word documents vary a bit depending on the version of Microsoft Word that you are using on your PC or Mac.
Add Watermark in Microsoft Word 2013 and 2016
Follow the steps below to Add Watermark in Word 2016 and 2013.
1. Open the Microsoft Word document in which you want to place the Watermark.
2. Next, click on the Design tab in top-menu bar and then click on the Watermark option.

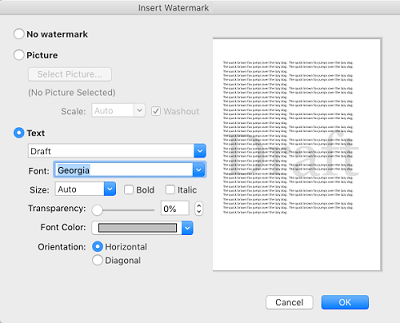
3. In the Insert Watermark Window that appears, you will see the options to add Picture or Text based Watermark to your document.

If you select picture, you can click on Select Picture button which allows you to select a picture from your computer.
If you select Text, you can type Draft, Confidential or anything else that you want to appear as Watermark. You can also, choose the font, size, font colour, transparency and orientation of the Watermark.
Once you have made the selection, click on OK to add the Watermark to your Microsoft Word document.
Add Watermark in Microsoft Word 2007 and 2010
Follow the steps below to Add Watermark in Microsoft Word 2007 and 2010.
1. Open the Microsoft Word document in which you want to add a Watermark.
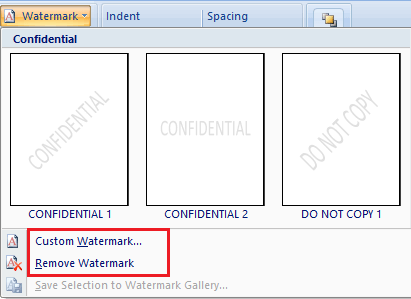
2. Next, click on the Page Layout tab and then click on Watermark option.

3. In the drop-down window, click on the Watermark type that you want to add to your Microsoft Word document. In case you want to create your own Watermark, click on Custom Watermark… option.

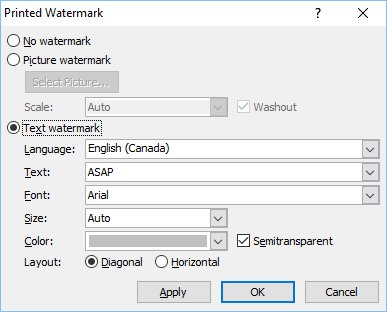
On the next Window, select either the Picture Watermark or Text Watermark option.

To add Picture Watermark, click on Select Picture button and find the picture that you want to use as a Watermark, then click OK.
To Add Text Watermark, type the Text that you want to appear in Watermark (Say Draft, Confidential), select the font, size, and color of the text Watermark and click on OK to add the custom text Watermark to your document.