The Audio Service Not Responding error message in Windows 11/10 is generated by Windows Audio Troubleshooter, which automatically starts running whenever Windows is unable to interact with Audio Devices on the computer.
There could be various reasons for “Audio services not responding” error on a Windows computer, ranging from the Audio Driver becoming outdated or corrupted to the issue of Windows Audio Service not starting.
This error can also be caused due to Faulty Windows update and corruption of system components that are required for proper functioning of Audio Service.
Audio Services Not Responding Error in Windows 11/10
If your Windows 10/11 computer is coming up with “Audio Services Not Responding” error, you should be able to fix the problem using the follow troubleshooting steps.
1. Troubleshoot Sound Problems
Start by using the built-in Sound Troubleshooter to find and fix Sound Problems on your computer.
1. Right-click on the Speaker Icon in the Taskbar and click on Troubleshoot Sound Problems option.
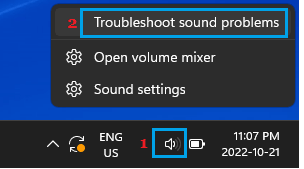
2. On the next screen, select the applicable method to fix Sound problems on your computer.
2. Update Audio/Sound Drivers
1. Right-click on the Start button and click on Device Manager.
2. On Device Manager screen, expand Sound, Video and Game Controllers entry > right-click on the Audio Device and click on Update driver option.
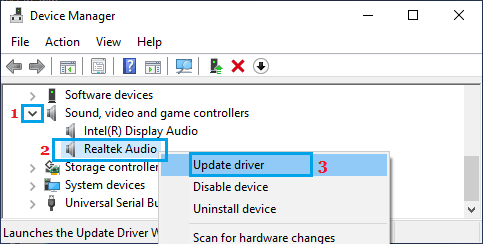
3. On the next screen, click on Search Automatically For Driver Software option and follow the instructions to install driver software.
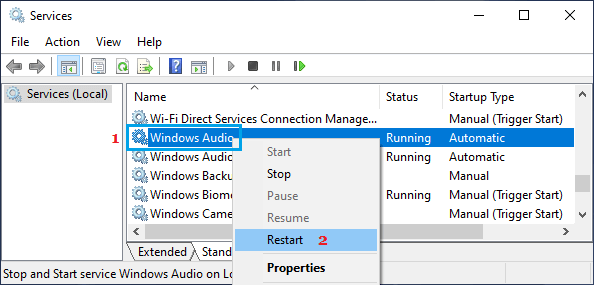
3. Restart Windows Audio Service
Windows Audio Service can sometimes become unresponsive or get disabled on a Windows computer.
1. Press Windows + R keys to open Run Command on your computer.
2. Type services.msc in the Run Command window and click on OK.

3. On the Services screen, right-click on Windows Audio entry and select the Restart option.
On the same screen, make sure Windows Audio Endpoint Builder, RPC EndPoint Mapper, Remote Procedure Call (RPC) and DCOM Service Process Launcher are running and the “Startup Type” for these services is set to Automatic.
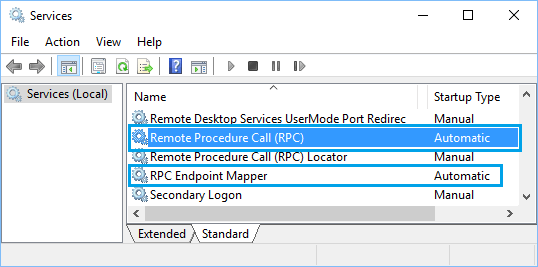
If the Startup Type is not set to Automatic, right-click on the Audio Service > click on Properties. On the next screen, set “Startup type” to Automatic and click on OK.
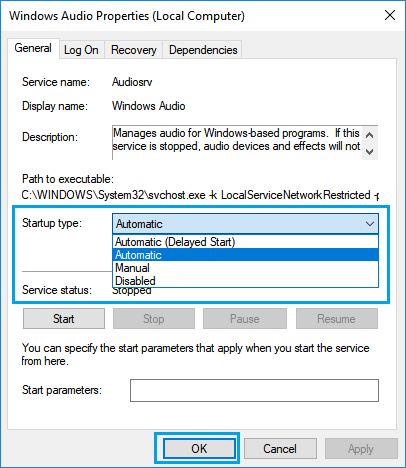
Once you are done, restart the Computer to implement above changes.
4. Reinstall Audio Drivers
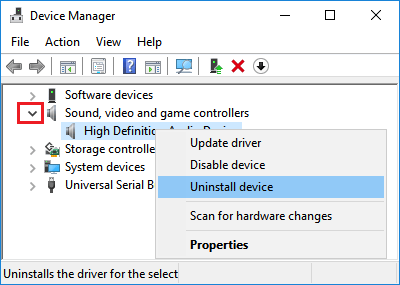
1. Right-click on the Start button and select Device Manager.
2. On Device Manager screen, expand Sound, Video and Game Controllers entry > right-click on the Audio device and click on Uninstall device option.
3. Next, click on Action tab in top-menu bar and select Scan for hardware changes option in the drop-down menu.
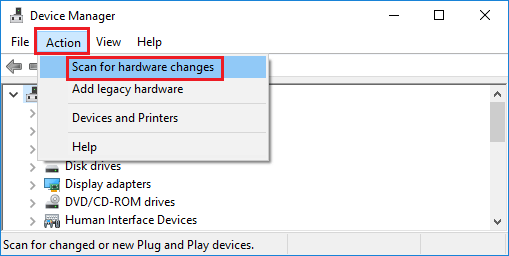
Restart your computer and it should automatically install the right drivers.
5. Uninstall Windows Update
If the problem has started after a Windows update, you should be able to fix the problem by uninstalling the update on your computer.
In this regard, you can refer to this guide: How to Uninstall Updates in Windows 11.
6. Disable Audio Enhancements
If above methods did not help, Disable Audio Enhancements on your computer and see if this helps in fixing the problem.
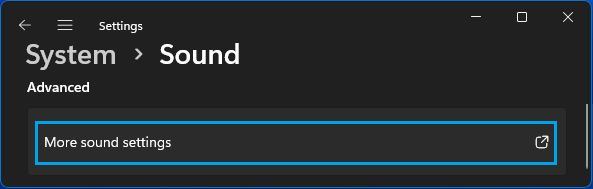
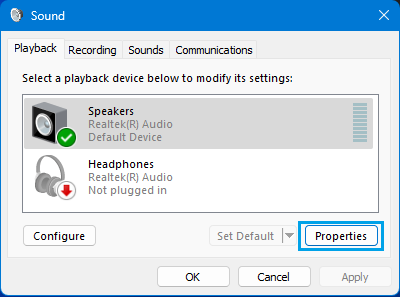
1. Go to Settings > System > Sound > scroll down and click on More Sound Settings.
2. On the pop-up, select your Sound Device and click on Properties.
3. On the next pop-up, switch to Advanced tab and uncheck Enable Audio Enhancements option.
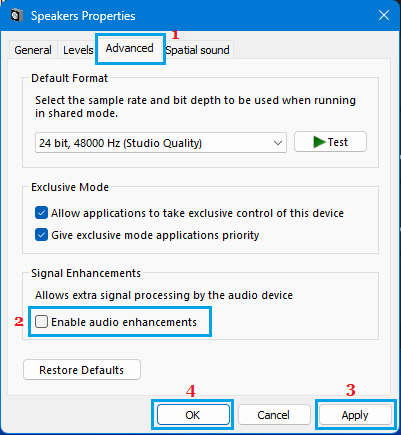
4. Click on Apply and OK to save this change on your computer.
After disabling Audio Enhancements, restart the computer and this should hopefully fix the sound problem on your computer.