The “File History” Backup feature is available in Windows 11 as a legacy tool and it can be used to automatically Backup All or selected Folders/Files from the computer to an External Storage Drive.
The default option in “File History” is to back up all the main Folders located on a User Account, which includes the Desktop, Documents, Pictures, Music, Videos and also the locally stored OneDrive files.
In addition to backing up the main User Folders, File History monitors these Folders for changes and automatically backs up any New File that you create or modify on the computer.
Backup Files Using File History in Windows 11/10
In order to backup Files using File History, the first step is to get hold of a USB Drive or an External storage drive, in which the File History Backups of your selected Files/Folders can be stored.
The attached USB/External storage drive needs to be formatted to Windows compatible NTFC format and it should have sufficient capacity to store the backup of all your files.
Once the storage drive is ready, you can follow the steps to Enable File History backup of the default or selected Files/Folders on your computer.
1. Backup Files Using File History
Attach the USB/External storage drive to the computer and follow the steps below to enable File History Backup on your computer.
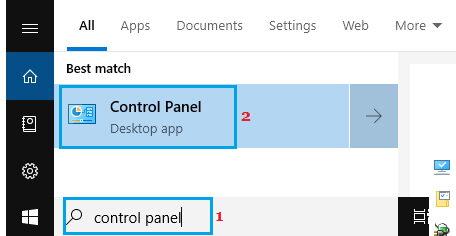
1. Type Control Panel in the Search box > click on Control Panel in the search results.
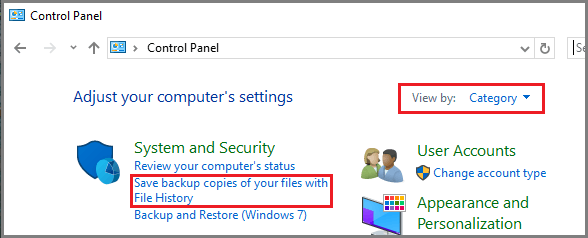
2. On the Control Panel screen, switch to Category view and click on Save backup copies of your files with File History link, located under “System and Security” section.
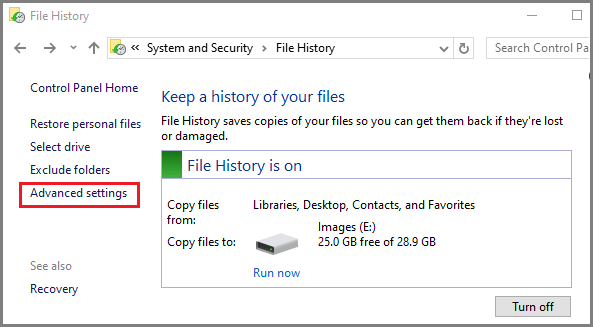
3. On the next screen, wait for the USB/Storage Drive to appear and click on the Turn on button.
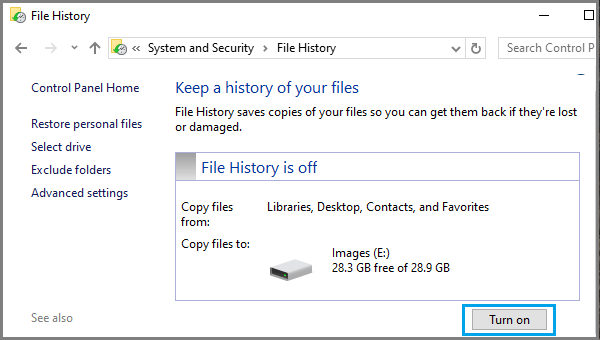
After this, Windows will automatically start backing up all the files located in the Default or selected Folders to the attached USB Drive or the External Storage Drive on an hourly basis (default setting).
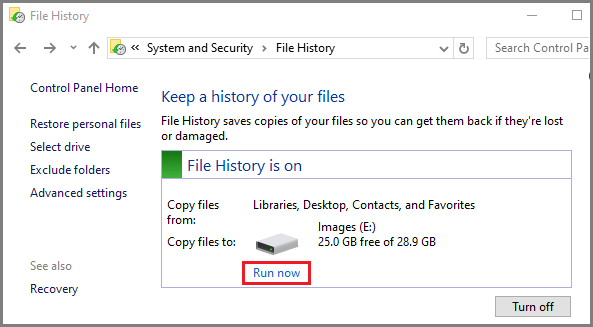
You can also manually backup files using File History at any time on your computer by clicking on Run Now option, which becomes available when the initial File History backup process is stopped or allowed to complete.
2. Change File History Backup Time
The default File History Setting is to backup Files on an hourly basis and keep the Backups stored Forever on the selected Backup Drive.
However, you can always change the File History Backup time and select a different Backup save option by going to Advanced Settings in File History.
1. Click on Advanced Settings Link.
2. On the next screen, you can select from 10, 15, 20, 30 minutes, 1, 3, 6, 12 hours or Once per day.
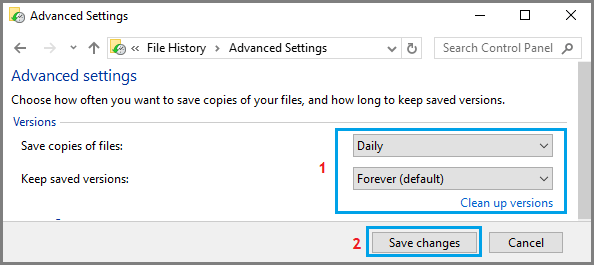
On the same screen, you can select the option to keep File History Backups for 1, 3, 6, 9 months, 1, 2 years or Until Space is Needed or Keep them Forever (default setting).
If you select Until Space is Needed, the File History tool will be automatically deleting older Backups to create space for new Backups.
3. What Folders are Included in File History Backup?
The default setting in Windows is to back up all the main folders located in the User Account. This includes, Desktop, Documents, Downloads, Music, Pictures and Video folders.
In addition to above, OneDrive Folder and Roaming Folders on your computer that store application data will also be included in a typical File History Backup.
4. How to Remove Folders from File History Backup?
As mentioned above, the default setting in Windows is to automatically select Desktop, Documents, Downloads, Music, Pictures, Video, OneDrive and Roaming App Data Folders for backup.
However, you can remove any files/folders from File History Backup by selecting the “Exclude Folders” option and selecting the Files/Folders to exclude on the next screen.
1. Click on Exclude Folders link.

2. On the next screen, click on Add button > select the Folder that you want to exclude and click on Save Changes button.
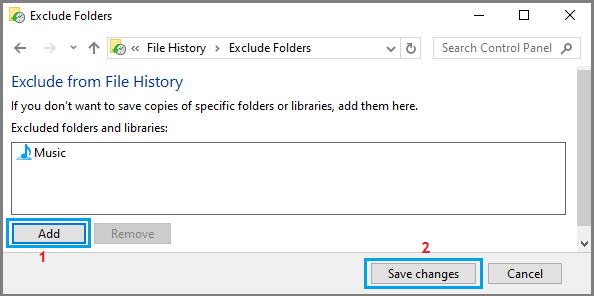
Similarly, you can select other Folders and exclude them from the File History Backups on your computer.
5. Stop File History Backups and Change Backup Drive
At any time, you can stop File History Backups on your computer by clicking on the Turn off button.
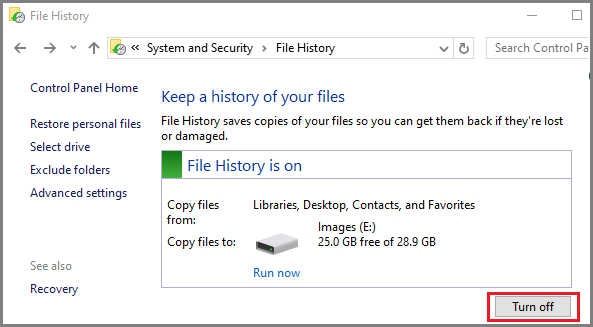
This stops your computer from backing up files to the selected backup drive and also disables File History Backups on your computer.