If you are wondering as to why you Can’t Delete Certain Photos from iPhone, you can find below the steps to remove such photos from your iPhone.

Why Can’t You Delete Photos on iPhone?
In addition to showing Photos stored on the internal storage of your iPhone, the Photos App can also bring up Photos from your iCloud Account.
This happens, when iCloud Photos feature is enabled on your device, which results in Photos from your older and other devices showing up in the Photos App.
Since, iCloud Photos exist on Apple’s iCloud servers and not on the physical storage of your device, they cannot be deleted from iPhone.
Apart from this, Photos synced or transferred to iPhone from Mac using the Finder or from Windows PC using iTunes cannot be deleted, as they do not have a delete button or delete option associated with them.
Which Photos Can Deleted on iPhone?
Photos that you shoot using the front Camera on iPhone and selfies that you take using the rear camera can be deleted, as they are stored on the internal storage of your device.
Similarly, Photos recieved via AirDrop and downloaded to iPhone from Messages, WhatsApp, Email Messages and other Apps are actually stored on the physical storage of your device and these Photos can be deleted.
How to Remove iCloud Photos from iPhone?
While iCloud Photos cannot be deleted, you can easily get rid of iCloud Photos from your device by disabling iCloud Photos on your iPhone.
1. Open Settings > tap on your Apple ID Name.
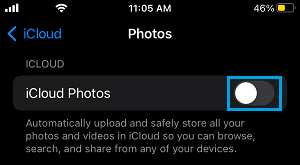
2. From Apple ID screen, go to iCloud > Photos > move the toggle next to iCloud Photos to OFF position.

3. On the confirmation pop-up, select Remove from iPhone option to remove all iCloud Photos from your device.
Note: Removed Photos will still be available in your iCloud Account and they can be easily downloaded to your Mac or Windows computer.
2. Remove Photos Synced from other Devices on iPhone
If turning OFF iCloud Photos did not fix the problem, it is likely that you have photos synced from Mac or Windows PC on your device.
The only way to remove Synced Photos on iPhone is to connect your device to the same Mac or PC from which the Photos originally came from.
2.1. Remove Photos Synced from Mac on iPhone
If you are using a Mac, follow the steps below to remove Photos Synced from your Mac to iPhone.
1. Plug iPhone to the Mac from which the photos originated.
2. Open the Finder on your Mac.
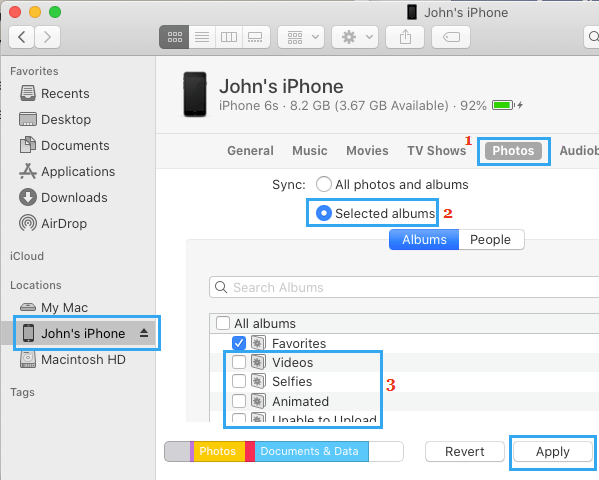
3. Select your iPhone in the left pane. In the right pane, switch to Photos (1) tab > check Selected Albums (2) and Uncheck Photo Albums (3) that you want to remove from iPhone.

4. Once you are done Unchecking Photo Albums, click on the Apply button.
5. Wait for above changes to Sync back to your iPhone.
Once the syncing process is completed, all Photos that came to your device from Mac will be removed.
2.2. Remove Photos Synced from Windows PC on iPhone
In the case of Windows computer, the interface is a bit different, but the steps are practically the same.
1. Plug iPhone to Windows Computer.
2. Open iTunes and click on the Phone icon as it appears in iTunes.
![]()
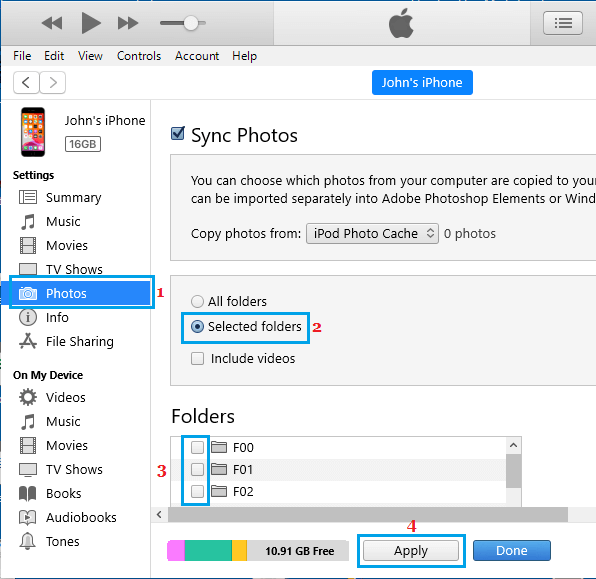
3. Next, select Photos (1) in the left-pane. In the right-pane, check Selected folders (2) and Uncheck Photo Albums (3) that you want to remove from iPhone.

4. Once you are done Unchecking Photo Albums, click on the Apply button.
5. Wait for above changes to Sync back to your iPhone.
Once the Syncing Process is completed, all Photos that were Synced from Windows PC on your device will be removed.