The most common method to bulk transfer Photos from iPhone to Mac is to simply plug your device to Mac and use the Import feature as available in the Photos App on your Mac.
In addition to Photos App, there are other tools like Image Capture and Preview App that can be used to Transfer All Photos from iPhone to Mac.
Transfer Photos from iPhone to Mac
If you are looking for a way to backup or offload Photos from iPhone to computer, you can find below 3 different ways to Transfer Photos from iPhone to Mac.
1. Transfer Photos from iPhone to Mac Using Photos App
The easiest way to transfer Photos from iPhone to Mac is by using the Photos App.
1. Plug your iPhone to Mac and open the Photos App on your Mac (if it is not already open).
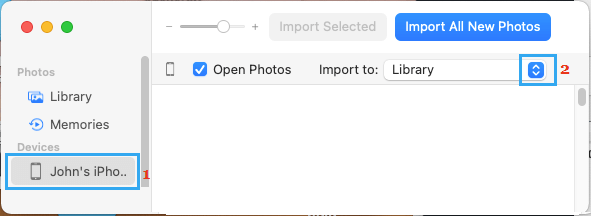
2. Once you are in the Photos App, select your iPhone under “Devices” section and click on the Down Arrow next to “Import to” entry.
Note: You can launch Photos App from LaunchPad and from the Applications Folder.
3. On the pop-up, click on New Album > type a Name for the New Photo Album and click on Create.
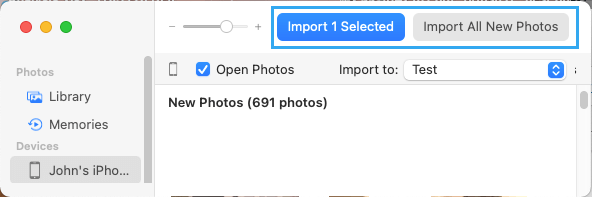
4. On the next screen, click Import All to import All Photos from iPhone to Mac. The other option is to manually select your desired photos and click on Import Selected option.
5. Wait for Photos to be transferred from iPhone to the New Photo Album on your Mac (Desktop).
2. Import Photos from iPhone to Mac Using Image Capture
Another way to Import iPhone Photos to Mac is by using the Image Capture Utility as available on your Mac.
1. Connect iPhone to Mac.
2. Open the Image Capture utility on your Mac using LaunchPad or from Applications Folder.
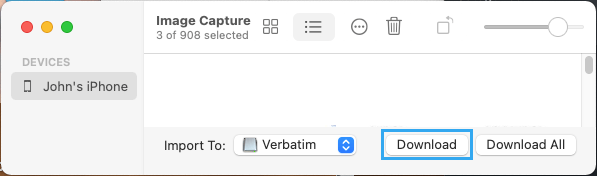
3. Once you are on Image Capture, select your iPhone under “Devices” section > click on the Down Arrow next to “Import To” and select the Location (Desktop, Downloads, etc.) for imported Photos on your Mac.

Note: By default, Image Capture Transfers Photos to the Pictures Folder on your Mac.
4. After selecting Location, click on Download All button to Import all Photos from iPhone to Mac.

The transferred iPhone Photos will be available on your Mac in a Folder named after your iPhone.
Note: If you do not want to transfer all Photos, select Photos manually and click on the Download button.
The selected Photos will be available in a Folder Named after your iPhone on the Desktop.
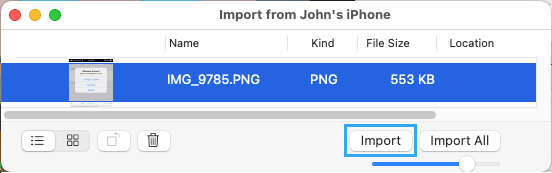
3. Import Photos from iPhone to Mac Using Preview App
The native Preview App on Mac can be used to import photos from iPhone to Mac.
1. Connect iPhone to Mac > enter the Passcode to unlock your iPhone.
2. Open the Preview App on your Mac using LauchPad.
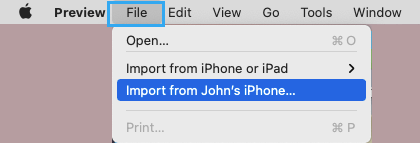
3. Click on the File tab located in the top-menu bar on your Mac and select Import from your iPhone option.
4. If you see “Photos cannot be imported…” pop-up, click on OK to close the pop-up.
5. On the next screen, click on the Edit tab in top-menu bar and select the Select All option in the drop-down menu.

Tip: You can use Command + I shortcut to unselect All Photos.
6. Once all the Photos are selected, click on the Import button.
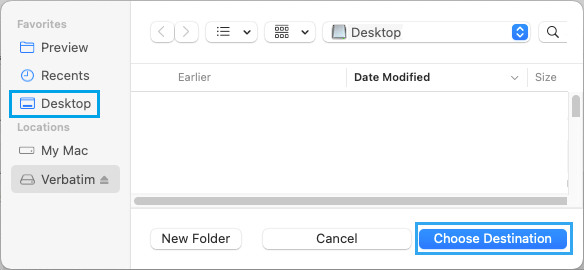
7. On the next screen, select the Location where you want to save the imported Photos on your Mac and click on Choose Destination.
Wait for the selected Photos to be transferred from iPhone to Mac.