As you may agree, the easiest way to free up the storage space on iPhone is to delete photos, which usually take up the most amount of storage space.
However, going through hundreds of photos and manually deleting them from iPhone can be a frustratingly slow process. Hence, we are providing below two different methods to select multiple photos on iPhone and bulk delete them from your mobile device.
Delete All Photos on iPhone
If you are actively using iCloud Photos, it is likely that a copy or backup of photos that you want to remove from iPhone is already available in your iCloud Account (please confirm).
If you are not using iCloud Photos or if your iCloud Account is lacking in storage space, you can transfer photos from iPhone to an external storage drive or transfer them to your MacBook and delete all the photos from your mobile device.
1. Select and Delete All Photos from iPhone
As you must have noticed, there is no ‘Select All’ or ‘Delete All’ option in the Photos App on iPhone; which leaves users guessing about how to select and delete All Photos at once from iPhone.
However, you can make use of a workaround as provided below to select and bulk delete photos from your iPhone.
1. Open the Photos App on your iPhone > tap on the Library tab in the bottom-menu.

2. Once you are in the Library, tap on the Select option located at top-right corner of the screen.

3. Next, scroll down to end of the Library screen and drag your finger from the Last Photo towards the diagonal opposite edge of the screen (as shown in the image below).
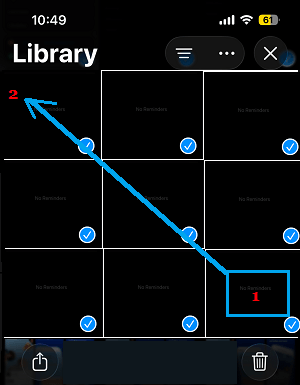
Keep your finger pressed at the diagonal edge of the screen, as the screen keeps scrolling up and more photos continue to be selected.
If this action is performed correctly, you will see multiple photos being continuously selected and check mark appearing against the selected photos.
Continue to hold your finger at the diagonal upper edge of the screen, until all the photos are selected.
4. Once all the photos are selected, tap on the Trash can icon located in the bottom menu.
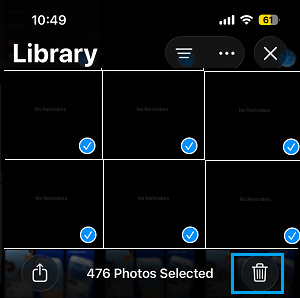
5. On the confirmation pop-up, tap on the Delete option to delete all the selected photos from your iPhone.
Note: Your iPhone may appear as stuck, if you select and delete more than 1,000 photos. Give your device enough time to delete the photos.
2. Permanently Delete All Photos from iPhone
Although, you have selected and deleted all photos from iPhone, the deleted photos will still be available on your iPhone in “Recently Deleted” Folder; where they continue to occupy storage space, until they are automatically deleted by the system.
Hence, you also need to to delete photos from “Recently Deleted” Album, in order to free up storage space occupied by the deleted photos on your iPhone.
1. Open Photos app > tap on Collections tab in located in the bottom menu.

2. On the Collections screen, scroll down to “Utilities” section open Recently Deleted Folder.
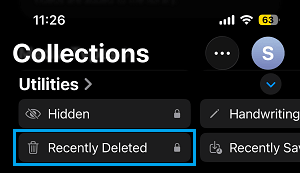
3. In the Recently Deleted Folder, tap on the Select option (top-right).

4. Next, tap on 3-dots Icon that appears and select the Delete All option.

5. On the Confirmation pop-up, tap on Delete to permanently delete All Photos from iPhone.
3. Bulk Delete All Photos from iPhone Using Image Capture
An easy way of backing up iPhone photos to Mac and bulk deleting all the photos on iPhone is by using the “Image Capture” utility as available on a MacBook.
For the steps to transfer photos from iPhone to Mac using Image capture you can refer to this guide: How to Transfer Photos from iPhone to Mac. After the photos are transferred to Mac, you can safely delete all the photos from your iPhone by using these steps.
1. Plug iPhone to your MacBook.
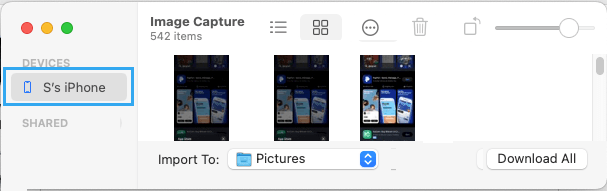
2. Go to Finder > Applications > open Image Capture App by double-clicking on it.
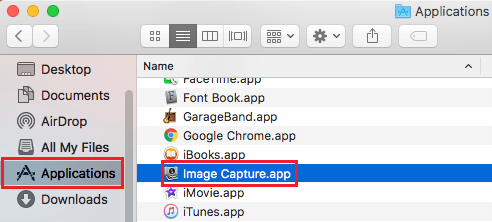
3. On the Image Capture screen, select your iPhone in the left-pane (if it is not already selected) and this will display all iPhone photos in the right-pane.
4. Press Command + A keys on the keyboard of your Mac and this will select all the photos that are stored on the local storage of your iPhone.
5. After all the photos are selected, click on the Delete Icon to remove all the photos from your iPhone.
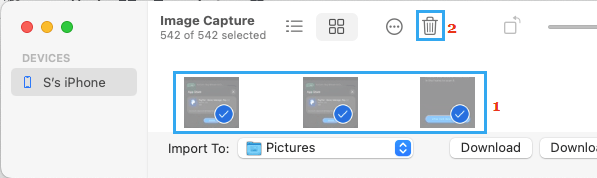
Note: If iCloud Photos is enabled on iPhone, the delete button will be missing or greyed out. In such cases, you will have make use of the Photos App to delete photos from iPhone.
6. On the confirmation pop-up, click on Delete to confirm.
After deleting photos using Image capture, you will have to permanently delete from iPhone by going to the Recently Deleted Photo Album; using the second method as provided above in this guide.