The “Driver Signature Enforcement” is a security feature in Windows; which prevents device drivers from being installed on the computer, unless they are digitally verified by Microsoft.
This results in Windows coming up with “Windows requires a Digitally Signed Driver” message, even if the driver that you are trying to install on the computer is from a legitimate source; but has not yet been digitally signed by Microsoft.
In such cases, the only way to install third-party drivers on the computer is by disabling or turning off the “Driver Signature Enforcement” feature.
Related: Location of Driver Files in Windows 11/10.
Disable Driver Signature Enforcement in Windows 11
While it is not uncommon for gamers, software developers and Advanced users to Disable Driver Signature feature, you need to be aware that disabling this feature increases the risk of installing unstable, malicious and older drivers on the computer.
Hence, you should think in terms of disabling this security feature on your computer, only if the unsigned driver that you want to install is from a reputable source.
If your computer is blocking the installation of device driver from a reputable third-party source, you can disable the “Driver Signature Enforcement” feature on your computer by using any of the following methods.
- Using Settings
- Using Recovery Mode
- Using Command Prompt
Once “Driver Signature Enforcement” is disabled, you will be able to install the third-party unsigned driver on your computer.
1. Disable Driver Signature Enforcement Using Settings
A strait forward way to disable the Drive Signature Enforcement on a Windows computer is by using the Settings App.
1. Press Win + I keys to open the Settings menu on your computer.
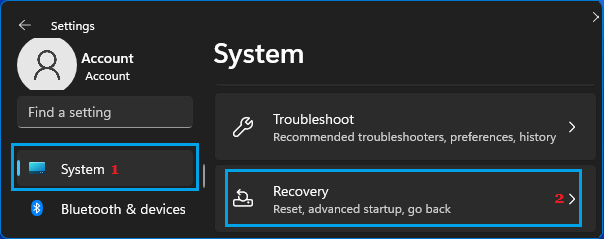
2. On the Settings screen, select System in the left-pane and click on Recovery in the right-pane.
3. On the Recovery screen, scroll down to “Recovery Options” and click on the Restart Now button located next to Advanced startup.
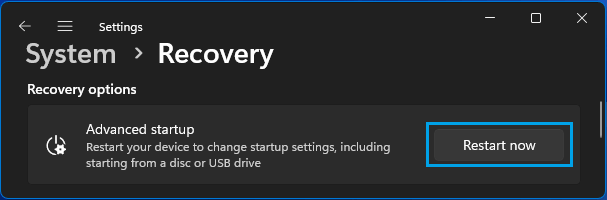
4. On the confirmation pop-up, click on Restart Now to confirm.
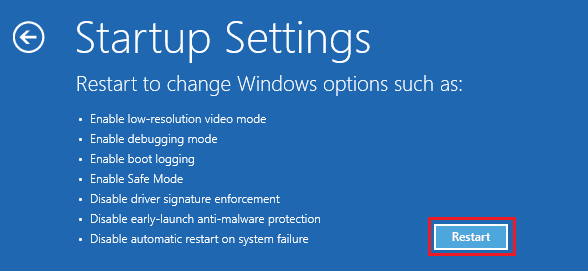
5. After the computer restarts, go to Troubleshoot > Advanced Options > Startup Settings and click on the Restart button.
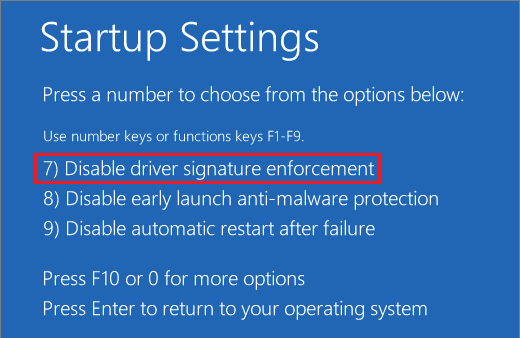
6. After the computer restarts, press F7 or 7 key to disable Driver Signature Enforcement.
7. After the computer restarts, you should be able to install unsigned drivers.
2. Disable “Driver Signature Enforcement” Using Recovery Mode
Another way to disable “Driver Signature Enforcement” is by making the computer to start in Recovery Mode.
1. Click on Start button > Power icon > press and hold the Shift key and click on Restart.
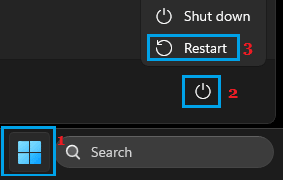
2. Wait for the computer to start in Recovery Mode.
3. From the Recovery Mode screen, go to Troubleshoot > Advanced Options > Startup Settings and click on the Restart button.
4. On the next screen, press F7 key to disable “Driver Signature Enforcement” on your computer.
5. After the computer restarts, you should be able to install unsigned drivers on your computer.
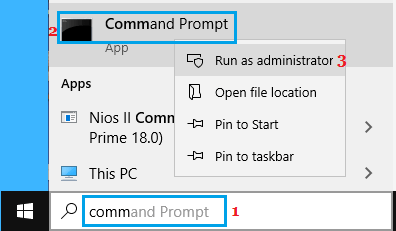
3. Disable “Driver Signature Enforcement” Using Command Prompt
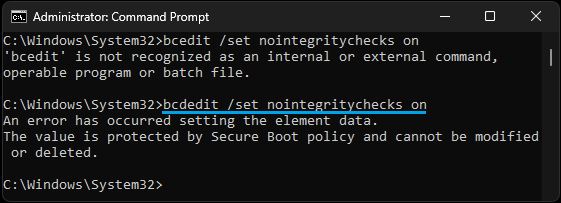
Note: If Secure Boot is required, you can re-enable it by going to the BIOS settings on your computer.