While the default option in Windows is to display time in 12-hour format, it also provides the option to change the display on the computer’s clock to 24-hour time format.
When the computer is left to its default 12-hour time format, you will find it displaying time in Day/Night or AM/PM segments, which suits most users and industries that follow this time format.
However, if you are working in Travel Industry, Airport, Sea Port, Railways, Military, Navy, Public Safety or Public Transport, you can switch the computer to display time in 24-hour time format.
Change 24 Hour Clock to 12 Hour in Windows 11/10
If for some reason, your computer is showing time in 24-hour format, you can find below the steps to switch the computer from 24-hour to 12-Hour Time Format.
You can also find below the steps to switch the computer from 12-hour to 24-hour time format, which can be useful in tracking flight times, which are always reported in 24-hour time format.
1. Change 24-Hour Clock to 12-Hour Time Format
You can follow the steps below to change the clock on your computer from 24-hour to 12-hour time format.
1. Press Win + I keys to open the Settings menu on your computer.
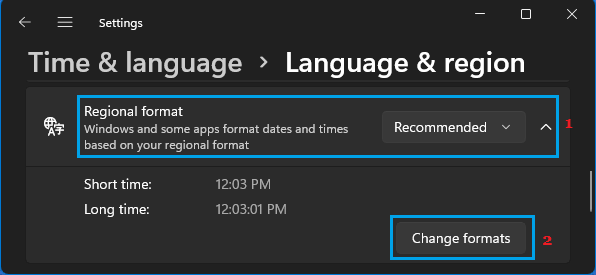
2. On the Settings screen, select Time and Language in the left-pane and click on the Language & Region card in the right-pane.

3. Scroll down in the right-pane, click on Regional Format and then click on Change Formats button in the drop-down.
4. On the next screen, use the Down-Arrow to select time with AM/PM suffix for both Long Time and Short Time.
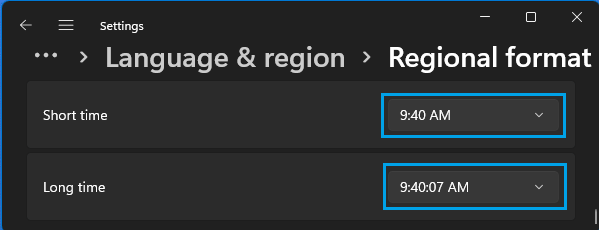
The change in the time format will be immediate and you should find the computer displaying the time in 12-hour format, with the regular AM/PM Suffix.
![]()
2. Change 12-Hour Clock to 24-Hour Time Format
If required, you can switch the computer from its default 12-hour time format to 24-hour time format using the following steps.
1. Click on Start button > Settings Icon.
2. On the next screen, select Time and Language in the left-pane and click on Language & Region tab in the right-pane.
3. On the next screen, expand Regional Format tab and click on the Change Formats button.
4. On the next screen, use the Down-Arrow to select time without AM/PM suffix for both Long Time and Short Time.
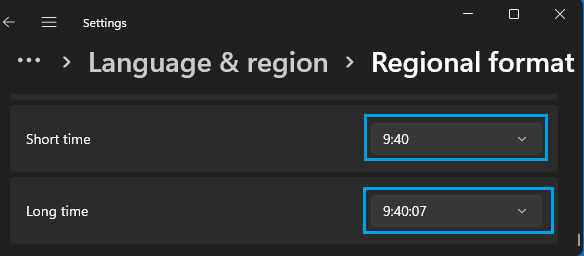
The change in the time format will be immediate and you should find the computer displaying time in 24-Hour format, without the usual AM/PM Suffix.
3. Change Time Format Using Control Panel
You can also change the Time Format on a Windows computer using the Control Panel.
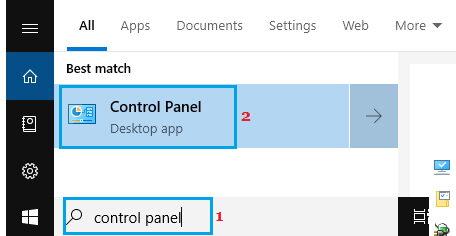
1. Type Control Panel in the search bar and click on Control Panel App in the Search results.
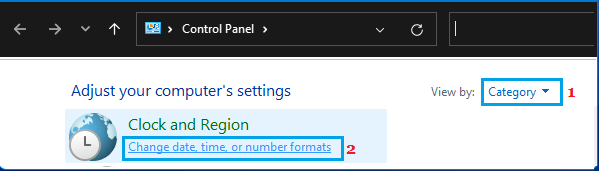
2. On Control Panel screen, switch to Category view and click on Change date, time or number formats link.
3. On the next screen, switch to Formats tab and select your desired Time Format (12-Hour or 24-Hour) by using the down arrow in Short Time and Long Time entries.
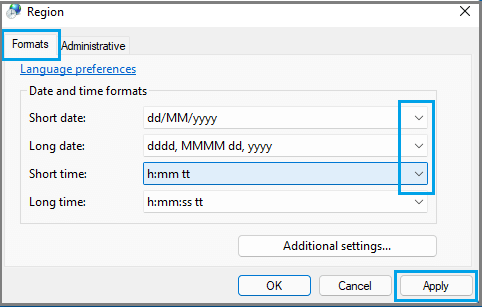
4. To set 12-Hour Time Format, select any entry with AM/PM Suffix in the drop-down. If you want to switch to 24-Hour Time Format, select any entry without AM/PM Suffix.
5. Click on Apply and OK to save this change in Time Display Format on your computer.
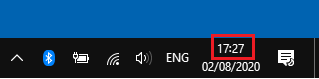
As you can see in above image, the current time on the computer is 17:27 hours, which corresponds to 5:27 PM in 12-hour time format.