• Skip to main content
  • Skip to primary sidebar

Techbout

Technology Simplified.

  • Windows
  • Mac
  • iOS
  • Android
  • Office
Home » Notes » How to Change Default Notes Account on iPhone and iPad

How to Change Default Notes Account on iPhone and iPad

By: Waseem Patwegar

By default, the Notes that you create on iPhone/iPad are stored on iCloud. However, you can easily Change Default Notes Account on iPhone and make the Notes App save all your Notes locally on your own device.

Change Default Notes Account on iPhone and iPad

Change Default Notes Account on iPhone

The Notes App on iPhone and iPad is a handy tool for recording useful information, creating shopping lists, creating task related checklists, collaborating with other people and many other uses.

As mentioned above, your iCloud Account serves as the default Account for Notes App on iOS devices. This means that all the Notes that you create on your iPhone or iPad are automatically uploaded to iCloud and stored in your iCloud Account.

As you can imagine, the main advantage of this setup is that it allows you to access Notes on all devices and allows you to Share Notes and Collaborate with others on Group Projects.

By going with the default setup, it is almost guaranteed that all your Notes will be available on iCloud, even if your device gets misplaced, damaged, stolen or lost.

However, in case you do not like the idea of your Notes being available on iCloud, you can prevent the Notes App from uploading Notes to iCloud by changing the Default Notes Account from iCloud to your own device (iPhone or iPad).

This will make the Notes App keep all your Notes stored locally on the device itself, instead of uploading them to iCloud.

Change Default Notes Account On iPhone

Follow the steps below to change the default Notes Account Location on iPhone or iPad.

1. Open Settings on your iPhone or iPad.

2. On the Settings screen, scroll down and tap on Notes.

Notes App on iPhone Settings Screen3. On the Notes screen, enable the option to store Notes Locally on your device by moving the toggle next to “On My iPhone” Account to ON position. Once this is done, tap on Default Account option located under “Accounts” section (See image below).

Default Account Settings Option For Notes App on iPhone

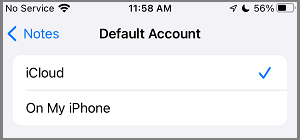
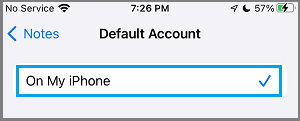
4. On the Default Account screen, tap on On My iPhone option.

Change Default Account for Notes App to On My iPhone

After this all the Notes that you create on your iPhone will be stored locally on your iPhone and not on iCloud. This change also affects how Siri acts on your instructions to create Notes.

For example, if you create a new Note by asking Siri to create a Note, the new Note will now appear locally on your iPhone or iPad, instead of being saved to iCloud.

Related
  • How to Password Protect Notes On iPhone and iPad
  • How to Recover Deleted Notes on iPhone and iPad

You May Also Like
    • What Happens When You Block Phone Number On iPhone
      What Happens When You Block Phone Number On iPhone
      • Factory Reset iPhone
        How to Factory Reset iPhone or iPad
        • Hard Reset iPhone
          How to Hard Reset iPhone (All Models)

Primary Sidebar

Twitter
Facebook


Popular Now

  • How to Reduce Cellular Data Usage on iPhone
  • How to Backup Registry in Windows 11/10
  • How to Check Computer Specs in Windows 10
  • How to Remove Bloatware From Windows 10 PC
  • How to Create Local Account in Windows 11


Gadget Guide

  • Mac vs PC Comparison: Should You Buy Mac or PC
  • Chromebook vs Windows Laptop
  • Kindle E-Reader Comparison | Which Kindle to Buy
  • iPad vs iPad Pro Comparison
  • Advantages of Chromebooks

About | Privacy Policy | Disclosure | Terms | Contact
© Copyright 2022 @Techbout.com · All Rights Reserved