While the default setting in macOS is to connect to internet using the DNS Server of your service provider, it also provides the option to switch or change the DNS Server on Mac to any other DNS Service provider of your choice.
Changing the DNS Servers on Mac to DNS services like Google or OpenDNS can help, if you are experiencing slow browsing speed and network connectivity issues due to the DNS Server of your service provider being busy or over-crowded at certain periods of the day.
Change DNS Servers on Mac
While you can switch to any DNS service provider of your choice, Google, Amazon and OpenDNS are some of the most popular and free DNS providers that you can make use of.
While both Google and Amazon can be trusted to provide a fast and dependable DNS service, OpenDNS provides additional features like content filtering, anti-phishing and child protection controls.
Steps to Change DNS Settings on Mac
You can follow the steps below to change the DNS Servers on your Mac.
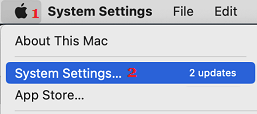
1. Click on Apple Logo in the top-menu bar and select System Settings in the drop-down menu.
2. From the Settings screen, go to Network tab and click on the Lock Icon.
![]()
3. When prompted, enter your Admin Account User Name and Password.
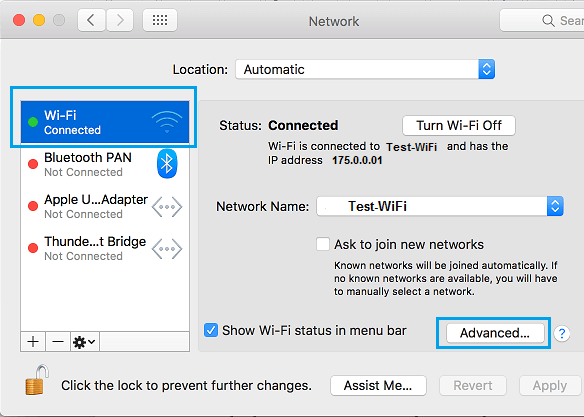
4. Next, select your Wi-Fi Network in the left-pane and click on the Advanced button in the right-pane.
5. On the Wi-Fi screen, go to DNS tab and click on the + Plus button located at bottom-left corner of the DNS Servers box.
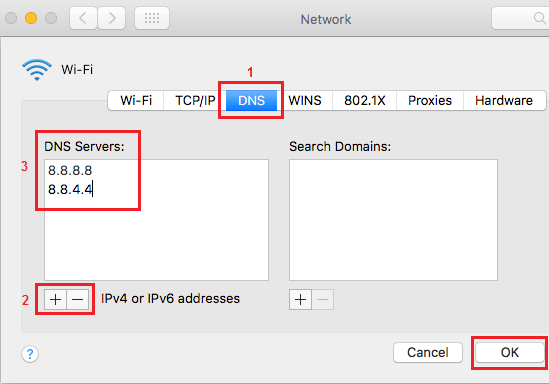
6. If you want to switch to Google, enter 8.8.8.8 and 8.8.4.4 as the DNS Servers and click on OK to save these settings.
Note: If you want to use OpenDNS, enter 208.67.222.222 and 208.67.220.220.
While you can enter as many DNS Servers as you want, macOS prioritizes connection to DNS servers based on the order in which they appear, which means your MacBook will mostly end up using the first listed DNS Address most of the times.