Printing two pages per sheet helps in reducing the size of printed documents, contributes to environment and leads to cost savings by reducing the overall consumption of Ink & Paper. Hence, the default setting in macOS is to enable two-sided printing; if Duplex-printing is supported by the attached printer and the apps being used.
However, it is not uncommon to find the two-sided printing option failing to appear or not being available on a MacBook and it usually happens due to the following reasons.
- Printer Limitations: Duplex Printing may not be supported by the Printer or the Printer may lack the ability to automatically flip the paper.
- Apps being used: While two-sided printing is supported by native macOS apps like Pages and Numbers; it may not be supported or suppressed by third-party apps.
- Manual Settings: Two-sided printing option may get locked or suppressed due to a Print Preset being intentionally or accidentally saved during a previous print-job.
- Driver Fallback: In certain cases, macOS ends up installing a generic driver; which does not support duplex printing or fails to reveal the duplex printing option.
For the purpose of this guide, let us assume that the printer is capable of duplex printing; but two-sided printing is not enabled by default on the printer.
Print Two Pages Per Sheet on Mac
As mentioned above, double-sided printing option may not be automatically enabled on certain printers. Hence, the first step is to make sure that two-sided printing is enabled and manually enable this option; if it has not been automatically enabled by the attached printer.
Once; the two-sided or duplex-printing option is enabled, you should be able to print two-pages per sheet in most supported apps by accessing the Print menu.
Related: Fix: Printer is Offline Error On Mac.
1. Manually Enable Two-Sided Printing on Mac
You can follow the steps below to check and confirm; if two-sided printing has been enabled on the printer attached to the MacBook and manually enable this option; if it has not been enabled.
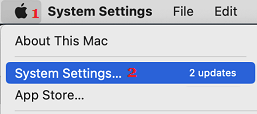
1. Click on Apple Logo in the top-menu bar and select System Settings in the drop-down menu.
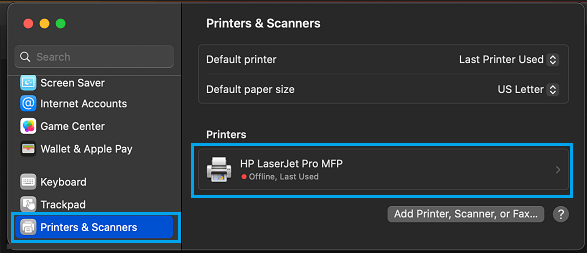
2. On the Settings Screen, select Printers & Scanners in the left-pane and select your Printer in the right-pane.
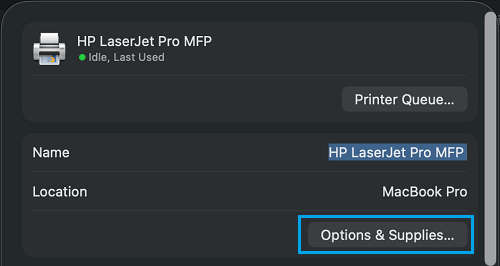
3. On the Printer’s screen, click on Options & Supplies button.
4. On the next screen, go to Options tab and enable the Duplexer option.
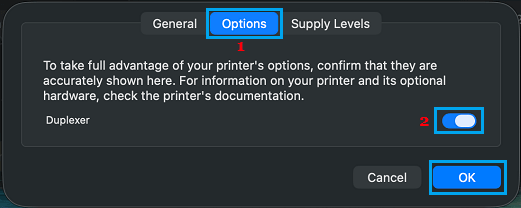
5. Make sure that you click on OK to save this Setting on your MacBook.
2. Print Two Pages Per Sheet on Mac
In the case of native apps like Pages, Numbers and also while using Microsoft Word and Excel; you should be able to print two-pages per sheet by using these steps.
1. Open the Document (Pages or Word) that you want to print.
2. Click on the File tab in top menu-bar and select Print… in the drop-down menu.
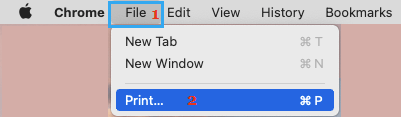
3. On Print screen, switch to Layout (1) option and select 2 pages per sheet.
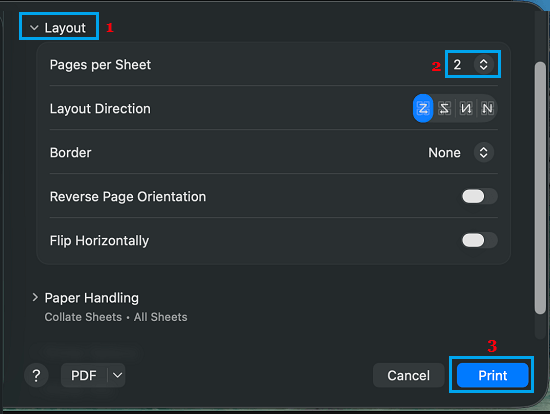
4. Click on the Print button.
3. Workaround to Print Two Pages Per Sheet on Mac
If the option to print two-pages per sheet is not supported by the App or Printer, you can make use of this workaround to print two or more pages per sheet on your MacBook.
1. Open the Document that you want to print
2. Next, click on the File tab in the top menu-bar and select Print… in the drop-down menu.
3. On Print document screen, click on the Down Arrow next to PDF and select Open PDF in Preview.
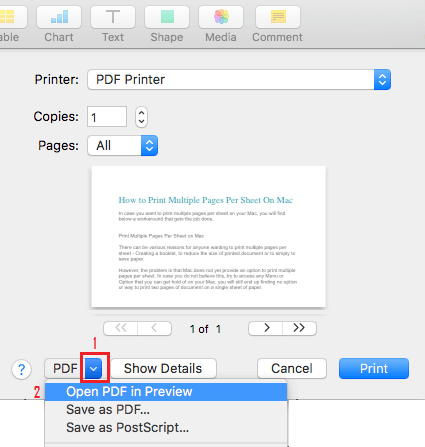
4. Wait for the Mac to generate the PDF preview of your document.
5. Once the PDF Preview is generated, click on the Print button, located at bottom-right corner of the document.
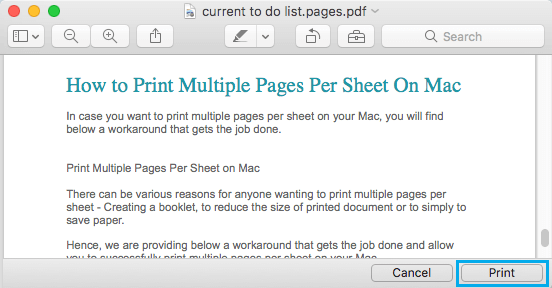
6. On the next screen, click on the Down arrow next to Preview and select the Layout option.
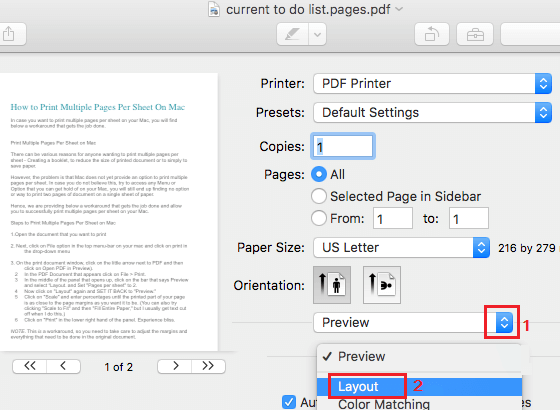
Once you switch to the Layout option, you will see Pages Per Sheet option.
7. Click on the Down-arrow next to Pages Per Sheet and select the number of pages that you want to print per sheet. In this case let us select 2 pages per sheet.
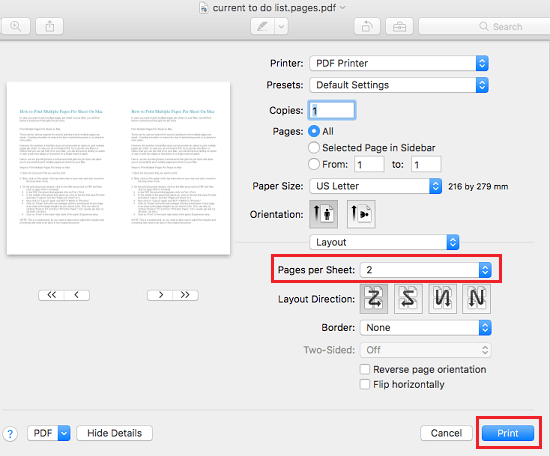
8. Once you are happy with the way your document looks, you can send the document to the Printer by clicking on Print button.
If you find the need to make any changes, you will have to switch back to Preview Mode to make those changes.
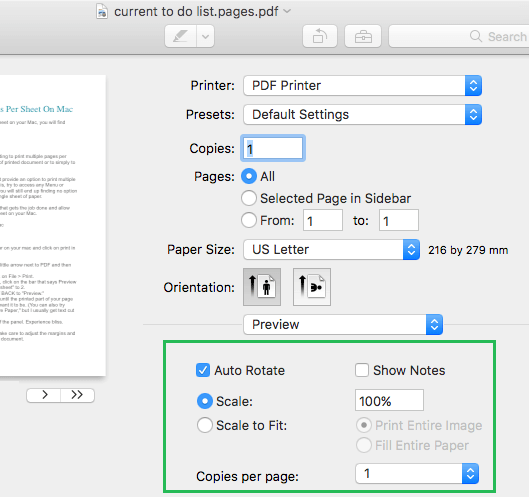
While in Preview Mode, you can choose Scale to Fit to fill the entire page or click on Scale and enter percentages until the content on the document to be printed is as close to the page margins as you want it to be.