When you Backup iPhone to computer using iTunes, the Backup of iPhone gets safely stored at a specific location on your computer. While most users are happy with this setup, there are users who want to change iTunes Backup Location.
Depending on your preference, you can change iTunes Backup location to Desktop, any other Folder or Location on your computer and even to an external storage drive.
However, going by our experience, it is not recommended to change iTunes Backup Location to External Storage Drive, as it can sometimes end up corrupting the backups files and lead to problems on your device.
Change iTunes Backup Location in Windows 11/10
The default Location of iTunes Backup on a Windows computer varies, depending on how iTunes for Windows software was installed on your computer.
If you had downloaded and installed iTunes from Windows Store, the iTunes Backup of your iPhone will be located at path: C:\Users\UserName\Apple\MobileSync.
If iTunes was installed from outside Windows Store, the iTunes backup of your iPhone should be available at path C:\Users\(username)\AppData\Roaming\Apple Computer\MobileSync.
Change iTunes Backup Location in Windows
Currently, the only way to change iTunes Backup Location on a Windows computer is to create a Symbolic link from the current iPhone Backup location to your desired New Backup Location.
Once the Symlink is created, it tricks iTunes into making a backup of iPhone to your desired New Location. The procedure to change iTunes Backup Location on a Windows computer involves the following three steps.
Step #1. Create MobileSync Folder at New Location
The first step is to navigate to New Location where you want to save iPhone Backups and create a New MobileSync Folder in that location.
1. Right-click on the Start button and click on File Explorer.
2. In the File Explorer window, navigate to Desktop or any other Location where you want to save iTunes Backup
3. Next, right-click in any Empty space and click on New Folder.
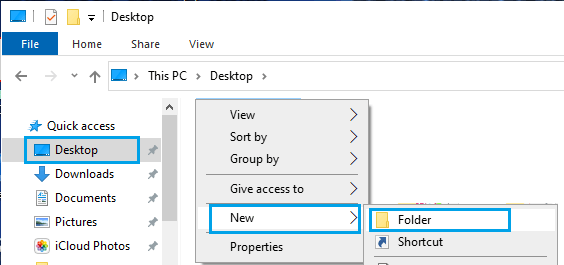
4. Name this New Folder as MobileSync and do not close the File Explorer window.
Step #2. Copy Current iPhone Backup Folder to New MobileSync Folder
The second step is copy the current iPhone Backup Folder to New MobileSync Folder that you created in the first step.
1. Open File Explorer and Navigate to C:\Users\UserName\Apple\MobileSync.
Note: If you are using Desktop version of iTunes, navigate to C:\Users\UserName\AppData\Roaming\Apple Computer\MobileSync.
2. Right-click on the current iPhone Backup Folder and select the Copy option.
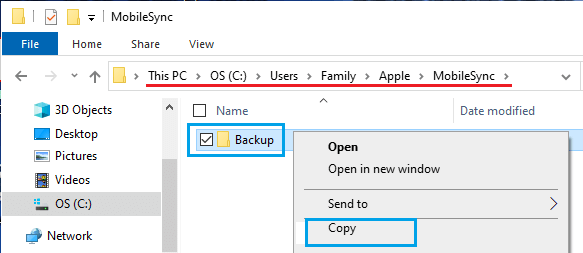
3. Go to New MobileSync Folder that you created in the first step and paste the iPhone Backup Folder there.
4. Now, go back to default MobileSync Folder and Rename the Current iPhone Backup Folder as Old Backup.
Step #3. Create Symlink from Current to New MobileSync Folder
The final step is to create a Symbolic link pointing from the default iTunes Backup Folder Location to New iTunes Backup Location.
1. Right-click on the Start button and click on Command Prompt (Admin).
2. In Command Prompt window, type MkLink /J “C:\Users\UserName\Apple\MobileSync\Backup” “C:\MobileSync\Backup”.
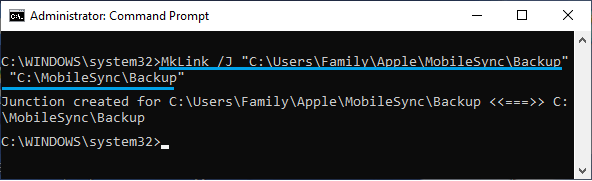
Note: If iTunes is installed from outside (not Windows Store), type MkLink /J “C:\Users\UserName\AppData\Roaming\Apple Computer\MobileSync\Backup” “C:\MobileSync\Backup”
If things go properly, you should now see a Symlink created in MobileSync Folder.
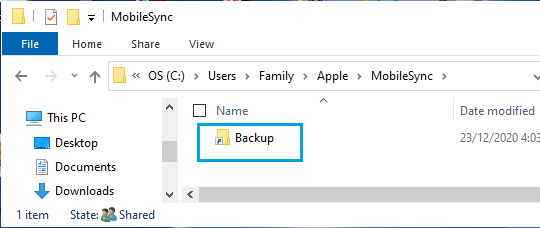
Once the Symlink is created, it should force iTunes to Backup iPhone to the New Selected Location.