If you feel that the Text Size in the Messages App on your Mac is small or big, you can change the Text Size in the Messages app to suit your own requirements.
Changing the text size in the Messages app to suit your eyesight should make it easy for you to both type and read the messages on Mac without experiencing any eyestrain.
Change Text Size in Messages App on Mac
Depending on the level of control that you want on the text size, you can use any of the following methods to change the text size in the Messages App on your Mac.
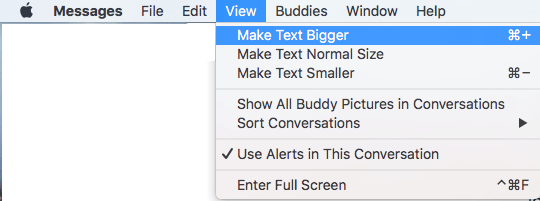
1. Change Text Size in Messages App Using the View Option
A quick way to change the Text size in the Messages App on Mac is to use the View option as available in the Messages App.
1. Open the Messages App on your Mac.
2. Click on the View tab in the top-menu bar and select the required Change Text Size option.
2. Change Text size Using Keyboard Shortcuts
You can also make use of the following Keyboard shortcuts to change the text size in the Messages App on your Mac.
1. Use Command & [+] Key – Press the Command Key on the keyboard of your Mac and then press the “+” (Plus) Key to increase the Text size
2. Use Command & [-] key – Press the Command Key and the “–” (Minus) Key to decrease the text size on the Messages App
3. Change Text Size Using Message Preferences
You can also change the Text Size in the Messages App by going to the Preferences in the Messages App. This method provides more control over Font Size and does not limit you to Pre-set sizes as available in the View option.
1. Open the Messages app on your Mac
2. Next, click on Messages tab in the top Menu bar and click on Preferences… in the drop-down menu (See image below).

3. On the next screen, you can change the text size by clicking on the text Size Slider. Dragging the Slider to the Right will increase the text size, while dragging it to the Left will decrease the text size in the Messages App.
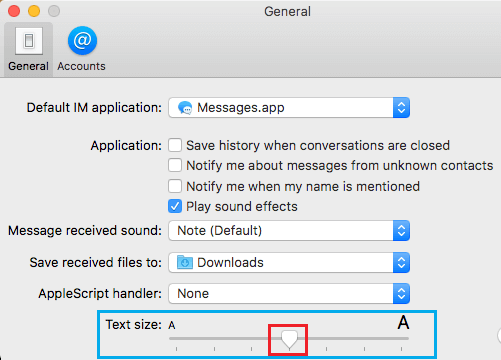
As you drag the Slider, you will be able to see the text size in the Messages App increasing or decreasing in size. Set the slider to a position where the text size appears good enough for your requirements.