You may find the need to change the Time & Date on your computer, if it is incorrect, you have moved to another Country and also if you want to change the Time Format.
If you are moving to another Country or travelling across different Time Zones, you can set your computer to automatically adjust Time/Date based on its Location. However, this setting works only if the “Location Services” feature is enabled on your device.
If Location Service is not enabled, your computer won’t be able to automatically adjust Time/Date and you will be required manually adjust or change the Time/Date on your computer.
Change Time and Date in Windows 11/10
You can find below the steps to make the computer to automatically set its Date/Time and also the steps to manually set the right Date and Time on your computer.
Note: If the computer continues to display the wrong time and date, there could be other issues involved, as discussed in this guide: Fix: Slow/Incorrect Computer Clock in Windows 11/10.
1. Automatically Set Date & Time on Windows Computer
The default setting on a Windows computer is to automatically set and maintain Time by connecting to Windows Time Server.
If you had changed this default setting for some reason, you can switch back to the default setting and allow Windows to automatically set the time on your computer.
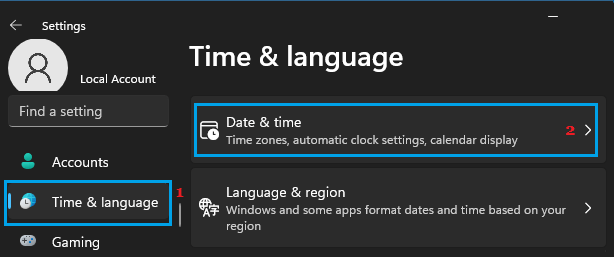
1. Click on Start button > Settings Icon.
2. On the Settings screen, select Time & Language in the left-pane and click on Date & Time in the right-pane.
3. On “Date & Time” screen, enable Set Time Automatically option by moving the toggle to ON position.
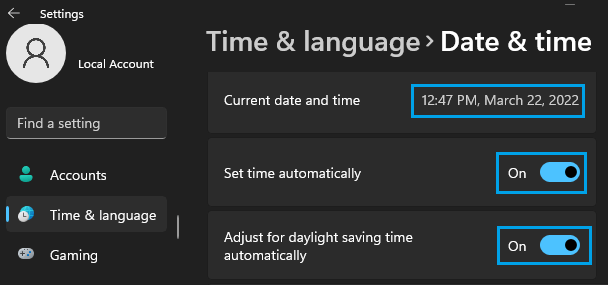
Note: If it applies to your Country, you can enable “Adjust for daylight saving time automatically” option.
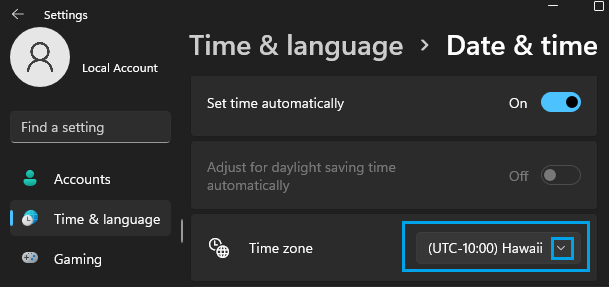
4. On the same screen, scroll down and click on the down arrow next to Time Zone to select the right Time Zone as applicable in your case.
5. On the same screen, scroll down to “Additional Settings” section and click on Sync Now.
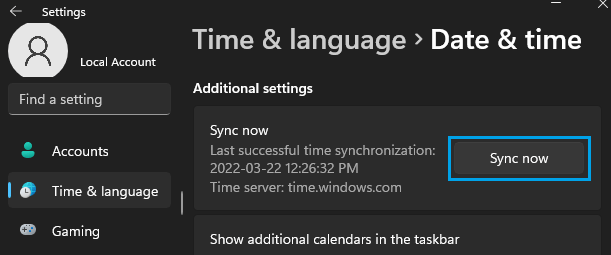
This will force Windows to update and set accurate Date and Time on your computer by connecting to Windows time server.
Windows 10: Go to Settings > Time & Language > Date & Time > Enable Set Time Automatically option in the right-pane.
2. Manually Change Date & Time on Windows Computer
If required, you can manually change the Time & Date on your computer by using the following steps.
Note: You need to be logged-in to the Admin Account, in order to manually change the “Time & Date” on your computer.
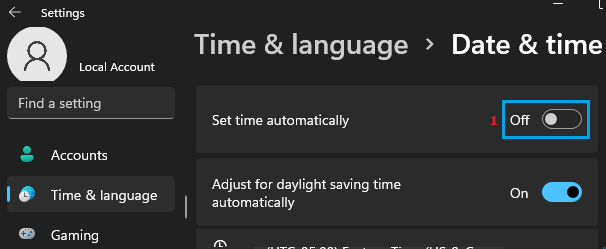
1. Go to Settings > Time & Language > click on Date & Time tab in the right-pane.
2. On Date & Time screen, disable Set Time Automatically option by moving the toggle to OFF position.
Windows 10: Go to Settings > Time & Language > Date & Time > Disable Set time automatically option in the right-pane.
3. On the same screen, scroll down and click on the Change button, located next to “Set the date and time manually” option.
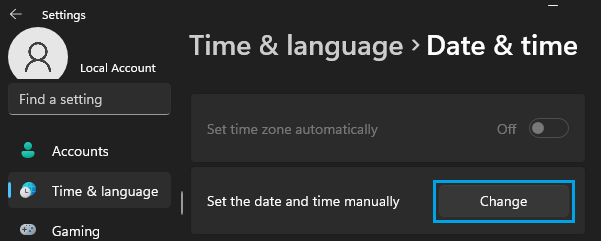
Note: The Change button becomes clickable only when Set Time Automatically option is disabled.
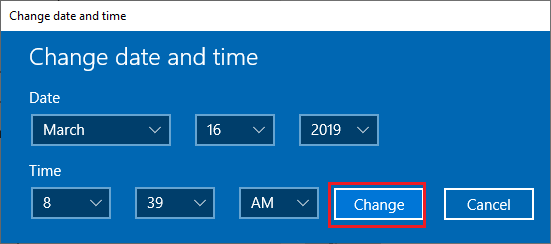
4. On the next screen, use the drop-down arrows to set the right Date and Time and click on the Change button.
3. Change Time and Date Format in Windows 11/10
If you want to, it is also possible to change the Date and Time Format on your computer. This will change the way in which time and date are displayed on the computer.
1. Click on Start button > click on Settings Icon.
2. On the next screen, select Time & Language in the left-pane. In the right-pane, scroll down and click on Language & Region.

3. On the pop-up, switch to Formats tab > use the down-arrows to select the Date and Time Format that you want to be displayed on your computer.
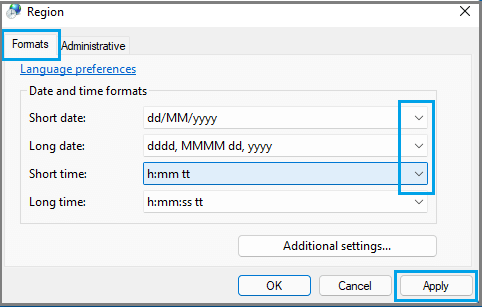
4. Once you are done, click on Apply and OK to save this change to the Date and Time Format on your computer.