In case you are not aware, Windows operating system comes with a built-in Hidden Admin Account, which is disabled by default on the computer for security reasons.
While the presence of Hidden Admin Account is not known to most users, system admins routinely make use of the Hidden Admin account to gain access to computers, in order to troubleshoot problems and perform other functions.
Enable Hidden Admin Account in Windows 11/10
When you enable the hidden admin account on your computer, the default option in Windows is to activate the Hidden Admin Account with “Administrator” as its user name and it requires no password for login.
In general, the recommendation is to enable the Hidden Admin Account only when you are unable to login to the Local Admin Account on your computer.
This can happen, if the User Profile for the current Admin Account becomes corrupted or if you cannot remember the Admin password for your computer.
1. Enable Hidden Admin Account Using Command Prompt
The easiest way to Enable Hidden Admin Account on a Windows computer is by using Command Prompt.
1. Type Command Prompt in the Search bar > right-click on Command Prompt and select Run as Admin option.

2. On the Command Prompt screen, type net user administrator /active:yes and press the Enter Key.
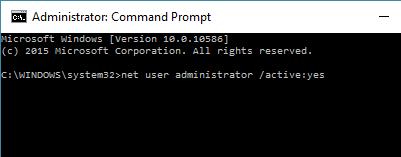
3. After this, restart the computer and you will be able to login to the Hidden Admin Account that you just activated.
Once you are done with the purpose of activating the Hidden Admin Account, you can disable or hide the Admin Account on your computer by using net user administrator /active:no command.
Important: Do not use net user administrator /active:no command, if the User Name for the original Admin Account on your computer was Admin or Administrator (this can lock you out from the computer).
2. Enable Hidden Admin Account Using PowerShell
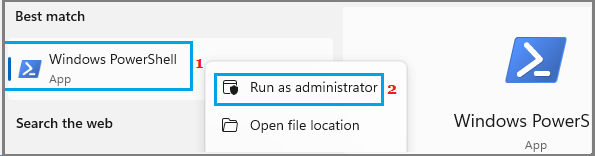
1. Type PowerShell in the Search bar > right-click on Windows PowerShell and select Run as Admin option.
2. In PowerShell window, type Get-LocalUser -Name “Administrator | Enable-LocalUser and press the Enter key.
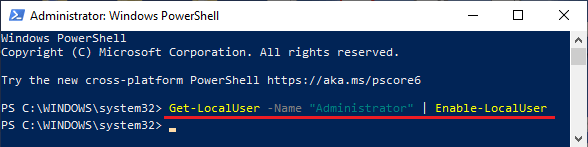
3. Restart the computer and you will be able to access the Hidden Admin account on the login screen.
At any time, you can disable the Hidden Admin Account on your computer by using Get-LocalUser -Name “Administrator | Disable-LocalUser.
3. Enable Hidden Admin Account Using Computer Management
1. Right-click on the Start button > select Computer Management in the right-click menu.
2. On Computer Management screen, go to Local Users and Groups > Users Folder in the left-pane. In the right-pane, right-click on Administrator and click on Properties.
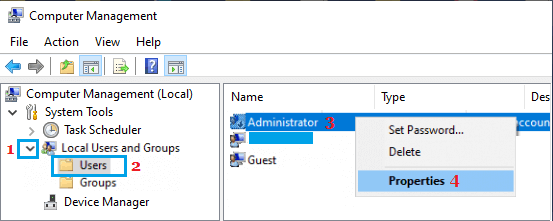
3. On Administrator Properties screen, uncheck Account is disabled entry.
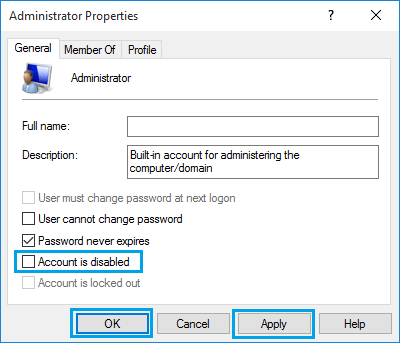
4. Click on Apply & OK to save this revised setting on your computer.
Now, when you restart the computer, you will be able to Access the Hidden Admin Account from the Login Screen.