According to Microsoft, the overall purpose of “Telemetry and Data Collection” on a Windows computer is to collect Diagnostic Data; in order to predict software usage and improve system performance.
The Diagnostic Data as collected by the “Telemetry and Data collection” feature in Windows has been classified by Microsoft into the following two categories.
Required diagnostic data: According to Microsoft, this is the minimum amount of data required to keep Windows operating system functional, secure, updated and reliable at a global scale. The information collected by Microsoft in this category includes details of crashes/errors, installed/rolled-back updates, device/driver specifications and certain others types of health metrics.
Optional diagnostic data: While optional diagnostic data can be disabled, it is enabled by default on a Windows computer; which allows Microsoft to collect app usage patterns, browser activity (in Microsoft Edge), enhanced crash dumps (memory state) and other signals.
According to Microsoft, optional diagnostic data is collected on a sampling basis and not from each and every Windows device. Optional diagnostic data helps Microsoft to prioritize enhancements and study hard-to-reproduce problems.
Note: You can view the type of “Diagnostic Data” being sent to Microsoft by enabling “Diagnostic Data Viewer” tool.
Disable Telemetry in Windows 11/10
In the Enterprise version of Windows, Microsoft provides the option to disable Telemetry & Diagnostic Data Collection by using Group Policy Editor. In the case of Home & Pro version of Windows, only the collection of “Optional Diagnostic Data” can be disabled and “Required Diagnostic Data” cannot be disabled.
However, you can considerably reduce “Telemetry & Data Collection” activity in both Pro & Home Edition of Windows by disabling Optional Diagnostic Data, Inking & Typing, Recommendations & Offers and switching off Connected User Experiences and “dmwappushsvc” services.
Note: You can also make use of a registry tweak to significantly reduce the amount of data being sent to Microsoft.
1. Disable Optional Diagnostic Data
If you are using the Home Edition of Windows, you can prevent your computer from sending Optional Diagnostic data by using the following steps.
1. Press Windows + I keys to open Settings.
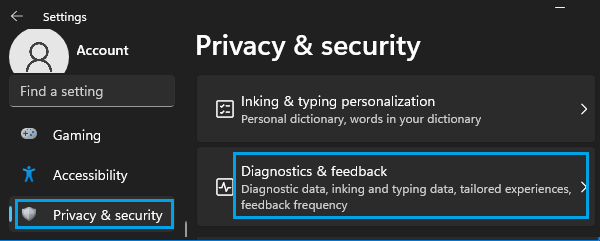
2. On the Settings screen, select Privacy & Security in the left-pane and click on Diagnostics & Feedback tab in the right-pane.
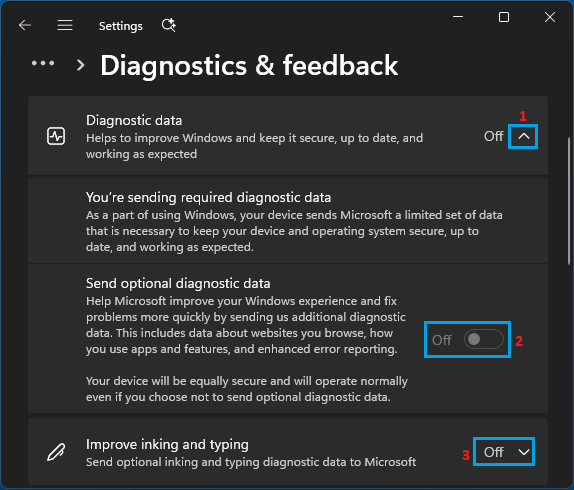
3. On the next screen, expand Diagnostic Data tab and toggle-off Send optional diagnostic data option.
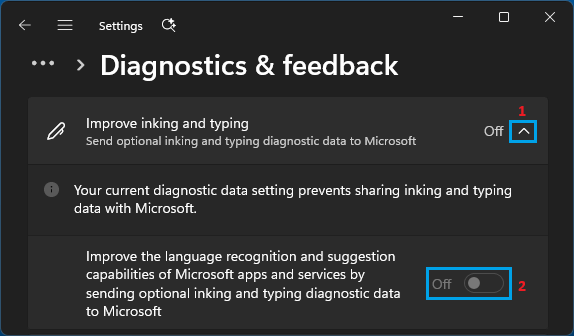
Next, expand Improve inking and typing tab and toggle-off sending optional inking and typing diagnostic data option.
If you scroll down on the same screen, you will find the option to View diagnostic data by enabling Diagnostic Data Viewer.
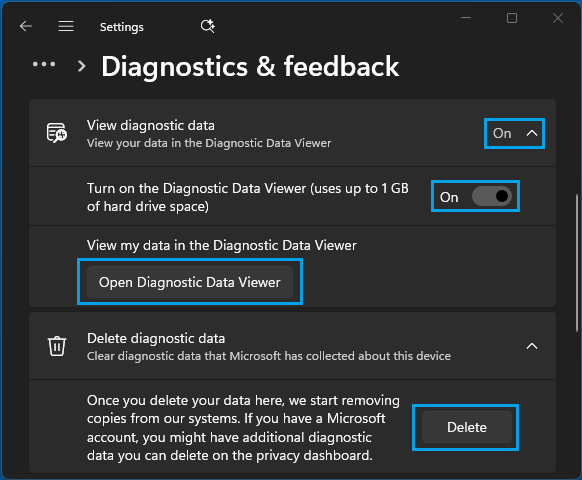
You can also request Microsoft to Delete Diagnostic Data by clicking on the Delete button.
2. Disable Recommendations and Offers
You can further cut down Telemetry & Data Collection activity on your computer by disabling Personalized recommendations.
1. Press Windows + I keys to open Settings.
2. On the Settings screen, select Privacy & Security in the left-pane and click on Recommendations & offers in the right-pane.
3. On the next screen, toggle-off Personalized offers and Improve Start and search results options.
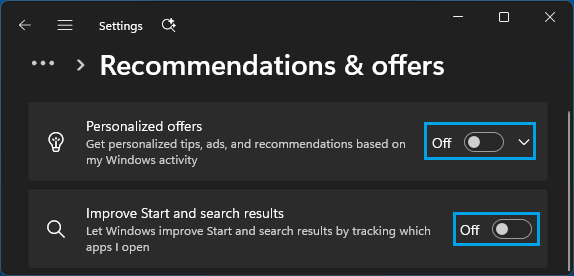
On the same screen, you can find the option to prevent Advertisers from serving personalized Ads.
3. Disable Telemetry Using Registry Editor
As mentioned above, you can make use of a registry tweak to significantly reduce the amount of data being sent to Microsoft.
Note: It is recommended that you create a System Restore Point, before going ahead with this step.
1. Press Windows + R keys to open Run Command.
2. Type regedit and press the Enter key.
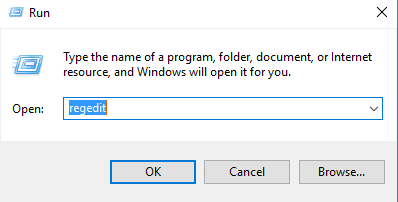
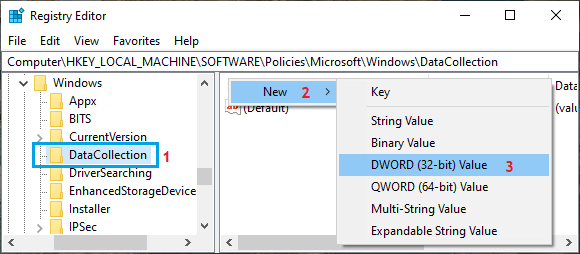
3. From the Registry Editing screen, navigate to HKEY_LOCAL_MACHINE\SOFTWARE\Policies\Microsoft\Windows\DataCollection.
Note: If DataCollection does not exist, right-clicking on Windows > select New > Key and name this key as DataCollection.
4. Select DataCollection key in the left-pane. In the right-pane, right-click in any empty space and select New > DWORD (32-bit) value and Name the newly created DWORD as AllowTelemetry.
5. Double-click on the newly created Allow Telemetry DWORD and set its Data Value to “0”.
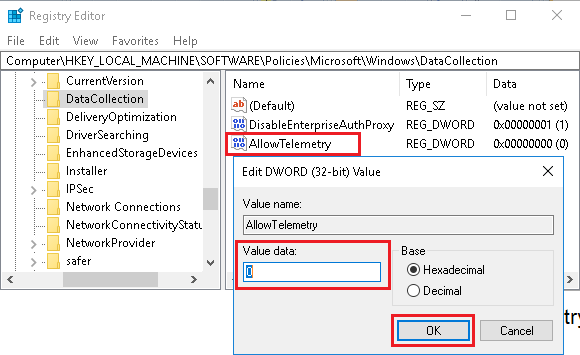
Note: We haven’t noticed any adverse impact after Disabling Telemetry on our testing device.
4. Disable Connected User Experience & dmwappushsvc service
You can switch-off Connected User Experience and dmwappushsvc services, to further reduce the Telemetry & Data collection activity on your computer.
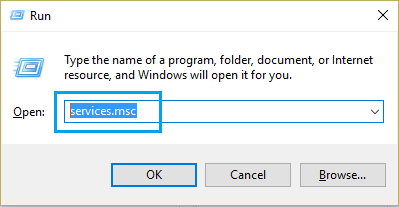
1. Open Run Command > type services.msc and click on the OK button.
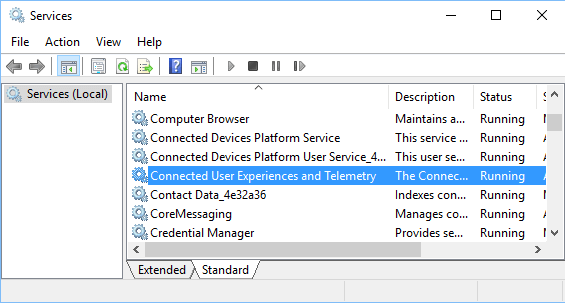
2. On the services screen, scroll down and double-click on Connected User Experiences and Telemetry.
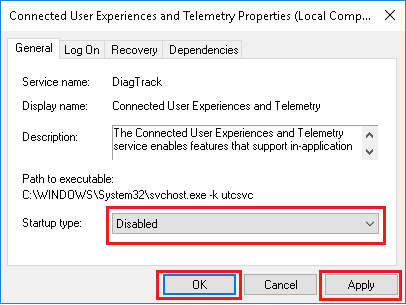
3. On the next screen, disable Connected User Experience and Telemetry on your computer by setting the Startup Type to Disabled.
4. On the same screen, locate dmwappushsvc service and double click on it.
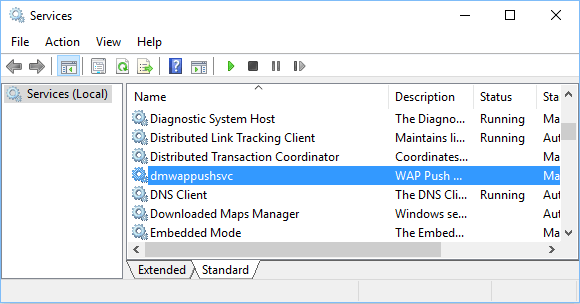
5. On the next screen, disable dmwappushsvc service by setting the Startup Type to Disable.
Hopefully, this should help in considerably reducing “Telemetry and Data Collection” activity on your computer.
5. Disable Telemetry Using Group Policy
If you are using the Enterprise and Professional Edition of Windows, you can disable Telemetry & Data Collection by using Local Group Policy Editor.
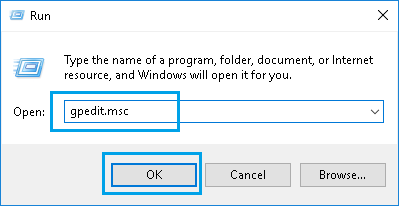
1. Press Windows + R keys > type gpedit.msc and click on OK.
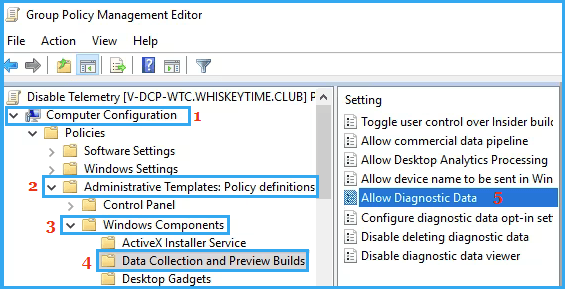
2. Navigate to Computer Configuration > Administrative Templates > Windows Components > Data Collection and Preview Builds > Double-click on Allow Diagnostic Data.
3. On the next screen, select the Enabled option > In the Drop-down, select 0 – Security (or Send required diagnostic data if Level 0 is restricted.
Note: Level – 0 is officially restricted in the Professional Edition of Windows and available only in the Enterprise version of Windows.
Hence, if you are using the Professional edition of Windows, you also need to disable Connected User Experience and “dmwappushsvc” services by using the 4th step as provided above in this guide.