When you start Windows in “Clean Boot” mode, it starts the computer with only the most essential services, which makes it easy to identify the program or service that is interfering with proper functioning of an app, program or game on the computer.
This can be done by enabling/disabling programs one-by-one or in groups (for efficiency) and restarting the computer, until the service or application that is causing the problem is identified.
Once the problematic background service or application has been identified, it can be disabled or prevented from starting up by using Task Manager.
Clean Boot Windows Computer
You can find below the steps to start the computer in Clean Boot mode and disable the startup service or application that is causing the problem on your device.
Note: It is normal for the computer to lose certain functionalities in Clean Boot Mode. All the functions will be restored back, when you start the computer normally.
1. Start Windows in Clean Boot Mode
If you have understood what clean boot does, you can follow the steps below to start your computer in Clean Boot Mode.
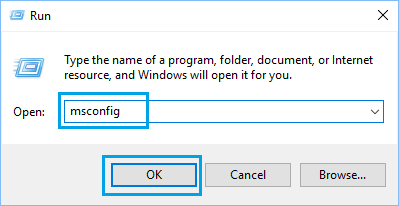
1. Press Windows + R keys > type msconfig and click on OK.
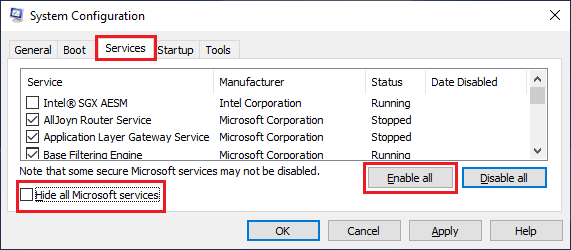
2. On System Configuration screen, click on the Services tab, select Hide All Microsoft Services option and click on Disable All button.
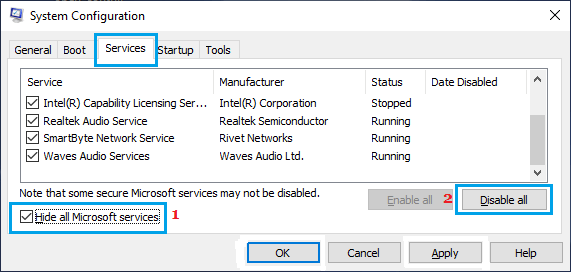
Note: Hiding Microsoft Services ensures that you do not accidentally disable any essential Microsoft service.
3. After this, go to Startup tab and click on Open Task Manager link.
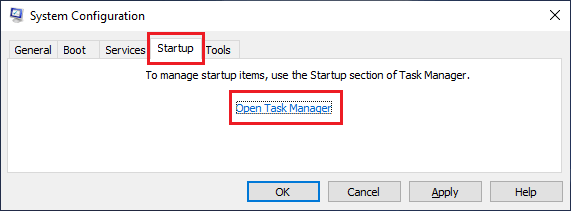
Note: Do not close the System Configuration screen, as you will be coming back to it later.
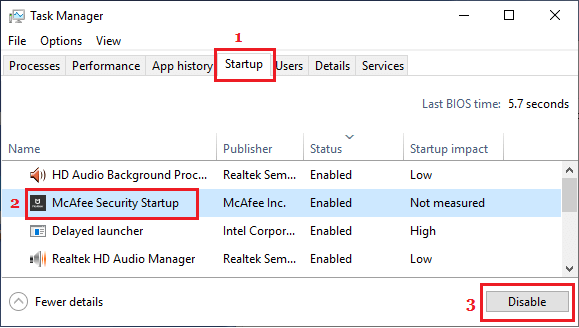
4. On the Task Manager screen, go to Startup tab > select the program that you suspect is causing the problem on your device and click on Disable.
5. Now, go back to System Configuration screen > click on the General tab > choose Selective startup option > clear Load Startup Items check box.
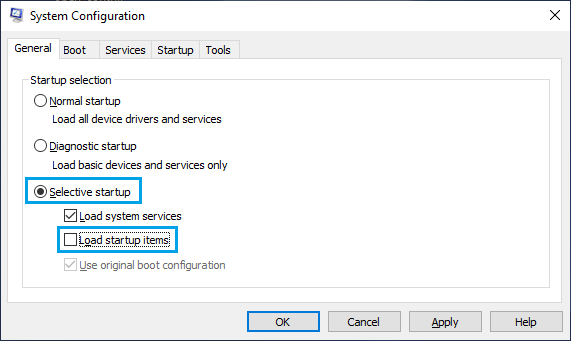
Note: Make sure Load System Services and Use Original boot configuration options are checked.
6. Finally, click on Apply and OK to start the computer in Clean Boot Mode.
Note: You may have to repeat the above steps multiple times, in order to identify the program or service responsible for the problem on your computer.
How to Disable Clean Boot Mode
After you are done with troubleshooting, you can disable Clean Boot Mode on your computer by following the steps below.
1. Open Run command > type msconfig and click on OK.
2. On the System Configuration screen, go to the Services tab > uncheck Hide All Microsoft Services box and click on Enable All button.
3. After this, go to the General tab and select Normal startup option.

4. Click on Apply/OK to start your computer normally.
Once your computer starts using Normal Startup, all the services and programs that were temporarily disabled during Clean Boot Mode will be restored back on your computer.