Similar to other computers, MacBook can also be connected to wired printers using a USB cable and wireless or network printers using your Home or Office Wi-Fi Network.
If your Printer supports Apple’s AirPrint technology, it will readily connect with your MacBook and you will be able to print wirelessly, without the need to download and install drivers.
AirPrint is supported by almost all major manufacturers of Printers, as listed on Apple’s AirPrint Support Page.
Add or Connect Printer to Mac
Although it sounds complicated, it is really easy to connect both wired and wireless or Network Printers to Mac. You can find below three different methods to Add Printer to your MacBook, Mac Mini or iMac.
1. Add Printer to Mac Using Print Command
This method works, if the wireless printer is switched ON and connected to Wi-Fi network. If the printer not wireless, it needs to be plugged-in to the Mac and switched ON.
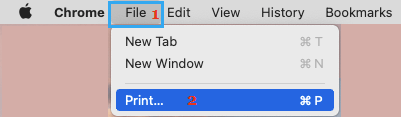
1. Open a Text, Word or PDF File on your MacBook.
2. Click on the File tab located in the top-menu bar and select the Print option.
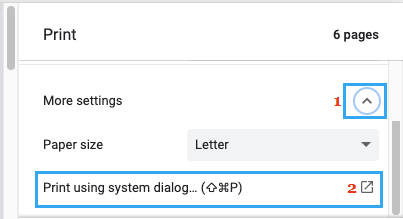
3. On the Print Command screen, expand More Settings entry > scroll down and click on Print Using System Dialogue option.
4. On the next screen, click on the down Arrow next to the “Printer” field and select Add Printer option in the drop-down menu.
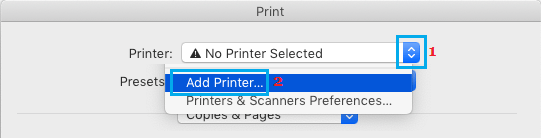
On the next screen, select the Printer that you want to Add and follow the prompts to Add Printer to Mac.
2. Connect Wireless Printer to Mac Using IP Address
The most common way to Add Wireless Printer to Mac is by using its IP Address, which can be obtained by printing the Configuration page of your printer.
On most wireless printers, the configuration page can be printed by pressing and holding the Power button for about 10 seconds. If this does not work, try printing from the Printer’s Control Panel by going to Menu > Information > Print Configuration.
If your printer is different, check the User Manual to see if it provides a method to print the Configuration page or obtain its IP Address.
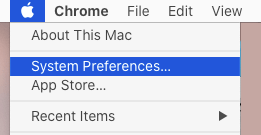
1. Click on Apple Logo in top-menu bar and select System Preferences in the drop-down menu.
2. On System Preferences screen, click on Printers & Scanners icon.
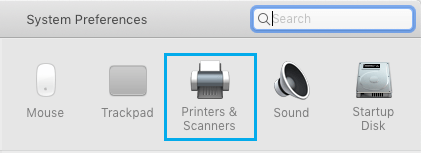
3. On the next screen, click on the Plus Icon to open Add Printer dialogue box.
![]()
Note: You may have to click on the Lock icon and enter your Admin User Name and password to authorize this change.
4. On the next screen, switch to IP tab > enter the IP Address of your Printer and click on the Add button.
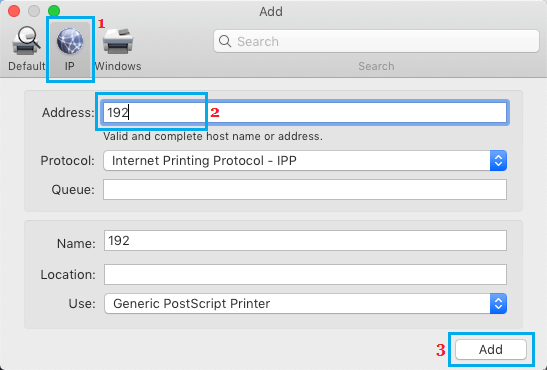
Note: Protocol will be automatically selected and you can leave the Queue box blank. If required, you can go with the default name or enter a Name for your Printer.
Location section can be left blank and in the “Use” section you can go with Generic PCL or Generic Post Script Driver, unless you have a different driver file that you want to use.
3. Connect USB Printer to Mac
If you have an older printer that does not connect to Wi-Fi, you can follow the steps below to connect the Printer to Mac.
1. Connect the Printer to Mac using lts supplied USB cable and Press the Power button to start the Printer.
2. Open System Preferences > click on Printers & Scanners Icon.
3. On the next screen, click on the Plus Icon to open Add Printer dialogue box.
![]()
Note: You may have to click on the Lock icon and enter your Admin User Name and password to authorize this change.
4. On Add Printers screen, make sure you are on the Default tab and select the Printer that you want to Add to Mac.
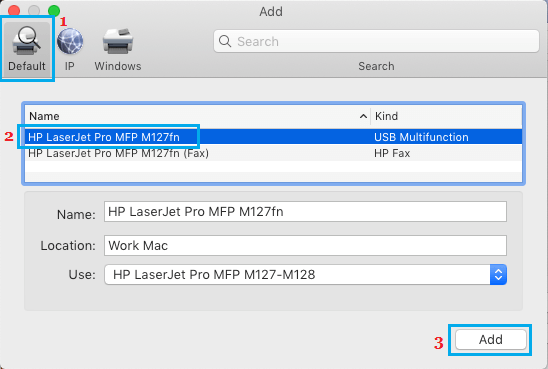
5. Once the Printer is selected, click on the Add button to Add the Printer to your MacBook.