As you must have noticed, the screen of a MacBook automatically starts dimming and becomes significantly lesser in brightness, when it is left inactive for a while.
The reason for this behavior is due to the default setting on MacBook to conserve battery life by dimming its display, when it is not being used and also when certain other conditions are detected.
Stop Screen from Dimming Automatically on Mac
Depending on your requirements, you can prevent the screen of your MacBook from automatically dimming in any of the following situations.
- When the Mac is left inactive for a while.
- When Mac is running on battery power.
- If the ambient light sensors on Mac detect brightness in the room.
Note: If you are looking to stop your MacBook from Sleeping, you can refer to this guide: How to Stop Mac from Automatically Sleeping.
1. Stop Mac Screen from Dimming When Inactive
You can prevent the screen of your MacBook from automatically dimming, when it is left inactive by increasing the duration after which the MacBook can begin to dim its display.
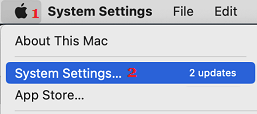
1. Click on Apple Logo in top-menu bar and select System Settings in the drop-down menu.
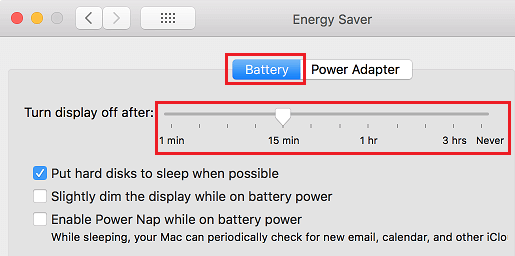
2. From System Settings screen, go to Energy Saver > Battery and use Turn Display Off After slider to increase the duration.
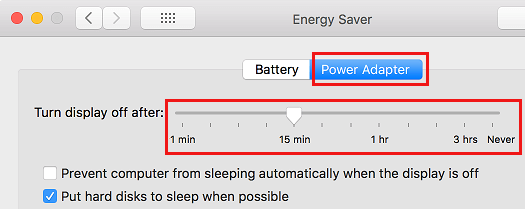
3. Next, go to Power Adapter and use Turn Display Off After Slider to increase the duration.
2. Stop Mac Screen From Dimming When Running on Battery
In order to save Battery life, the default setting on a MacBook is to reduce the brightness of the screen, when it is unplugged from direct power supply.
If required, you can prevent your MacBook from dimming its display while running on battery power by using these steps.
1. Click on Apple Logo in top-menu bar and select System Settings in the drop-down menu.
2. From System Settings screen, go to Energy Saver > Battery and uncheck Slightly dim the display while on battery power option.
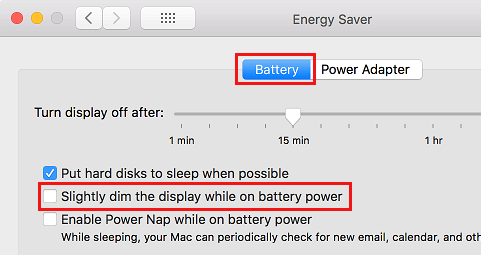
After this, the brightness of the display on your MacBook running on Battery will stay exactly the same, as it was when the computer was connected to direct power supply.
3. Stop Mac Screen from Dimming Due to Lightning Conditions
If required, you can also prevent your MacBook from automatically dimming its display based on the surrounding lighting conditions.
1. Click on Apple Logo in top-menu bar and select System Settings in the drop-down menu.
2. From System Settings screen, go to Displays > Display and uncheck Automatically adjust brightness option.

After this, you won’t find the screen of your Mac Automatically Dimming due to change in the lighting conditions of your room.