While Apple has never provided the option to create Nested Folders (Folder within Folder) on the home screen of iPhone, it was still possible to create Nested Folders in the previous versions of iPhone by entering jiggle mode (editing mode); which allowed a Folder to be moved or Nested into another Folder.
However, the bug or loophole that allowed Nesting of Folders in jiggle mode; cannot be used in the current versions of iPhone; which only provide the option to create Nested Folders within Notes & Files App; but not on the home screen of your Apple device.
Currently, you can reduce the clutter of Apps on the home screen of your iPhone by creating New Folders and moving apps into these newly created Folders.
Create New & Nested Folders on iPhone
As mentioned above, you can create Nested Folders (Folder within Folder) within the Notes, Files Apps and also create Nested Albums (Album within Album) within the Photos App.
When it comes to the home screen, you can manage apps by creating New Folders and moving apps with similar function into the newly created Folders.
1. Create New Folders on Home Screen of iPhone
If you are like most users, it is likely that you have come across a Folder named as “Utility” on one of the home screens of your iPhone.
If required, you can create similar New Folders on the home screen of your iPhone, give them appropriate names and move multiple apps into each of these New Folders.
1. Tap & Hold in any Empty space on the Home Screen of iPhone, until all the App icons start to jiggle.
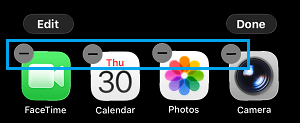
2. While your iPhone is in jiggle mode, drag one App Icon over another App Icon and Release the icon to create a New Folder containing both the Apps.
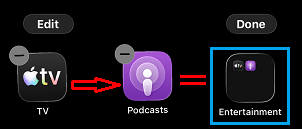
As you can see in above image, dragging the TV app over Podcasts app has automatically created a Folder named as Entertainment.
3. While the Apps are still in jiggle mode, you can drag additional App Icons into the newly created folder.
4. You can repeat the above steps to create another Folder and add apps to the second folder.
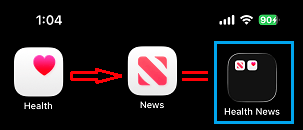
In this case, we have dragged the Health App over the News App to create the second Folder and named this Folder as Health News
2. Create Nested Folders in Notes App
If you are dealing with a large numbers of Notes, you can manage them by creating Folders. If required, you can also create Nested Folders within the Notes App.
1. Open the Notes App on your iPhone and go to Folders screen (If you are not already there).
2. On “Folders” screen, tap on +Folder Icon to create a New Folder and give this Folder a proper name. In this example, we have named this as “Main Folder.

3. Open the Newly created Folder > tap on 3-dots Icon and select Add Folder option.

4. Type an appropriate Name for this Folder and tap on the Save button.
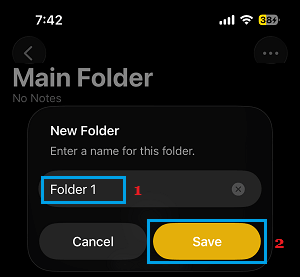
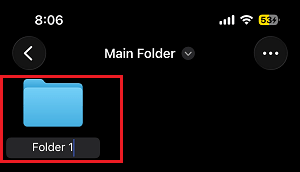
As you must have noticed, in the above steps; we have created a Main Folder and placed another Folder (Folder#1) within the Main Folder.
3. Create Nested Folders in Files App
Similarly, the Files App on iPhone provides the option to create Nested Folders.
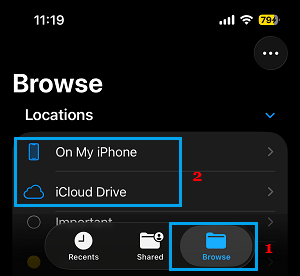
1. Open the Files App on your iPhone > go to the Browse screen and select where you want to create Nested Folders – On My iPhone or iCloud Drive.
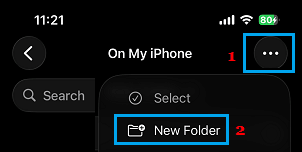
2. Once you are in your desired location, tap on 3-dots icon and select New Folder option in the drop-down menu.
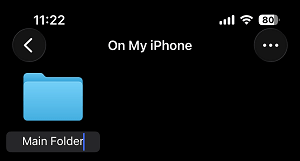
3. Type an appropriate Name for this New Folder and tap anywhere outside the folder to save it.
4. Next, open the Newly created Folder (by tapping on it) > tap on 3-dots icon and select New Folder option.
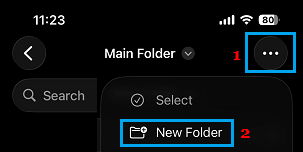
5. Type a Name for this Folder within Folder and tap outside the folder to save it.
As you can see in above image, we have created a Folder within Folder or Nested Folder structure. If required, you can repeat the process to add more Folders (sub folders) within the Main Folder.
4. Create Nested Albums in Photos App
As mentioned above, the Photos App on iPhone also provides the option to create Albums within Albums; which is similar to creating Nested Folders in Notes & the Files App.
The steps to create Nested Albums in iPhone Photos App is similar to creating Folder within Folders as you have seen above in the Notes and the Files App.