The built-in Windows Security program provides the option to disable Windows Defender antivirus protection on your computer, if required for troubleshooting and other purposes.
In general, users find the need to disable Windows Defender Real-Time protection in order to fix the issue of a computer running slow, getting stuck or freezing due to High RAM & CPU Usage and other reasons.
Before going ahead with the steps to disable Windows Defender antivirus protection, you need to be aware that leaving your computer without an antivirus program can make it vulnerable to malware and other online threats.
1. Temporarily Disable Windows Defender Antivirus Real Time Protection
The easiest way to temporarily disable Windows Defender on both Windows 10 and Windows 11 computers is by going to Windows Security Settings on your computer.
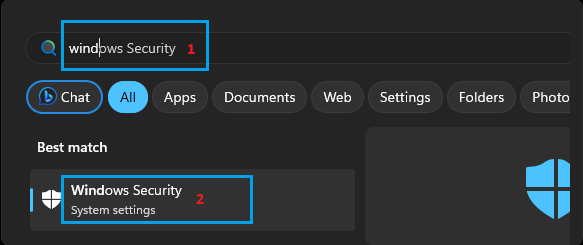
1. Type Windows Security in the Windows search bar > click on Windows Security System Settings in the search results.
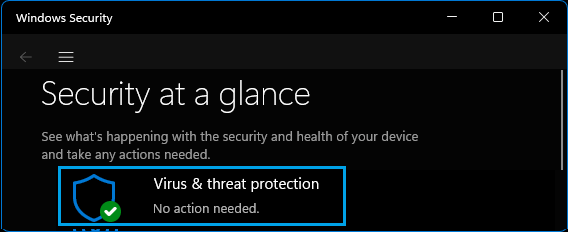
2. On the Windows Security screen, click on Virus & Threat Protection.
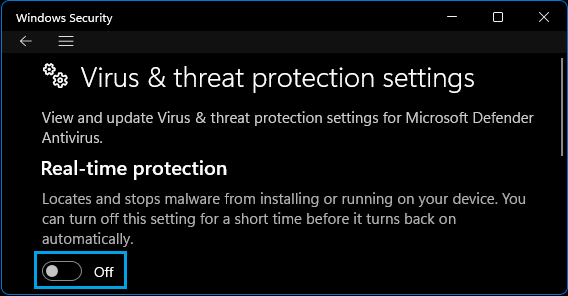
3. On the next screen, click on Manage Settings Link, located under “Virus & threat protection settings”.

4. On the next screen, turn OFF Real-Time Protection, Cloud Delivered Protection and Automatic Sample Submission.
Note: This method disables Windows Defender for a temporary period of time. Your computer will automatically switch ON Real Time protection after a certain period of time.
2. Permanently Disable Windows Defender Using Registry
Note: It is recommended that you create a system restore point or backup registry before making changes to Registry Files on your computer.
1. Right-click on the Start button and click on the Run.
2. In Run Command window, type Regedit and click on OK.

3. On Registry Editor Screen, navigate to HKEY_LOCAL_MACHINE\SOFTWARE\Policies\Microsoft\Windows Defender. In the right-pane, double-click on DisableAntiSpyware and change its Value Data from 0 to 1.
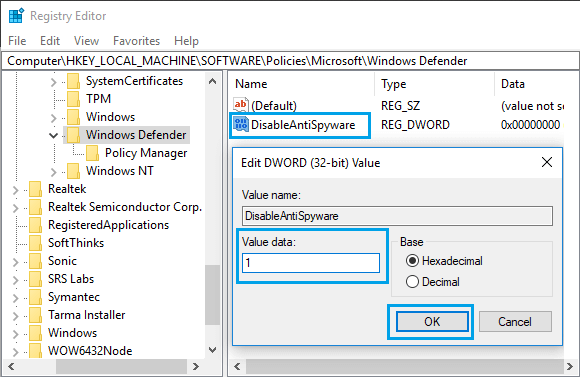
This will Permanently Disable Windows Defender Antivirus protection on your computer. At any time, you can Real Time Protection by Microsoft Defender on your computer by changing Value Data from 1 to 0.
Cannot Find DisableAntiSpyware
If you do not find DWORD named “DisableAntiSpyware”, you will have to create a New DWORD and name the DWORD as “DisableAntiSpyware”.
1. Right-click on an empty area in the right-pane > select New and click on DWORD (32-bit) Value.
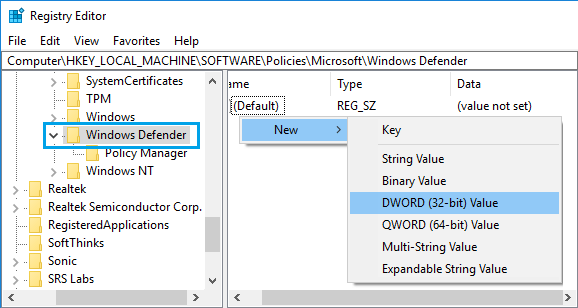
2. Name the new Key as DisableAntiSpyware > Enter 1 in the Value Data field.
Note: It is not recommended to permanently disable Microsoft Defender, unless a Third Party Antivirus Program is protecting your computer.