If you do not want to use OneDrive on a particular computer, Microsoft provides the option to Unlink that particular computer from OneDrive and also the option to Uninstall the OneDrive App.
In general, unlinking the computer from OneDrive should be good enough to disable OneDrive and prevent the possibility of files from that particular computer being automatically backed up or saved to OneDrive.
In addition to this, you can uninstall the OneDrive App from your computer; in case you do not feel the need to use OneDrive or any other cloud storage service on that particular computer.
Disable/Uninstall OneDrive in Windows 11/10
If you have started using iCloud (bought iPhone), Google Drive or another cloud storage service, you can find below the steps to disable OneDrive on your computer.
If required or if you want to, you can also uninstall the OneDrive app from your computer using two different methods as provided below in this guide.
Special Note:
After stopping the OneDrive backup process, you may find files disappearing from Desktop and other Folders. However, they have not been deleted, OneDrive has moved them to its default save location on your computer.
You can go to C:\Users\Username\OneDrive and move the files back to Desktop and other folders, where they were originally located on your computer.
1. Disable OneDrive on Windows Computer
The Settings menu of OneDrive App provides the option to Unlink your computer from OneDrive.
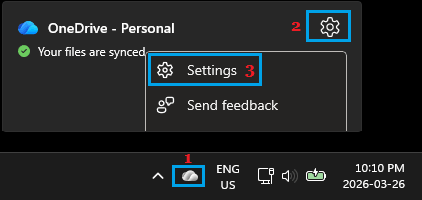
1. Click on OneDrive Icon on the Taskbar > select the Gear-shaped Icon and click on Settings.
2. On the Settings Screen, select the Account tab in the left-pane and click on Unlink this PC option in the right-pane.
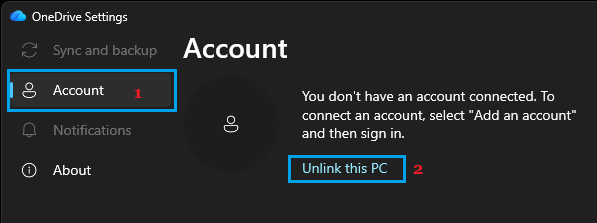
3. On the confirmation pop-up, select the Unlink Account option to confirm.
After this, you should no longer find OneDrive uploading files from this particular computer to your OneDrive account.
2. Uninstall OneDrive Using Settings
If you no longer want to use OneDrive and unlikely to use it in future, you can uninstall OneDrive from your computer.
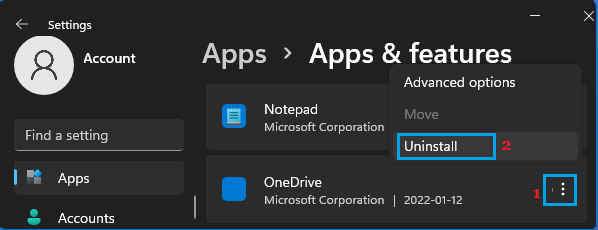
1. Go to Settings > Apps > click on Apps & Features in the right-pane.

2. On the next screen, click on 3-dots icon, located next to OneDrive entry and select the Uninstall option in the menu that appears
3. On the confirmation pop-up, click on Uninstall to confirm.
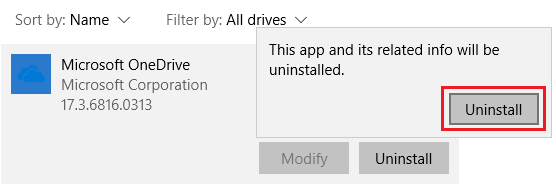
4. Wait for Windows to Uninstall the OneDrive App from your computer.
Windows 10: Go to Settings > Apps > Microsoft OneDrive > click on the Uninstall option.
3. Uninstall OneDrive Using Command Prompt
You can also uninstall the OneDrive app from your computer by using Command Prompt.
1. Type CMD in the Search bar > right-click on Command Prompt App in the search results and select Run as Administrator option.

2. In the command prompt window, type the following commands and hit the enter key on the keyboard of your computer.
- For 32-bit system – %systemroot%\System32\OneDriveSetup.exe /uninstall
- For 64-bit system – %systemroot%\SysWOW64\OneDriveSetup.exe /uninstall
Once the command is executed you will not see a confirmation, but the OneDrive app will be removed from the computer and it will no longer appear in the File Explorer sidebar.
Reinstall OneDrive
If you happen to change your mind, you can download and Install the OneDrive App on your computer from any of the following sources.
1. Download and Install OneDrive Desktop Program, this will replace the OneDrive application that you had deleted from your computer.
2. Download and Install the OneDrive App as available at Microsoft Windows Store. This version of OneDrive is better suited for touch enabled devices.