You can instantly transfer files, photos and videos from iPhone to iPhone, iPhone to Mac and Mac to iPhone or another Mac by using AirDrop, without the need to use a cable to transfer data between two Apple Devices.
In addition to files, photos and videos, you can make use of AirDrop to wirelessly transfer Notes, Calendar and Contacts between two supported Apple Devices.
Use AirDrop on iPhone and Mac
Apple’s propriety AirDrop feature is deeply embedded into iOS and macOS ecosystems and tightly integrated across all native apps on both iPhone and Mac.
Hence, all that is required to make use of AirDrop to wirelessly transfer files from an iPhone or Mac to another Apple device is to open the file, photo, contact or note that you want transfer and select the option to share the item by using AirDrop.
However, AirDrop is not enabled by default on Apple devices and it is important that you understand the requirements for using AirDrop and how it works.
What is AirDrop & How it Works
The AirDrop feature as available on iPhone and Mac makes use of BLE (Bluetooth Low Energy) to locate nearby devices and negotiate a direct peer-to-peer Wi-Fi connection between the two Apple devices.
For example, when you open AirDrop or select AirDrop to transfer files to another iPhone or Mac, AirDrop makes use of Bluetooth to scan for nearby Apple devices and display them as available targets on the screen of your iPhone.
When you select the receiving device and the recipient accepts it, AirDrop establishes a direct peer-to-peer Wi-Fi connection (not your Home Wi-Fi network) to quickly transfer files from the sending to receiving device.
What is Required to Use AirDrop on iPhone and Mac
The first step that is required to use AirDrop on an iPhone or Mac is to make sure that Bluetooth & Wi-Fi is enabled on both sending and receiving devices.
- iPhone: Go to Settings > Bluetooth > Enable Bluetooth.
- On Mac: Click on Bluetooth Icon (top-right corner) > enable Bluetooth in the drop-down menu.
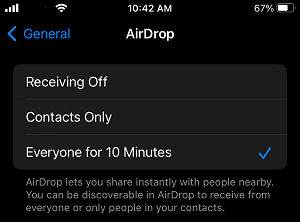
Since, AirDrop is not enabled by default on Apple devices; the next step is to manually enable AirDrop on both sending and receiving devices and select the option to be discovered by everyone using AirDrop for a limited period of time.
On iPhone: Go to Settings > General > AirDrop > select the Everyone option.
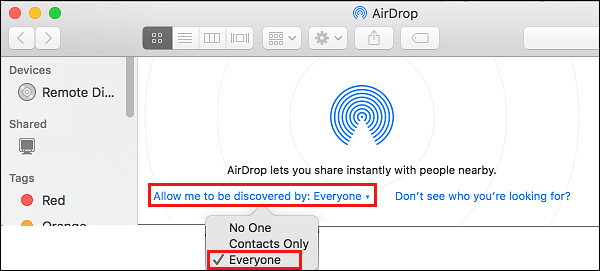
On MacBook: Open Finder > click on the Go tab in the top-menu bar and select AirDrop in the drop-down menu.

On the AirDrop screen, click on Allow me to be Discovered by option and select Everyone from the drop-down.
Note: While you can select the “Contacts Only” option, selecting Everyone is helps in preventing AirDrop problems.
How to AirDrop Files, Photos from iPhone and Mac
As mentioned above, AirDrop becomes available as a sharing option in Files, Photos and other native apps; which allows you to seamlessly share files, photos, videos, contacts and notes between iPhone and Mac.
Before going ahead with the actual steps to use AirDrop, make sure that both iPhone and Mac fulfill the following requirements.
- Your Mac needs to be 2012 or later version, running OS X Yosemite or later versions of macOS.
- iPhone needs to be iPhone 5 or later version.
- If you have created a Personal Hotspot on iPhone, it needs to be disabled.
If your device meets above requirements, you can follow the steps as provided below to AirDrop files from iPhone to iPhone, iPhone to Mac and Mac to iPhone
1. AirDrop from iPhone to iPhone (or iPad & Mac)
You can quickly AirDrop photos, videos, contacts and practically any type of file from your iPhone to another iPhone, iPad or Mac by using the following steps.
1. Open the Photos, Files or Contacts app that provides the Share option (most apps do).
2. Select the Photo, File or Contact that you want to transfer and tap on the Share icon located in the bottom menu.
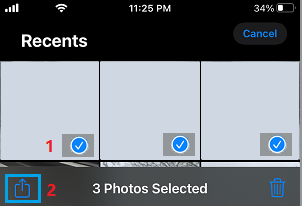
3. From the Sharing Menu that appears, select the AirDrop option.

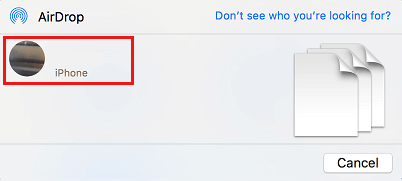
4. On the next screen, select the iPhone (Receiving device) to which you want to send photos.

5. Your Recipient will see an AirDrop pop-up and needs to select the Accept option to receive the Files (Photos in this case) from the sending device.

Once the recipient taps on Accept, you will see photos from the sending device appearing on the receiving iPhone.
2. AirDrop from Mac to iPhone (or Mac)
You can follow the steps below to AirDrop photos, notes, contacts, PDF and other types of files from your Mac to iPhone or another Mac.
1. Open Files, Photos or Contacts app that supports the Share option (most apps do).
2. Select the File, Contact or Photo (in this case) that you want to transfer.
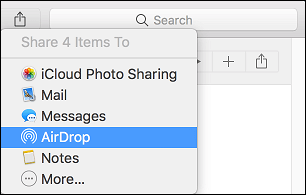
3. Once the Photo is selected, click on the Share icon located at top-left corner of the screen.
![]()
4. From the drop-down menu, select the AirDrop option.
5. On the pop-up that appears, select the receiving device (iPhone or Mac).
The selected Photos will be magically transferred to the receiving device.
3. Another Way to AirDrop from Mac to iPhone (or Mac)
Here is another way to transfer photos, PDF and other types of files from Mac to iPhone using AirDrop.
1. Open the Finder on your Mac > click on Go tab in the top-menu bar and select AirDrop option in the drop-down menu.
2. On the next screen, wait for the receiving device (iPhone or another Mac) to appear in the right-pane.
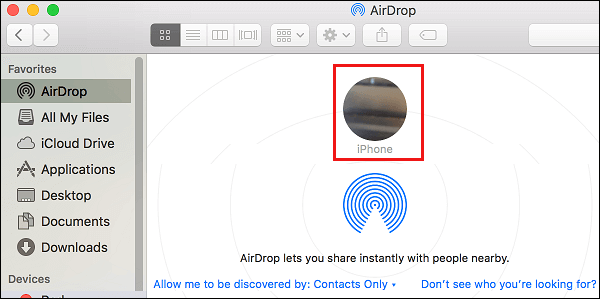
3. Once the receiving device (iPhone or another Mac) appears on the screen, you can transfer Files or Photos located on the Desktop or any folder on your Mac by dragging them into the iPhone circle or Mac circle (if transferring to another Mac).
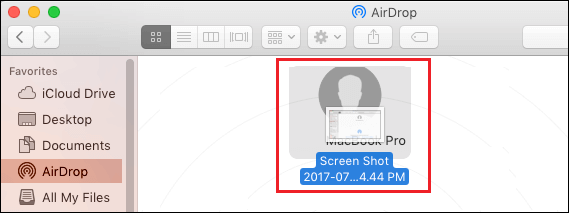
4. On the receiving device, you will see an AirDrop pop-up > tap on the Accept option to recieve the Files from Mac.