The Camera App on iPhone comes with a built-in HDR function, which automatically takes 3 photos at different exposure levels and combines them to produce a single HDR image.
In theory, the HDR (High Dynamic Range) image produced by combining 3 different photos should be of better quality, compared to photo shot at a single exposure level.
Luckily, iPhone saves both HDR and the Original images, providing you with the option to review both images and keep the one that you feel is of a better quality.
How to Enable HDR Mode for Photos on iPhone
You can follow the steps below to enable HDR Mode for photos on your iPhone or iPad.
1. Open the Camera App on your iPhone.

2. Tap on the HDR option located in top-menu bar.
![]()
3. Next, tap on either Auto or On

Tapping ‘ON’ will make HDR default for all photos that you take from your iPhone.
Tapping on ‘Auto’ will allow the Camera on your iPhone to switch to HDR Mode, whenever it senses the right conditions for shooting pictures in HDR Mode.
When to Use HDR Mode?
Going by articles on iPhone Photography School , HDR Mode is better suited for shooting Landscapes, especially when the sky is bright and the objects on land (hills, trees) are shaded.
In such cases, HDR Mode on iPhone should be able to combine the large contrast between bright sky and shaded objects to produce a photo of better quality.
Other good times to use HDR Mode would be for shooting Outdoor Portraits and backlit scenes.
HDR Mode should be able to even out the glare (in case of bright sunlight) and brighten up the dark portions (in case of backlit objects), producing images of comparatively better quality.
When Not to Use HDR Mode?
HDR Mode is not recommended for shooting moving objects, low light indoor Photos and shooting photos using the Flash Light on your Camera.
Shooting Moving objects using HDR is likely to increase chances of blurry images, especially in case the subject happens to move between any of these 3 photos.
Avoid Duplicate Copies in HDR Mode
As mentioned above, iPhone keeps copies of both original and HDR Photos on your device. However, you can also set your device to keep only HDR images and automatically discard Original images.
1. Open Settings > scroll down and tap on Camera.
2. On the next screen, disable Keep Normal Photo option by moving the toggle to OFF position.
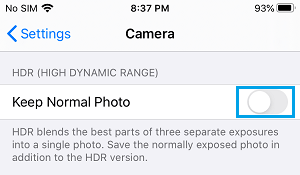
After this, your iPhone will only save the HDR version of photos and automatically delete the Original Photos.