There could be multiple reasons for AirPods frequently disconnecting from a Windows computer, ranging from the driver software not being updated to interference from other Bluetooth devices and other issues.
In certain cases, users have also reported about AirPods being connected to Bluetooth and still getting disconnected and not working while watching Netflix, YouTube and listening to music on a Windows 11/10 computer.
AirPods Disconnecting from Windows 11/10
If AirPods are frequently getting disconnected from your computer, you should be able to fix the problem using the following troubleshooting steps.
1. Power Off and Restart
In many cases, the problem of AirPods disconnecting from Windows can be fixed by shutting down the computer and re-starting it back again.
1. Shut Down the computer and wait for your device to completely power off.
2. After 60 seconds > Restart the computer and see if AirPods are now working properly on your computer.
2. Run Bluetooth Troubleshooter
If restarting the computer did not help, you can see if the built-in Bluetooth Troubleshooter on your computer can help in fixing this problem.
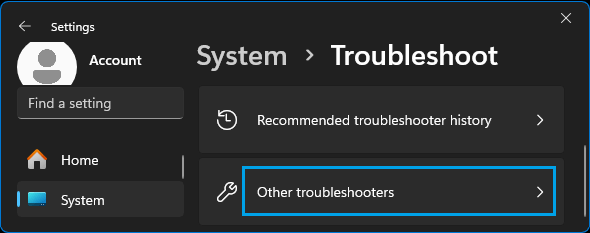
1. Open Settings > click on System in the left-pane. Scroll down in the right-pane and click on Troubleshoot.
2. On the Troubleshoot screen, click on Other troubleshooters.
Windows 10: Go to Settings > Update & Security > Troubleshoot > click on Additional Troubleshooters.
3. On the next screen, select Bluetooth and click on Run the Troubleshooter button.
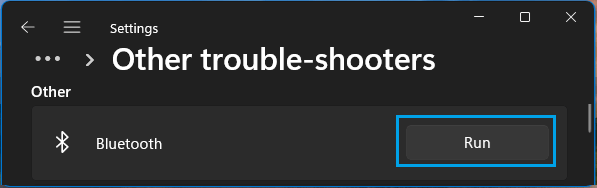
Wait for the troubleshooter to find and fix Bluetooth connectivity problems on your computer.
3. Update AirPods Driver
As mentioned above, the problem could be due the drivers for the AirPods not being updated.
1. Right-click on the Start button and click on Device Manager.
2. On Device Manger screen, expand Bluetooth entry, right-click on AirPods and click on Update Driver option.
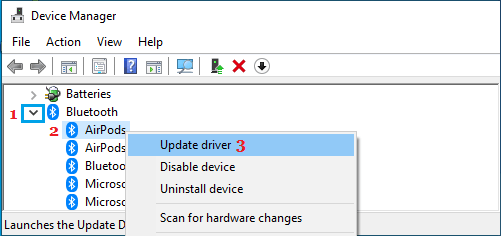
3. On the next screen, click on Search Automatically for Updated Driver Software option.
Windows will automatically search for the latest drivers and install them on your computer and this should help in fixing the problem with AirPods on your computer.
4. Install Updates
Make sure that your computer is up-to-date with the latest operating system updates.
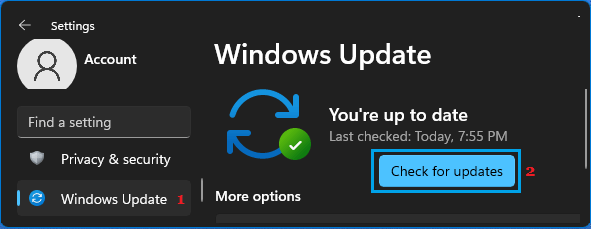
1. Open Settings > click on Windows Update in the left-pane and click on Check for updates button in the right-pane.
Windows 10: Go to Settings > Updates & Security > Windows Update > click on Check for Updates button.
2. Allow Windows to check for available updates and install them on your computer.
After installing the available updates, Restart the computer and see if AirPods are now working properly.
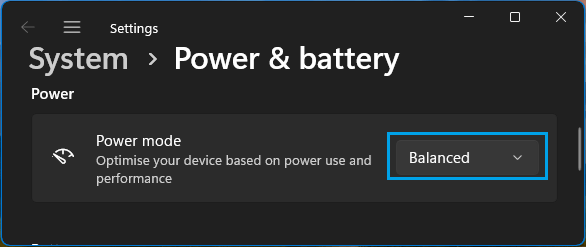
5. Switch to Balanced Power Plan
If your computer is set to use manufacturers power-saving plan, switch to a Balanced Power Plan and see if this helps in fixing the problem.
1. Right-click on the Start button and click on Power Options.
2. On the Power Settings screen, make sure the Balanced Option is selected.
Windows 10: Go to Settings > System > Power & Sleep > scroll down and click on Additional Power Settings > make sure Balanced Power Plan is selected.
3. After this, Restart the computer and see if you can now use AirPods without experiencing any problem on your computer.
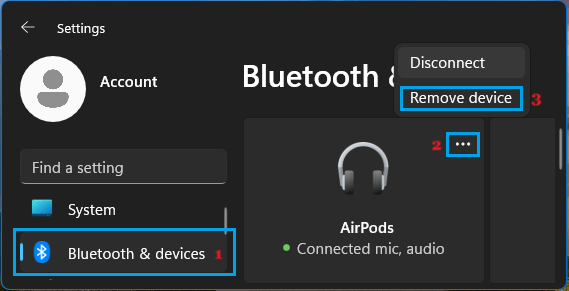
6. Remove AirPods and Add Them Back
If the problem is still not fixed, follow the steps below to remove the AirPods from the computer and add them back.
1. Keep AirPods in the Charging case > Close the Lid and wait for 60 seconds.
2. Go to Settings > Bluetooth & Other Devices > click on 3-dots menu Icon next to AirPods and select Remove device option.
3. After this, go to Settings > Bluetooth & Other Devices > Add Device > click on the Bluetooth tab.
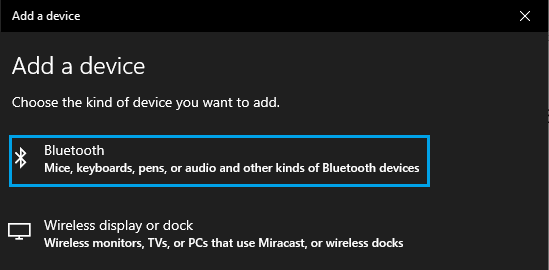
4. Press the pair button located at backside of the AirPod Case for a few seconds.
5. Select your AirPods as the appear on Add a device screen.
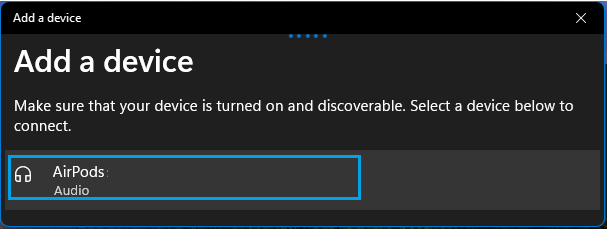
After this, you should find the AirPods working properly, while watching Netflix, YouTube and listening to Music on Spotify and other streaming services.
7. Disconnect Other Bluetooth Devices
The problem could be due to interference from other Bluetooth devices attached to your computer.
To rule out this possibility, go to Settings > Devices > disconnect other Bluetooth devices from your computer and see if this helps in fixing the problem.
If the issue is resolved, reconnect Bluetooth devices one-by-one to identify the particular device that is causing the problem on your computer.