While both Microsoft Word & Excel come with the built-in ability to send Emails directly from within the apps, the specific “Send to Mail Recipient” feature needs to be manually enabled in both Excel and Word.
Once the “Send to Mail Recipient” feature or option is enabled, you will be able to access the default Email Client on your computer, directly from within any Microsoft Excel File or Microsoft Word document on your computer.
Enable “Send to Mail Recipient” in Excel and Word
You can find below the steps to enable “Send to Mail Recipient” option in Microsoft Word and Microsoft Excel programs on a Windows 11/10 computer.
1. Enable Send to Mail Recipient Option in Microsoft Word
You can follow the steps below to enable “Send to Mail Recipient” option in Microsoft Word app or desktop program on your computer.
1. Open the Microsoft Word program on your computer
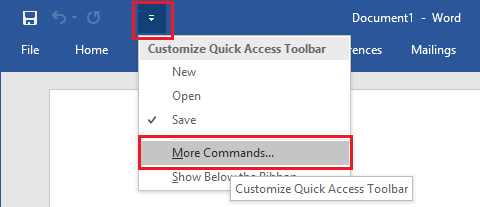
2. Click on the small Down Arrow located at the upper left corner of your screen and click on More Commands.
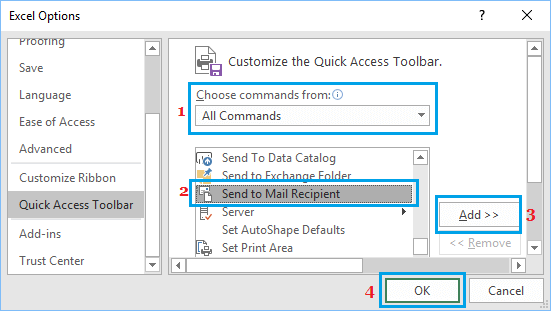
3. On “Word Options” screen, click on Quick Access Toolbar > select All Commands > go to Send to Mail Recipient entry and click on the Add button to add “Send to Mail Recipient” option to Quick Access Toolbar in Word.

4. Click on OK to save this setting for all Word Files on your computer.
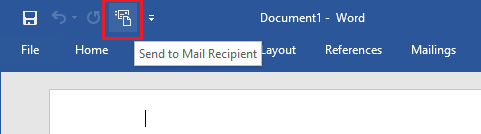
After this, you should be able to see Send to Mail Recipient option in Quick Access Toolbar in Microsoft Word.
2. Enable Send to Mail Recipient Option in Excel
Similarly, you can enable the “Send to Mail Recipient” option in Microsoft Excel app or desktop program on your computer.
1. Open Microsoft Excel Program on your computer.
2. Click on the small Down Arrow located at upper-left corner of the screen and click on More Commands.

3. On the next screen, select All Commands > Send to Mail Recipient and click on the Add button.
4. Make sure that you click on OK to save this setting for all Excel Files on your computer.
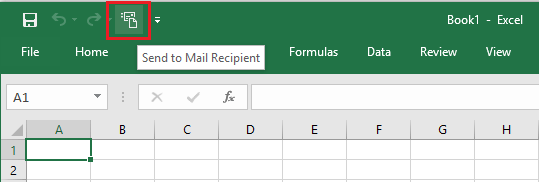
After this, you should be able to see and access the Send to Mail Recipient option from the Quick Access Toolbar in the Microsoft Excel program on your computer.
Note: If “Send to Mail Recipient” option is missing or not working properly, you should be able to fix the problem using steps as provided in this guide: Mail Recipient Missing from Send to Menu in Windows 11/10.