If you are concerned about confidential files and folders on your computer being accessed by others, you can find below different methods to hide files on Mac.
Hide Files and Folders on Mac
Perhaps the easiest or the most uncomplicated way to hide files on Mac would be to place them in a sepearate User Account.
Since, the New User Account is protected by a Login Password, it will make it very difficult for anyone to access your files, without knowing the login password.
If you do not like the idea of hiding important files in a sepeare User Account, you can hide them on the same User Account by using other methods as provided below.
1. Hide Files on Mac in Library Folder
An easy way to Hide Files and Folders on Mac is to move them to Library Folder, which is used by macOS to hide important System Files.
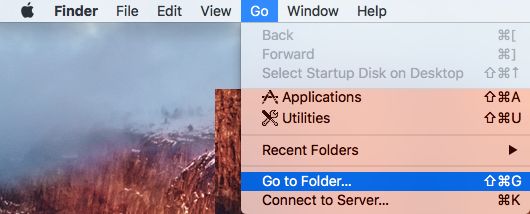
1. Click on the Finder Icon > select the Go tab in top-menu bar and click on Go to Folder… option in the drop-down menu.
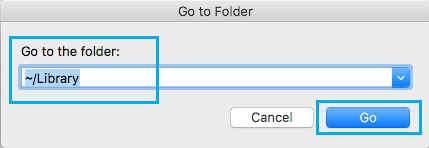
2. In Go to Folder window, type ~/Library and click on the Go button and this will take you to the Library Folder.
3. In the Library Folder, click on 3-dots icon and select New Folder option in the menu that appears.

4. Once the New Folder is created, type an appropriate Name for the Folder and click outside to save this Folder on your computer.

5. Now, any File or Folder that you drag and drop into this New Folder will be hidden.
At any time, you can access the Files in this hidden folder by going to the hidden library folder.
2. Hide Files on Mac Using Terminal
If you are comfortable using the Terminal, you can follow the steps below to Hide Files on your Mac.
1. Click on the Finder icon > Navigate to Applications > Utilities > Terminal.app.

2. On the terminal screen, type chflags hidden and press the space bar to leave one empty space.

3. Next, drag the File or Folder that you want to hide into the Terminal screen and drop it next to chflags hidden command.
This will type the path to File/Folder next to the chflags hidden command > press the Enter key and you will immediately find the File/Folder disapearing.
At any time, you can unhide this File/Folder by typing chflags nohidden followed by the path of the hidden file or folder.

Tip: Copy the path to hidden Files/Folder whenever you hide them on your Mac.
3. Hide Files in a Different User Account
1. Click on Apple Icon on top menu bar and select System Settings or System Preferences in the drop-down menu.
2. On the next screen, click on Users & Groups icon (See image below)

3. On the next screen, click on the Lock icon located at lower-left corner of the screen.
![]()
4. On the pop-up, enter your Admin User Name, Password and click on Unlock.
5. Next, click on the “+” Plus button, located at bottom-left corner of to Add a New User Account.
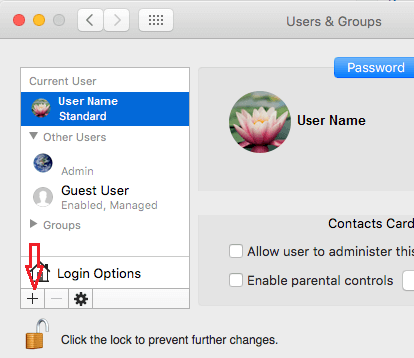
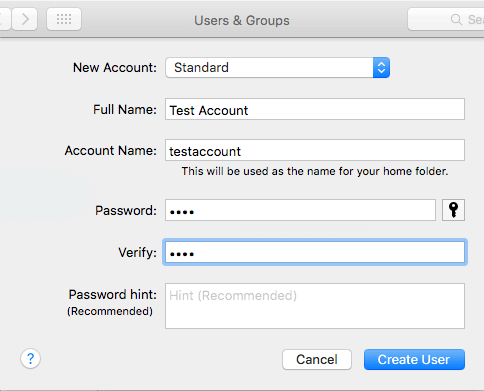
6. On the next screen, enter Name, Password and an optional but recommended Password Hint for the New User Account and click on the Create User button.
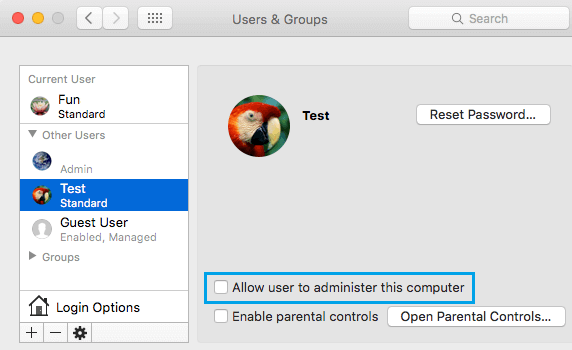
7. On the next screen, make sure “Allow user to administer this computer” option is unchecked.
Now, you can keep your confidential and important files/folders in this User Account and prevent them from being accessed by others.