There could be various reasons for high disk usage on a Windows computer, ranging from startup programs, background running apps, outdated device drivers to malware and corrupted software and system files.
In a typical case, the disk usage on the computer constantly remains high and goes up to a range of 80% to 100%, as soon as you start using the web browser or start working on a spreadsheet or document.
You can check and confirm the amount of disk usage on your computer by opening Task Manager and taking a look at the Disk column under the processes tab.

As you can see in the image above, the Disk column is marked red with High Disk Usage (99%), which means the resource usage on the computer is maxed out.
Steps to Fix High Disk Usage in Windows 11
If your computer has become painfully slow, freezes, stutters, or hangs up frequently, it is likely suffering from high disk usage. You should be able to fix this issue using the following steps.
1. Restart the Computer
The first step would be to restart the computer, in order to rule out the possibility of a stuck program or process being the cause of this high disk usage on your computer.
If your computer is suffering from high disk usage due to other reasons, you will find it slowing down and struggling to run after a certain period of use, once it has been restarted.
2. Repair System Files Using SFC
The next step would be to rule out the possibility of the problem being caused due to corrupted system files.
1. Type CMD in the Search bar > right-click on Command Prompt in the search results and select Run as Administrator option.
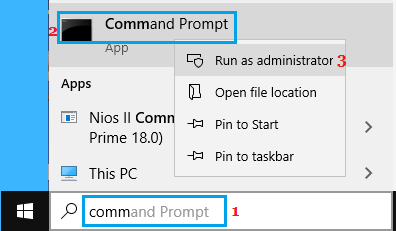
2. Type sfc /scannow in the Command Prompt window and press the Enter Key on the keyboard of your computer.
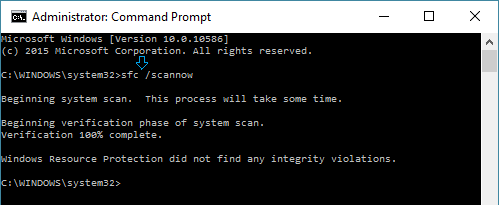
Patiently wait for Windows to scan your computer for System File Errors and fix them.
3. Disable Startup Apps
A common reason for 100% disk usage in Windows is due to the default tendency of apps like OneDrive and Skype to automatically start up with the computer and keep running in the background.
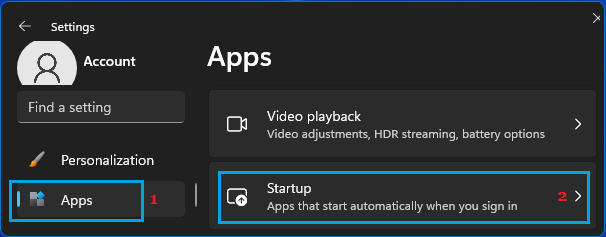
1. Open Settings > click on Apps in the left-pane and then click on Startup in the right-pane.
2. On the Startup screen, move the toggle next to Apps that you do not want startup with the computer to OFF position.
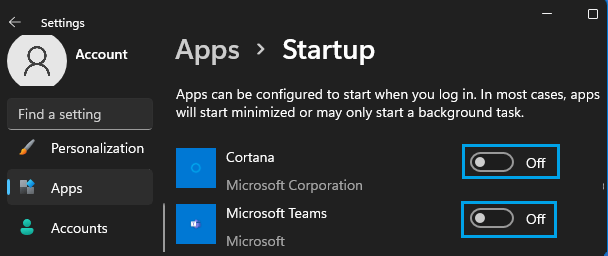
When you restart the computer, you will notice that the disabled apps are no longer starting up with the computer.
4. Prevent Apps from Running in Background
Even if the Startup apps are disabled, they have tendency to keep running in the background, once they are manually opened by the user.
Hence, the next step is to prevent all unwanted Apps from running in the background and unnecessarily using up resources on your computer.
1. Open Settings > click on Apps in the left-pane and then click on Installed Apps in the right-pane.
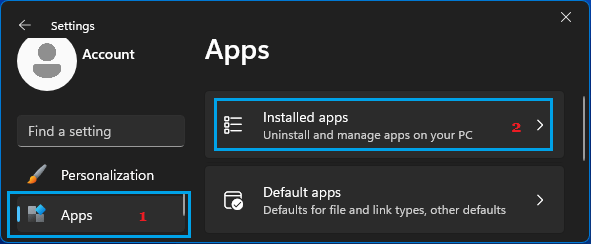
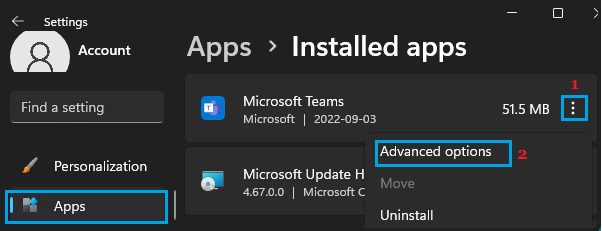
2. On the Installed apps screen, click on the 3-dots icon next to the app that you want to stop from running in the background and click on Advanced options from the dropdown.
3. Next scroll down to the “Background App Permissions section” and set Let this App Run in Background to Never.
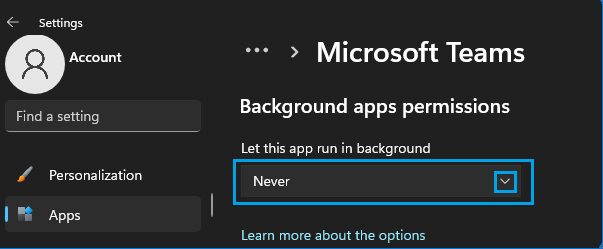
Similarly, you can prevent Skype, OneDrive and other Apps from running in the background.
5. Disable SuperFetch
While SuperFetch feature helps in efficiently loading apps on the computer, it has been associated with high disk usage.
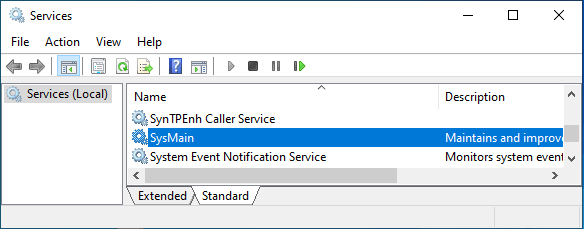
1. Right-click on the Start button and click on Run. In the Run command window, type services.msc and then click on OK.
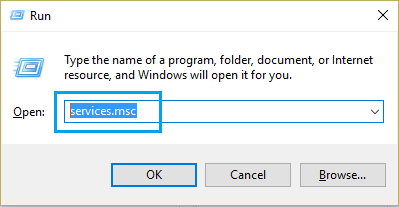
2. On the next screen, double-click on SysMain.
3. Next, set Startup type to Disabled and then click on the Stop button.
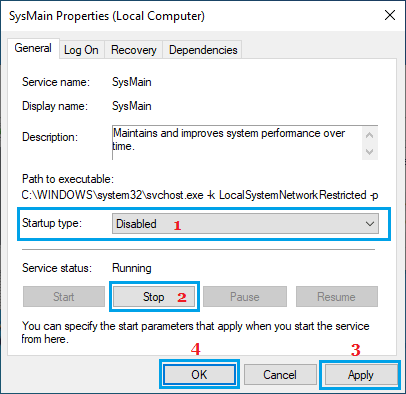
4. Click on Apply and OK to save this setting on your computer.
6. Disable MSI Mode in StorAHCI.sys Driver
If you are facing 100% disk usage on a Windows computer with an SSD drive, the problem could be due to a firmware bug that prevents SSD drives from completing input/output requests.
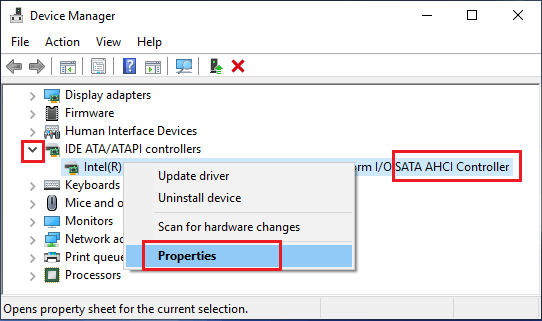
1. Right-click on the Start button and click on Device Manager.
2. On the Device Manager screen, expand IDE ATA/ATAPI controllers > right-click on Standard SATA AHCI Controller and click on Properties.
3. On the next screen, switch to the Driver tab and click on Driver Details.
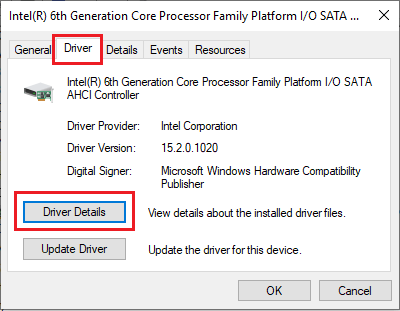
If you see storachi.sys entry on the Driver Details screen, you need to disable MS Mode for the Driver by using Registry Editor fix mentioned on Microsoft’s support page.
7. Disable Tips & Tricks
While receiving tips from Microsoft can be useful, this feature has also been linked to high resource usage.
1. Go to Settings > System > Notifications > scroll down and click on Additional Settings.
2. On the next screen, uncheck the Get tips and suggestions when using Windows option.
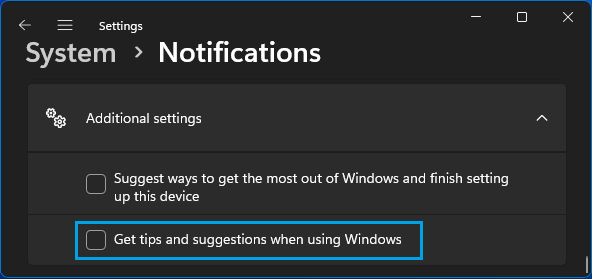
Also, uncheck “Suggest ways to get the most out of Windows…” option.
8. Switch OFF Diagnostic Data & Tailored Experiences
Sending out diagnostic data can also be a contributing factor to high resource usage on a Windows computer.
1. Open Settings > click on Privacy & security in the left-pane. Scroll scroll down in the right-pane and click on Diagnostics & feedback tab.
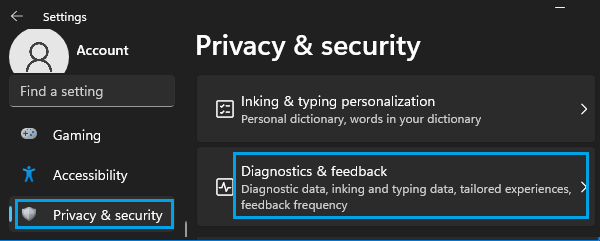
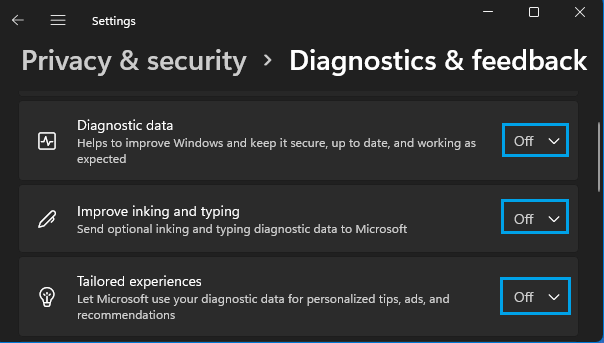
2. Next, disable Diagnostic data, Improve inking & typing and Tailored experiences.
9. Disable Updates from More Than One Place
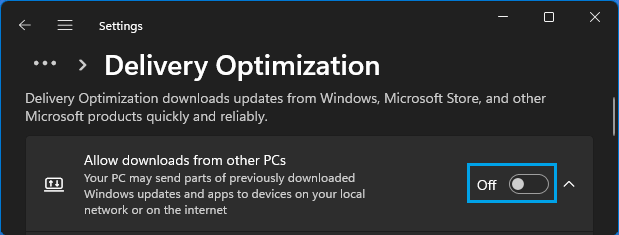
Disabling updates from more than one place has been identified as a solution to fix the problem of high resource usage on a Windows computer due to Runtime Broker Activity.
1. Go to Settings > select Windows Update in the left-pane and then in the right-pane click on Advanced options.
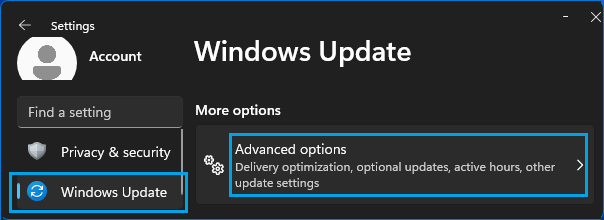
2. On the next screen, click on Delivery Optimization and then disable Allow Downloads from other PCs option.
10. Setup Visual Effects for Best Performance
1. Right-click on the Start button and then click on Run.
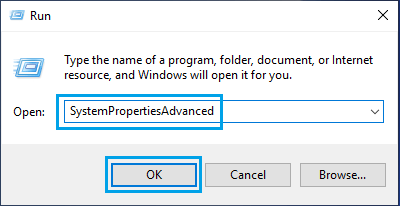
2. In the Run Command window, type SystemPropertiesAdvanced and click on OK.
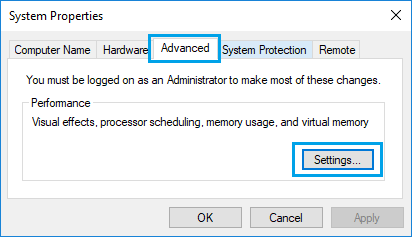
3. On the pop-up screen, switch to the Advanced tab and click on the Settings button under “Performance” section.
4. Next, switch to the Visual Effects tab and select the Adjust for best performance option.
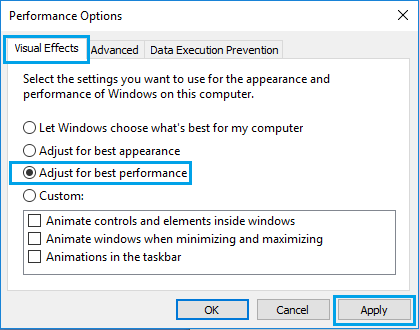
5. Click on Apply > OK to save these settings.
11. Check for Viruses and Malware
The presence of viruses and malware on the computer can cause a variety of problems, including 100% disk usage error.
To check for viruses and malwares, make sure that your antivirus program is up to date. You can also make use of Microsoft’s free Safety Scanner, which you can make use of to scan your computer for malware and viruses.