Here is how to Insert Picture into Excel Cell, in case you come across the need to insert company logo or product pictures into Excel.

Insert Picture Into Excel Cell
The Insert function in Microsoft Excel allows you to insert Shapes, Icons and Pictures from computer and also from the Internet into Excel.
This can be useful in a variety of work related situations. For example, if you are preparing a list of products, you can have an extra column containing pictures of the products.
After inserting pictures, you can embed them into Excel cells, which will make them move, resize, hide, unhide and filter along with the cells.
So, let is go ahead and take a look at the steps to Insert Picture Into Excel Cell and Lock the Picture to an Excel Cell.
1. Insert Picture into Cell in Excel
Follow the steps below to insert picture into a cell in Excel.
1. Open the Excel File into which you want to insert Picture
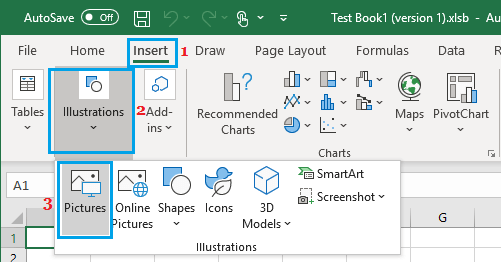
2. Click on the Insert tab > click on Illustrations and select Pictures option in Illustrations group.

3. On ‘Insert Picture’ screen, select the Picture (or Pictures) that you want to insert and click on the Insert button.

The selected picture will be immediately available in your Excel File.
2. Resize Picture to Fit into Excel Cell
By default, pictures inserted into Excel remain in their own separate layer and you will find them moving or floating independent of the cells.
This allows you to resize the picture to match the size of the Cell or Cells into which it is being placed.
An easy way to fit picture within an Excel Cell is to first enlarge the Cell > press the ALT key > Move the picture into the Cell.
3. Lock Picture to Cell in Excel
When you insert Picture in Excel Cell, the image will not stick with the cell, when you move or resize Cells in the worksheet.
You can easily fix this issue by associating or locking the picture to the Cell into which it has been placed.
Once the picture is locked to the Cell it will move, resize, hide, unhide and filter along with that cell.
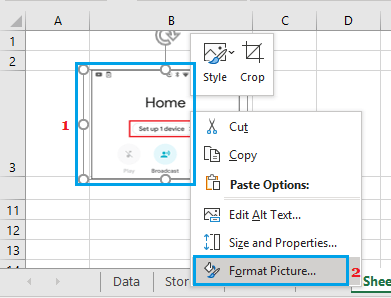
1. Right-click on the inserted picture and select Format Picture option in the contextual menu.

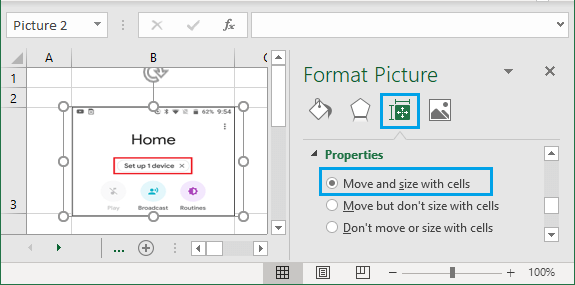
2. In Format Picture window, select Move and size with cells option in ‘Properties’ section.

After this setting, the picture gets locked to the Cell into which it has been placed and it will move, resize, hide, unhide and even filter along with the Cell.
Note: In order to Filter Pictures in Excel, you will have to label or name the pictures.