An easy way to prevent your personal information and confidential work files being seen by others is to get into the habit of manually locking the screen of your computer, whenever you are stepping away from it.
Once the screen of your computer is locked, it will prevent the possibility of an open document, spreadsheet or the website that you were using being viewed by others around you.
This will also totally eliminate the possibility of anyone being able to gain access to your device, while you are away and the computer is still within its regular auto-lock period (3 to 15 minutes of inactivity).
Lock Windows Screen: Quickly, Manually & Automatically
The quickest way to manually lock the screen of a Windows computer is by pressing Windows + L keys at the same time.
In addition to this, you can find below 3 other methods to manually lock the screen of your computer and also the steps to automatically lock the screen of a Windows computer using screen saver.
1. Lock Screen Using Ctrl +Alt + Delete Shortcut
Press Ctrl + Alt + Delete keys at the same time on the keyboard of your computer and click on the Lock option that becomes available on the pop-up menu.
While this is probably the most commonly used method to quickly Lock Screen in Windows, it is not fast as the second method as provided below.
2. Quickly Lock Screen Using Windows + L Shortcut
As mentioned above, the quickest way to lock screen in Windows is by using Windows + L keyboard shortcut.
Simply, press Windows Logo + L Keys at the same time on the keyboard of your computer and this will immediately Lock you out of the current screen and take you to the Login Screen.
3. Lock Screen Using Start Menu
If you are not good at remembering keyboard shortcuts, you can manually lock the screen of your computer by using the Start menu.
Click on Windows Start button located in the Taskbar of your computer.
2. In the Start menu, click on the Power Icon and select the Lock option.
![]()
While this method may not be as fast as Windows + L method, it is easy to remember and most users are quite familiar with opening the Start menu on a Windows computer.
4. Create Desktop Shortcut to Lock Windows Screen
Another way to quickly lock the screen of a Windows computer is by creating a Desktop shortcut to Lock the computer screen
1. Right-click in any blank space on the Desktop > click on New > Shortcut.
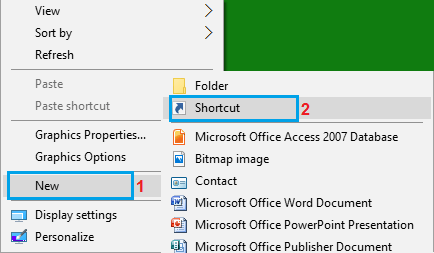
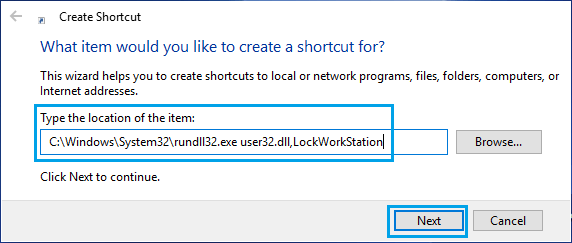
2. On Create shortcut screen, enter C:\Windows\System32\rundll32.exe user32.dll,LockWorkStation as location for the item and click on the Next button.
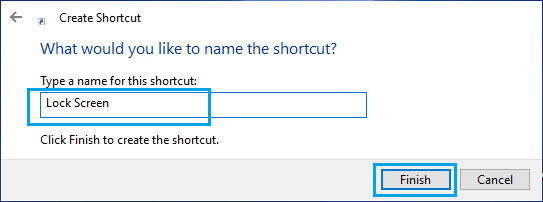
3. On the next screen, type a Name for the shortcut (you can call it “Lock Screen”) and click on Finish.
4. Next, right-click on the newly created Shortcut and select Pin to taskbar option.
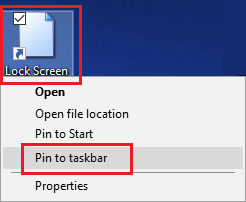
This will add the Lock Screen shortcut to Taskbar, which should make it easy to Lock the screen on your computer by double-clicking on the Shortcut.
5. Automatically Lock Windows Screen
Using Screen Saver Settings, you can make your computer to automatically Lock its screen as soon as the screen saver pops up.
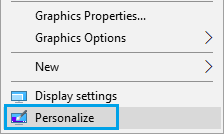
1. Right-click in any Empty space on the Desktop and click on Personalize.
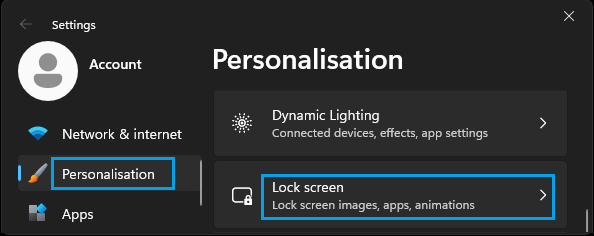
2. On the Personalization screen, scroll down in the right-pane and click on Lock Screen .
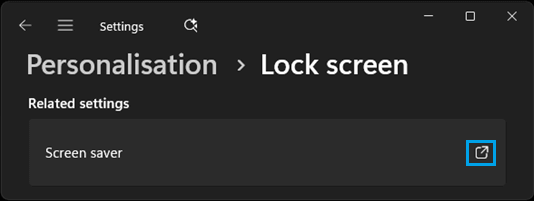
3. On the next screen, scroll down in the right pane and click on Screen Saver link.
4. On Screen Saver Settings screen, select On resume, display logon screen option.
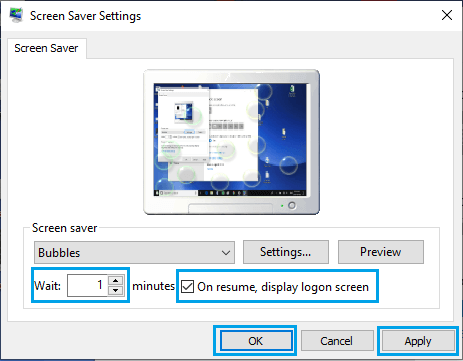
5. Click on Apply and OK.
As you can see in above image, the Wait option allows you to set the wait time, after which the screen Saver becomes active on the computer.
Once the Screen Saver gets triggered on the computer, anyone that is trying to access your computer will be required to tap on the track pad (or press any key) and enter the Login Password.