You may find the need to manually make the Printer Online on your Windows 11/10 computer, if the printer has gone offline and not responding to your print commands.
In most day to day scenarios, printers usually go offline due to paper getting jammed in the printer, the printer running out of paper and also due to the printer being unable to process the print job.
Make Printer Online in Windows 11/10
If your printer has suddenly gone offline, you should be able to make the printer online by clearing the paper jam, filling the paper tray and restarting the printer.
If the problem is not related to paper jam or lack of paper, you should be able to make the printer online by using any of the following methods.
1. Make Printer Online in Windows 11 Using Settings
An easy way to disable offline mode and make the printer online is by using the Settings App on your computer.
1. Go to Settings > Bluetooth & devices > scroll down and click on Printers & Scanners in the right-pane.
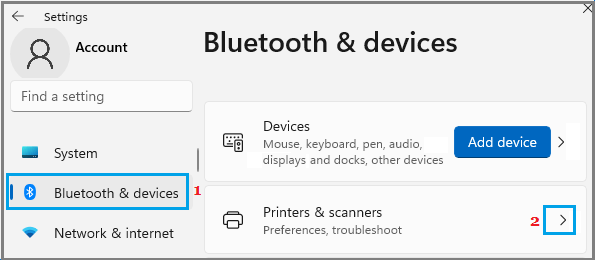
Windows 10: Go to Settings > Devices > Printers & Scanners >
2. On Printers & scanners screen, select your Printer (it will be listed as offline).
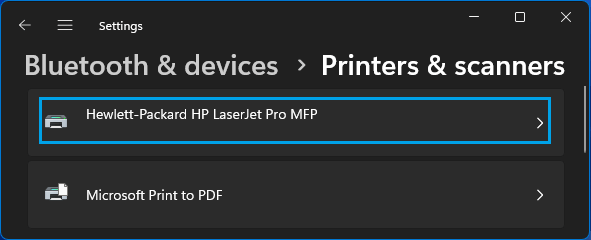
2. On the next screen, click on Open queue option.

3. On the next screen, click on Use Printer Offline option to remove the check mark on this item.
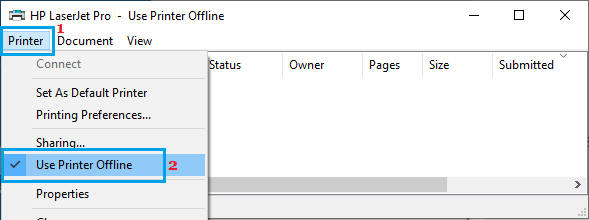
4. Wait for the printer to come back online.
2. Make Printer Online in Windows 10 Using Settings
The easiest way to make a printer online on a Windows 11/10 computer is by using the Settings App.
1. Go to Settings > Devices > Printer & Scanners (left-pane). In the right-pane, select your printer and click on Open queue option.
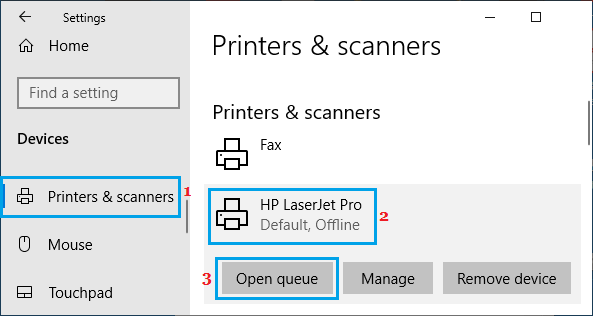
2. On the next screen, select the Printer Tab and click on Use Printer Offline option to remove the check mark on this item.

3. Wait for the printer to come back online.
3. Make Printer Online Using Device Manager
If you prefer using Device manager, you can follow the steps below to make the printer online on your Windows 11/10 computer.
1. Right-click on Start button and click on Device Manager option in the WinX menu.
2. On Device Manager Screen, click on the Action tab and select Devices and Printers option in the drop-down menu.
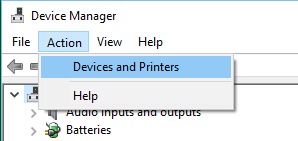
Note: If Devices and Printers option does not appear, retry again after sometime.
3. On Devices and Printers screen, right-click on the Offline Printer (it will appear Faded) and select See what’s printing option in the contextual menu.
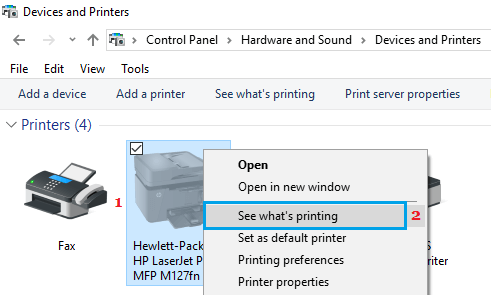
4. On the next screen, select the Printer Tab and click on Use Printer Offline option to remove the check mark on this item.

5. Wait for the printer to come back online.
Once the printer comes back online, it should start printing whatever was in the print queue.
4. Use the Printer Troubleshooter
If the option to make printer online is Grayed Out or if the printer comes online briefly and then goes back offline again, it is time to troubleshoot the printer problem on your computer.
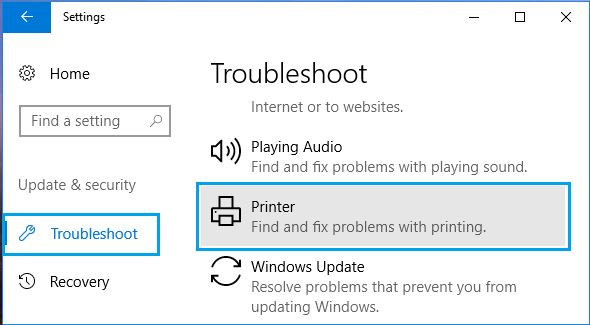
1. Go to Settings > Devices > click on Troubleshoot option in left-pane. In the right-pane, scroll down and click on Printer option under ‘Troubleshoot’ section.
2. In the Expanded Printer Menu, click on Run the Troubleshooter Option.
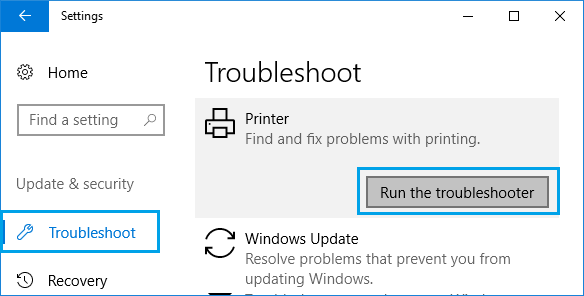
3. Allow the Troubleshooter to run and it will come up with suggestions to fix the problem.
In this case the suggestion was to make the Printer as the Default Printer. The suggestion in your case might be to update the driver or anything else.
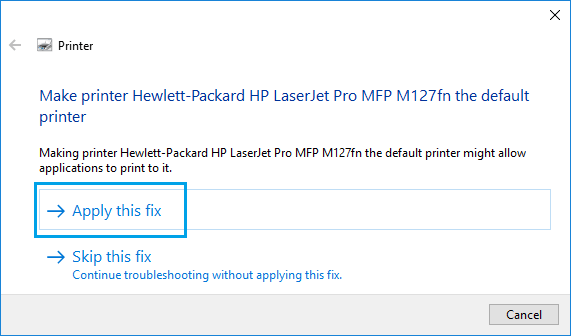
4. Click on Apply This Fix, and follow the next instructions.