The problem of Microphone not working in Microsoft Teams on a Windows computer could simply due to the microphone being muted, Incorrect Input device being selected or an access/permission related issue.
In general, the most likely or the top reasons for microphone not working in Microsoft Teams are likely to be the following.
- Input Device Selection: If you are using an external microphone or headphones, the reason could be due to the built-in microphone of the computer being selected as the input device.
- Privacy Settings: Windows Security & Privacy settings might be blocking Microsoft Teams from accessing the microphone.
- Browser Permissions: If you are using Teams on the web, you may need to provide microphone access in the web browser’s settings (Edge or Chrome).
Note: If the problem is System wide and not specifically related to Microsoft Teams, you need to take a look at this guide: Fix: Microphone Not Working in Windows 11.
Microphone Not Working in Microsoft Teams
Now that we have understood the most likely reasons for microphone not working in Microsoft Teams, we can go ahead and take a look the troubleshooting steps to fix this issue.
1. Check Microphone Access in Privacy Settings
The first step would be make sure that access to microphone is not being blocked by the “Privacy Settings” on your computer.
1. Open the Settings App on your computer.
2. From the Settings screen, go to Privacy & security > Microphone > move the slider next to Microphone Access to ON position.
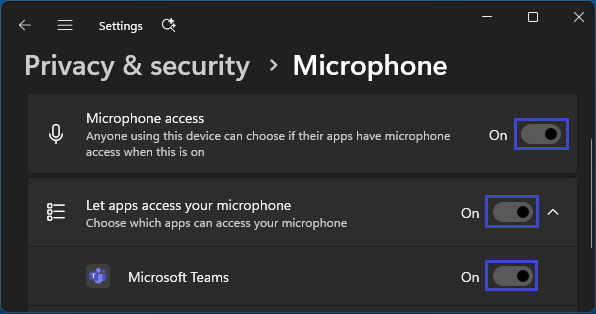
On the same screen, make sure Let apps access your microphone option is switched ON and Microsoft Teams (if listed) is provided with access to microphone.
After this, restart Microsoft Teams and you should find the microphone working properly.
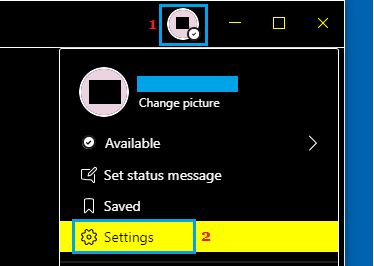
2. Select Microphone in Teams
It is possible that the microphone is not being recognized by MS Teams or it needs to be specifically selected or identified within the Teams App.
1. Open Microsoft Teams on your computer.
2. Click on the Profile Icon and select Settings in the drop-down menu.
3. On the “Settings” screen, select the Devices tab in the left-pane > In the right-pane, use the drop-down to select your Microphone.
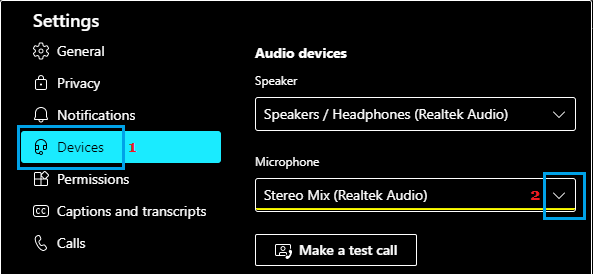
If the Microphone is not listed on this screen, it is either not being recognized or has been disabled in “Privacy settings” on your computer.
3. Allow Media Access for Apps in Microsoft Teams
Make sure that access to Media (Microphone & Speakers) is provided in “Permissions” section of the Microsoft Teams App on your computer.
1. Open Microsoft Teams > click on Profile Icon and select Settings in the drop-down menu.
2. On the “Settings” screen, select Permissions in the left-pane > Enable Media (Camera, microphone, speakers) option in the right-pane.
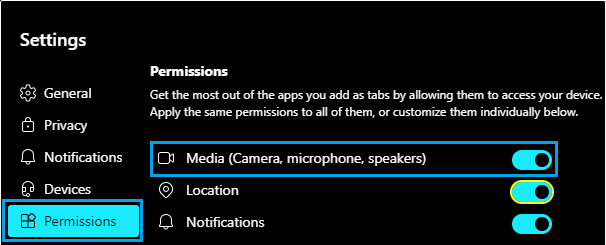
This will allow Apps that you add as tabs in Teams to access the microphone on your computer.
4. Enable Microphone Using Control Panel
If an external microphone or headset is not being detected by Settings, you can enable the external microphone by using Control Panel.
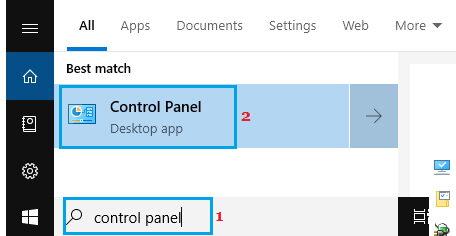
1. Type Control Panel in the search bar and click on Control Panel App in the search results.
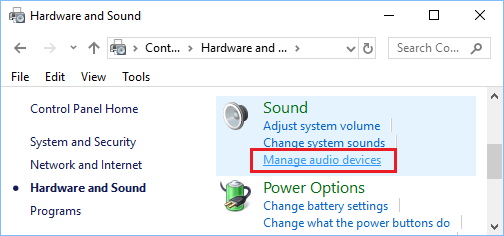
2. On the Control Panel screen, navigate to Hardware & Sound > click on Manage Audio Devices.
3. On the pop-up, switch to Recording tab > Right-click on the Microphone and click on Enable.
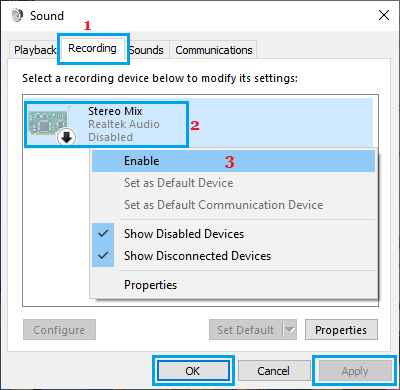
After this, the Microphone should be available for selection in the Teams App.
5. Allow Microphone Access in Web browser
As mentioned above, access to microphone needs to be provided in the browser settings; if you are using the web version of Microsoft Teams.
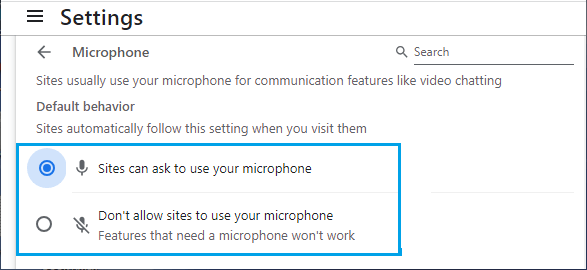
Google Chrome: Go to Settings > Privacy and Security > Site Settings > Microphone > Select Sites can ask to use your microphone option.
Microsoft Edge: Go to Settings > Privacy, search and services > Site Permissions > All Permissions > Microphone > Enable Ask before accessing option.

Note: This fix is applicable only if you are joining a Teams meeting via an Email Link and not applicable if you are using the Desktop version of Microsoft Teams.