If your computer is coming up with “There is not enough memory to complete this operation”, you won’t be able to open the File, App or Desktop program that you were trying to open.
While this error message appears to be pointing to lack physical memory (RAM), it can also occur on computers with high RAM capacity, where lack of memory is not the issue.
In such cases, the problem could be occurring due to corrupted system files or the App/program that is generating this error message being damaged or corrupted.
Not Enough Memory to Complete This Operation in Windows
On computers with Low RAM capacity (8 GB RAM in our case), this error message can be fixed by increasing the virtual memory on the computer, which provides Windows with additional room to handle data.
In addition to this, it is also worth checking the computer for System File Errors and repairing the App or Desktop program, which is generating this error message.
1. Increase Virtual Memory
As mentioned above, increasing the size of virtual memory or paging file can help in fixing this issue.
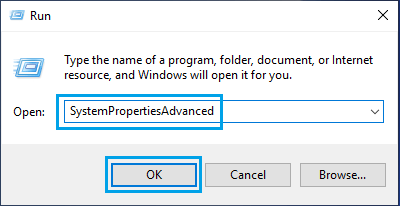
1. Open Run Command (press Windows + R keys).
2. Type SystemPropertiesAdvanced and click on OK.
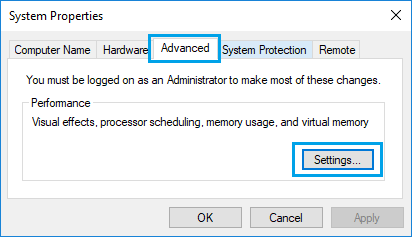
3. On System Properties screen, make sure you are on Advanced tab and click on the Settings button, located under “Performance” section.
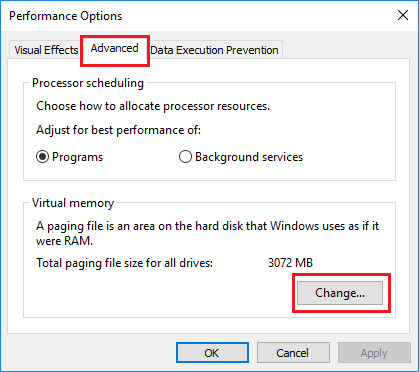
4. On the next screen, go to Advanced tab and click on the Change button, located under “Virtual memory” section.
5. On “Virtual Memory” screen, de-select Automatically manage paging file size option, select your Hard Drive, select Custom size option, type Initial Size and Maximum Size values and click on the Set button.
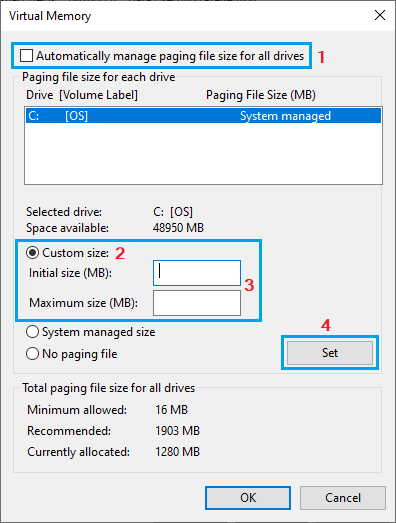
Note: Set Initial Size to 1.5 times RAM and Maximum Size to 3 times the available RAM on your computer.
6. Make sure you click on OK and Restart the computer to apply this change.
This provides Windows with additional space on the Hard Disk (virtual RAM), to store data required for proper functioning of apps and programs running on the computer.
2. Repair the App
Windows operating system comes with the built-in option to repair apps, if they are not running properly and coming up with error messages.
1. Go to Settings > Apps > Apps & Features.
2. On the next screen, click on 3-dots icon located next to the App and select Advanced options in the menu that appears.
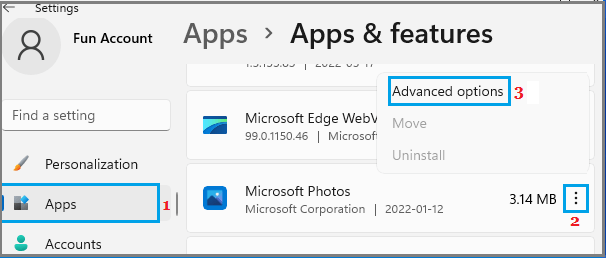
3. On the next screen, select the Repair option.
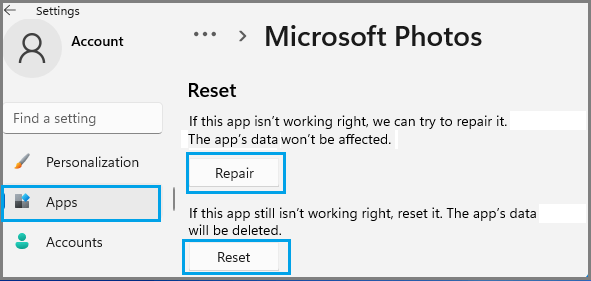
Note: You can also try the Reset option, which resets the App to its original settings.
3. Check 32-bit Apps
While the latest version of Windows can run 32-bit apps, there is always the possibility of 32-bit apps becoming incompatible with system/security and performance requirements of a 64-bit operating system.
1. Right-click on the Taskbar and click on Task Manager.

2. On Task Manager screen, go to the Details tab and see if is any 32-bit application is showing up.
If you find any 32-bit application, you can replace it with a 64-bit version, in order to avoid this problem.
4. Run Disk Cleanup
Accumulation of temporary files, thumbnails and other types of files can cause performance issues and lead to memory related errors on the computer.
1. Type Disk Cleanup in the Search bar and click on Disk Cleanup in the search results.
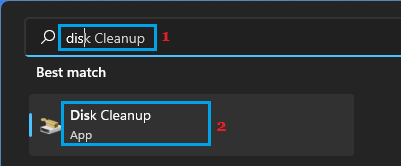
2. On the next screen, select the Files that you want to delete and click on OK.
5. Run SFC Scan
If your computer is still coming up with “Not Enough Memory” error message, the problem could be due to damage or corruption of System Files.
In most cases, this can be checked and fixed by using the built-in SFC (System File Checker) tool that is available on a Windows computer.
1. Right-click on Start button and click on Command Prompt (Admin).
2. On the Command prompt screen, type sfc /scannow and press the Enter key.
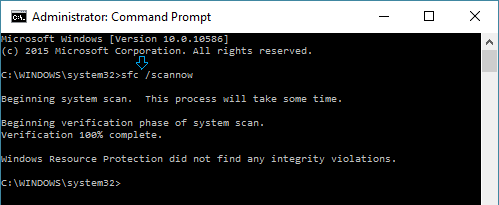
3. Wait for the SFC command to be executed and Restart the computer.