Windows operating system provides the option to Optimize and Defragment the hard drive, which can help in improving the performance of computers using traditional HDD Drives.
Since, computers with SDD drives do not need to be defragmented, the “Optimize Drives” utility works in a different way to optimize the performance of SSD drives.
After running ‘Optimize Drives’ utility, you should notice improved startup times and quick opening of files and applications on your computer.
Optimize/Defragment Hard Drive in Windows 11/10
Windows should automatically run ‘Optimize Drives’ utility on your computer on a weekly basis, in order to Defragment the Hard Disk and improve its performance.
However, this may not always happen and hence it is a good idea to make sure that the Hard Drive on your computer is not too fragmented.
While there is no set rule about when to Defragment Hard Drives, it is considered a good practice to keep the fragmentation percentage of Hard Disk Drive to a low number (5 to 7%).
In general, you should consider running ‘Optimize Drives’ utility, whenever you notice a sluggishness in the performance of your computer.
1. Steps to Defragment Hard Drive on Windows Computer
Follow the steps below to Defragment the Hard Drive on your Windows computer.
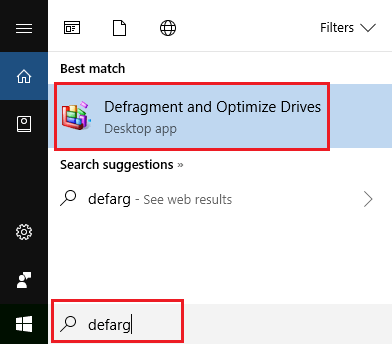
1. Type defrag in the Windows Search bar and click on Defragment and Optimize Drives option in the “Best Match” section of search results.
2. On the next screen, select the Hard Disk Drive that you want to defragment and click on the Optimize button.
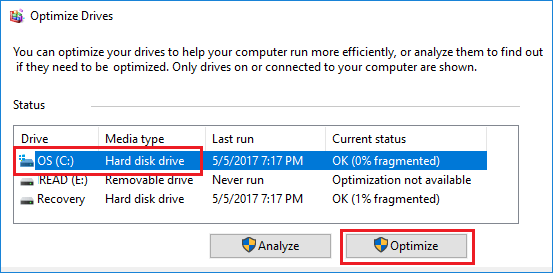
3. Patiently wait for Windows to complete the process of Defragmenting the selected Hard Drive.
Once the Hard Disk Drive is defragmented, you should be able notice much improved performance on your computer.
2. Impact of “Optimize Drives” Utility on SSD Drive
Unlike traditional Hard Disk Drives (HDD), SSD Drives have a different pattern of file arrangement and do not need to be defragmented.
Compared to traditional spinning disk drives (HDD), SSD drives have higher read/write speeds and do not slow down over a period of time.
In case of computers with SSD storage, Optimize Drives utility does not defragment the hard drive and it works in a different way to optimize the performance of your computer.
Hence, you should consider running Optimize Drives utility, whenever your computer with SSD storage appears to be running slow.
3. Setup Scheduled Disk Defragmentation in Windows
By default, the Optimize Drive utility is set to run Weekly on a Windows computer. However, you can setup your computer to run this utility on a Daily or Monthly basis.
1. Type defrag in the Windows Search bar and click on Defragment and Optimize Drives option in the search results.
2. On the next screen, select the Hard Disk Drive that you want to defragment and click on Change settings button.

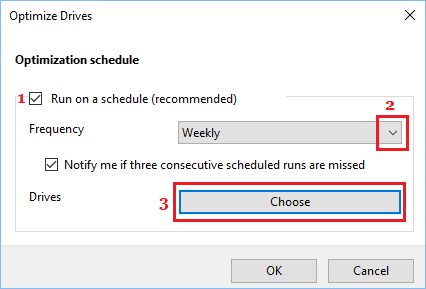
3. On the next screen, check Run on a schedule (1) option > click on the down-arrow (2) to select Daily, Weekly or Monthly Frequency and click on the Choose button.
4. On the next screen, select the Drives on which you want to apply Scheduled Defragmentation.
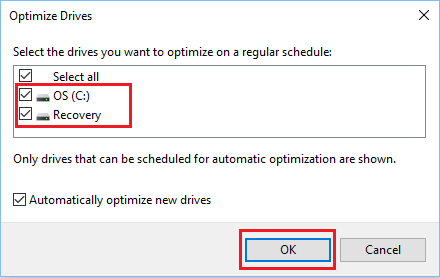
5. Click on OK to save these settings on your computer.